Why Do You Need a Size Chart in Shopify?

Before we start, you might wonder why you need a size chart in Shopify. It is one of the vital elements of an e-commerce store, so we included the quick reasons to add a size chart in Shopify below:
- Improves customer experience: A size chart in a Shopify store can function as a virtual sales assistant that helps customers determine which size to select. For visitors who are uncertain about sizes, these charts can provide accurate & right fit.
- Reduces customer uncertainty: Size charts can give visitors confidence that the products they choose will fit them well. That way, you can sell more & reduce cart abandonment related to size uncertainty.
- Builds trust: An informative size chart shows your commitment to customer satisfaction. It's a sign that you care about your customers' needs, which can boost trust and loyalty.
- Decreases returns: As a size too small or too large can increase returns and disappointment, having a size chart is crucial in decreasing the return rate. Customers will be less likely to order the wrong size if you provide a size chart.
- Reduces costs related to returns: Product returns can also get costly as they involve additional shipping, restocking, and handling costs. If you reduce return rates, you can also save money on these costs.
- Provides a competitive advantage: A size chart can set you apart from the competition and help you meet customer expectations. As customers have a better experience, they can also leave positive reviews, which will help you stand out from the crowd in your industry.
5 Different Ways to Add a Shopify Size Chart
There are various methods to add a size chart to a Shopify store. Here, we explained how to add a Shopify size chart in 5 different ways.
Explore them, and find the one that suits your experience and needs best!
1. Creating a Size Chart Page Editing the Theme Code
You can simply create a size chart page using the built-in HTML code. To accomplish this, you also need to create a size chart page on Shopify as well.
Here is the step-by-step guide that will help you.
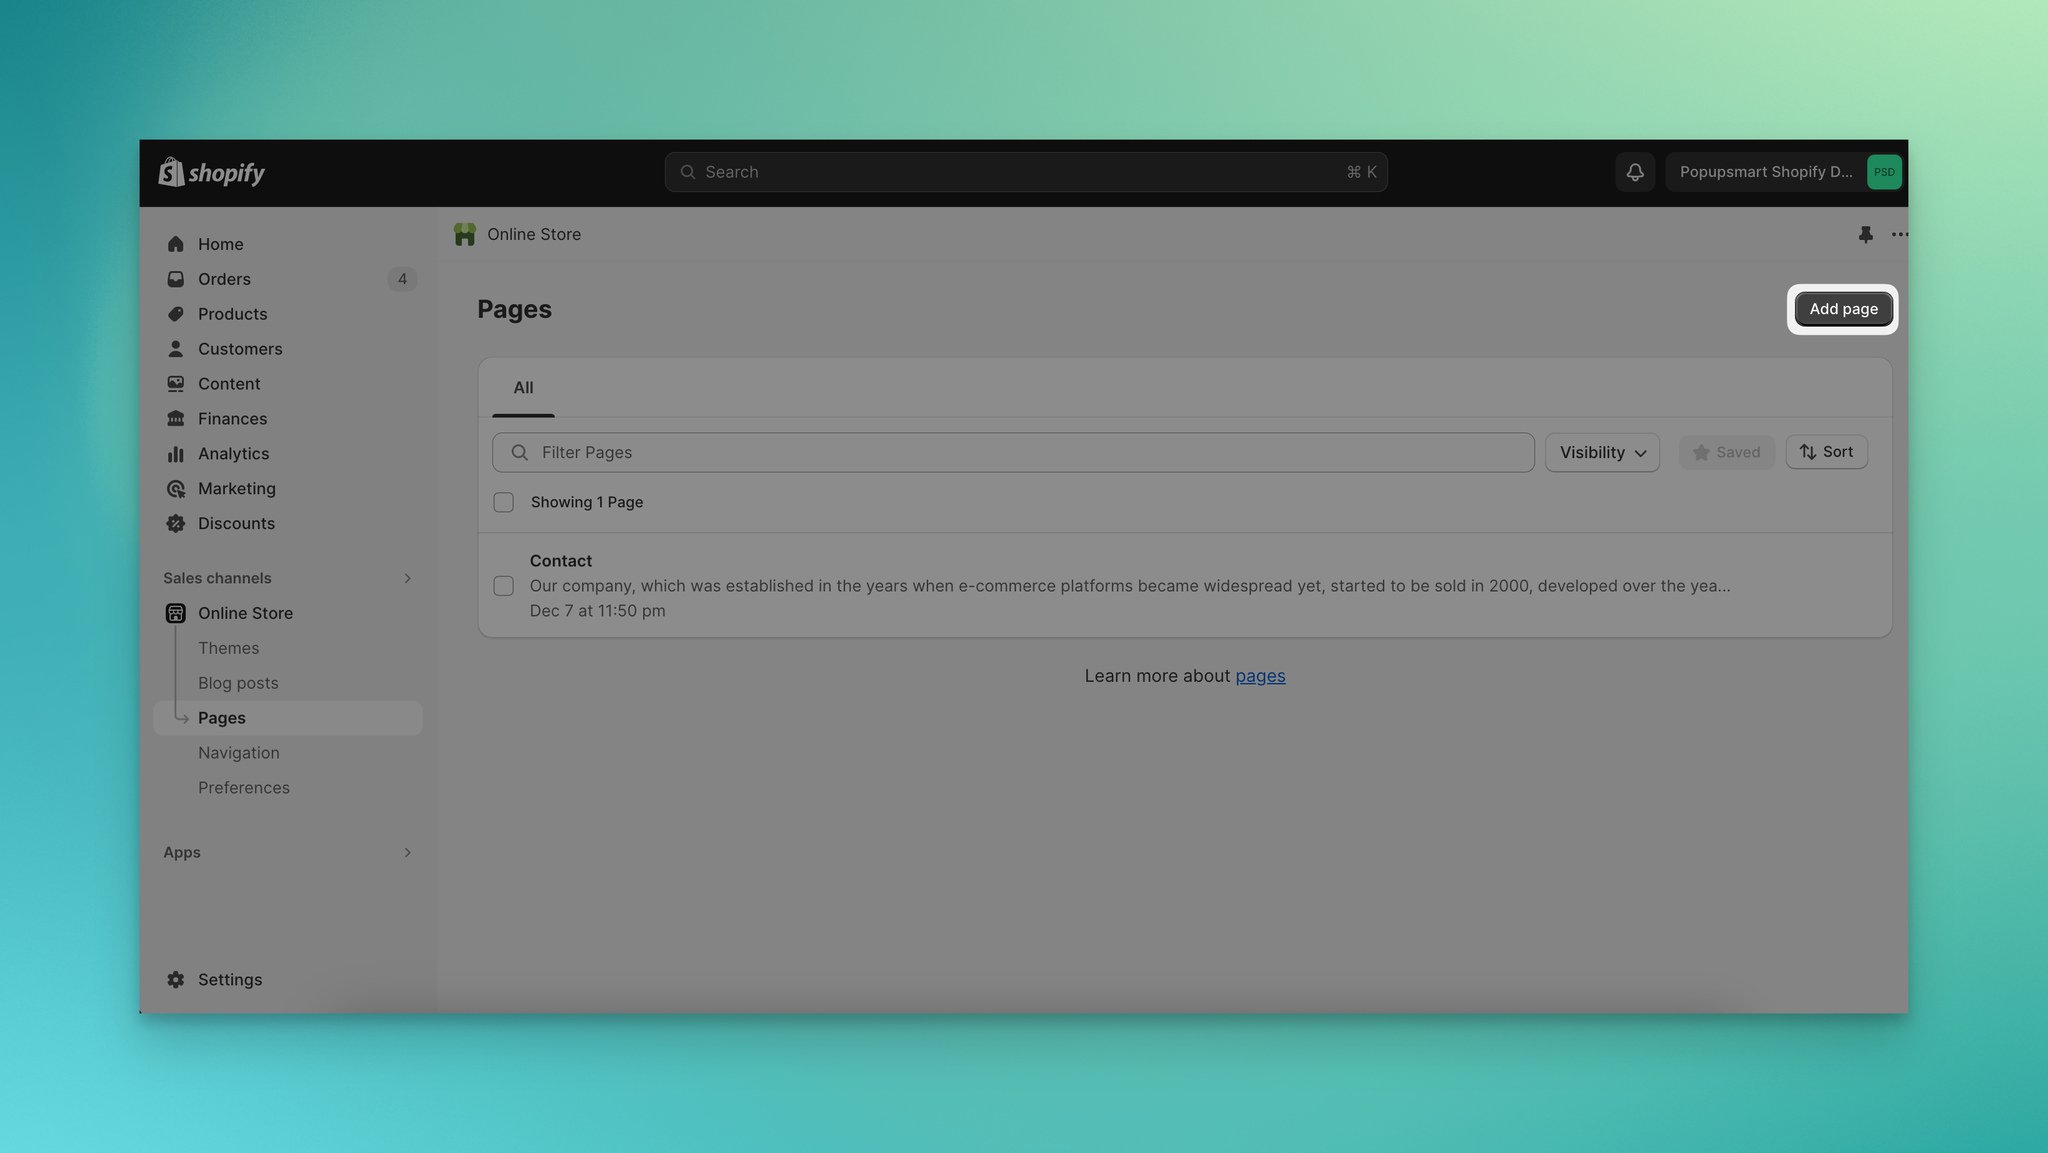
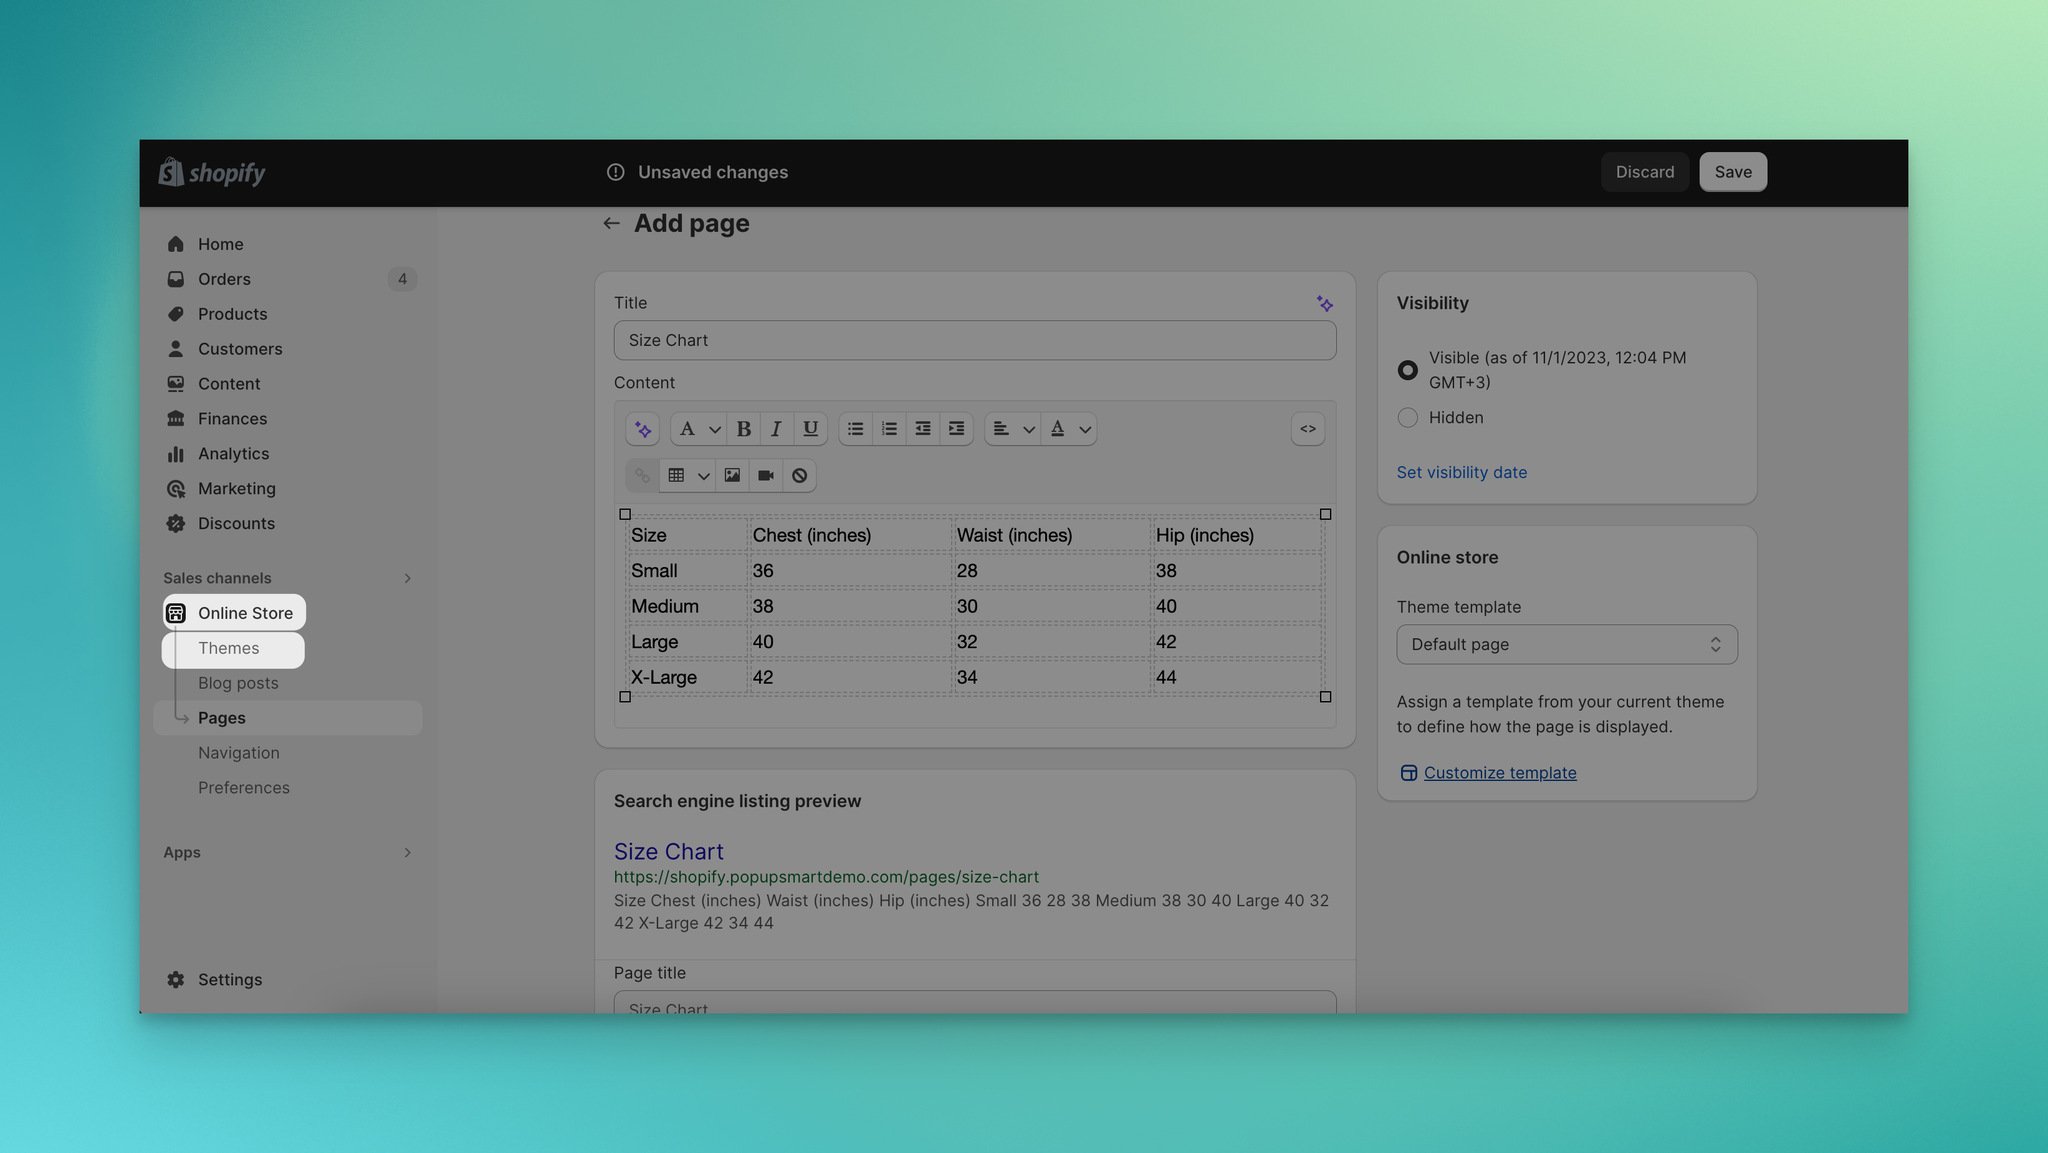
Step 1: Go to your Shopify admin dashboard. Click on "Online Store" in the sidebar, and then select "Pages."

Step 2: Click on the "Add page" button to add a new page.
Step 3: Provide a title for your new page according to the type of your size chart
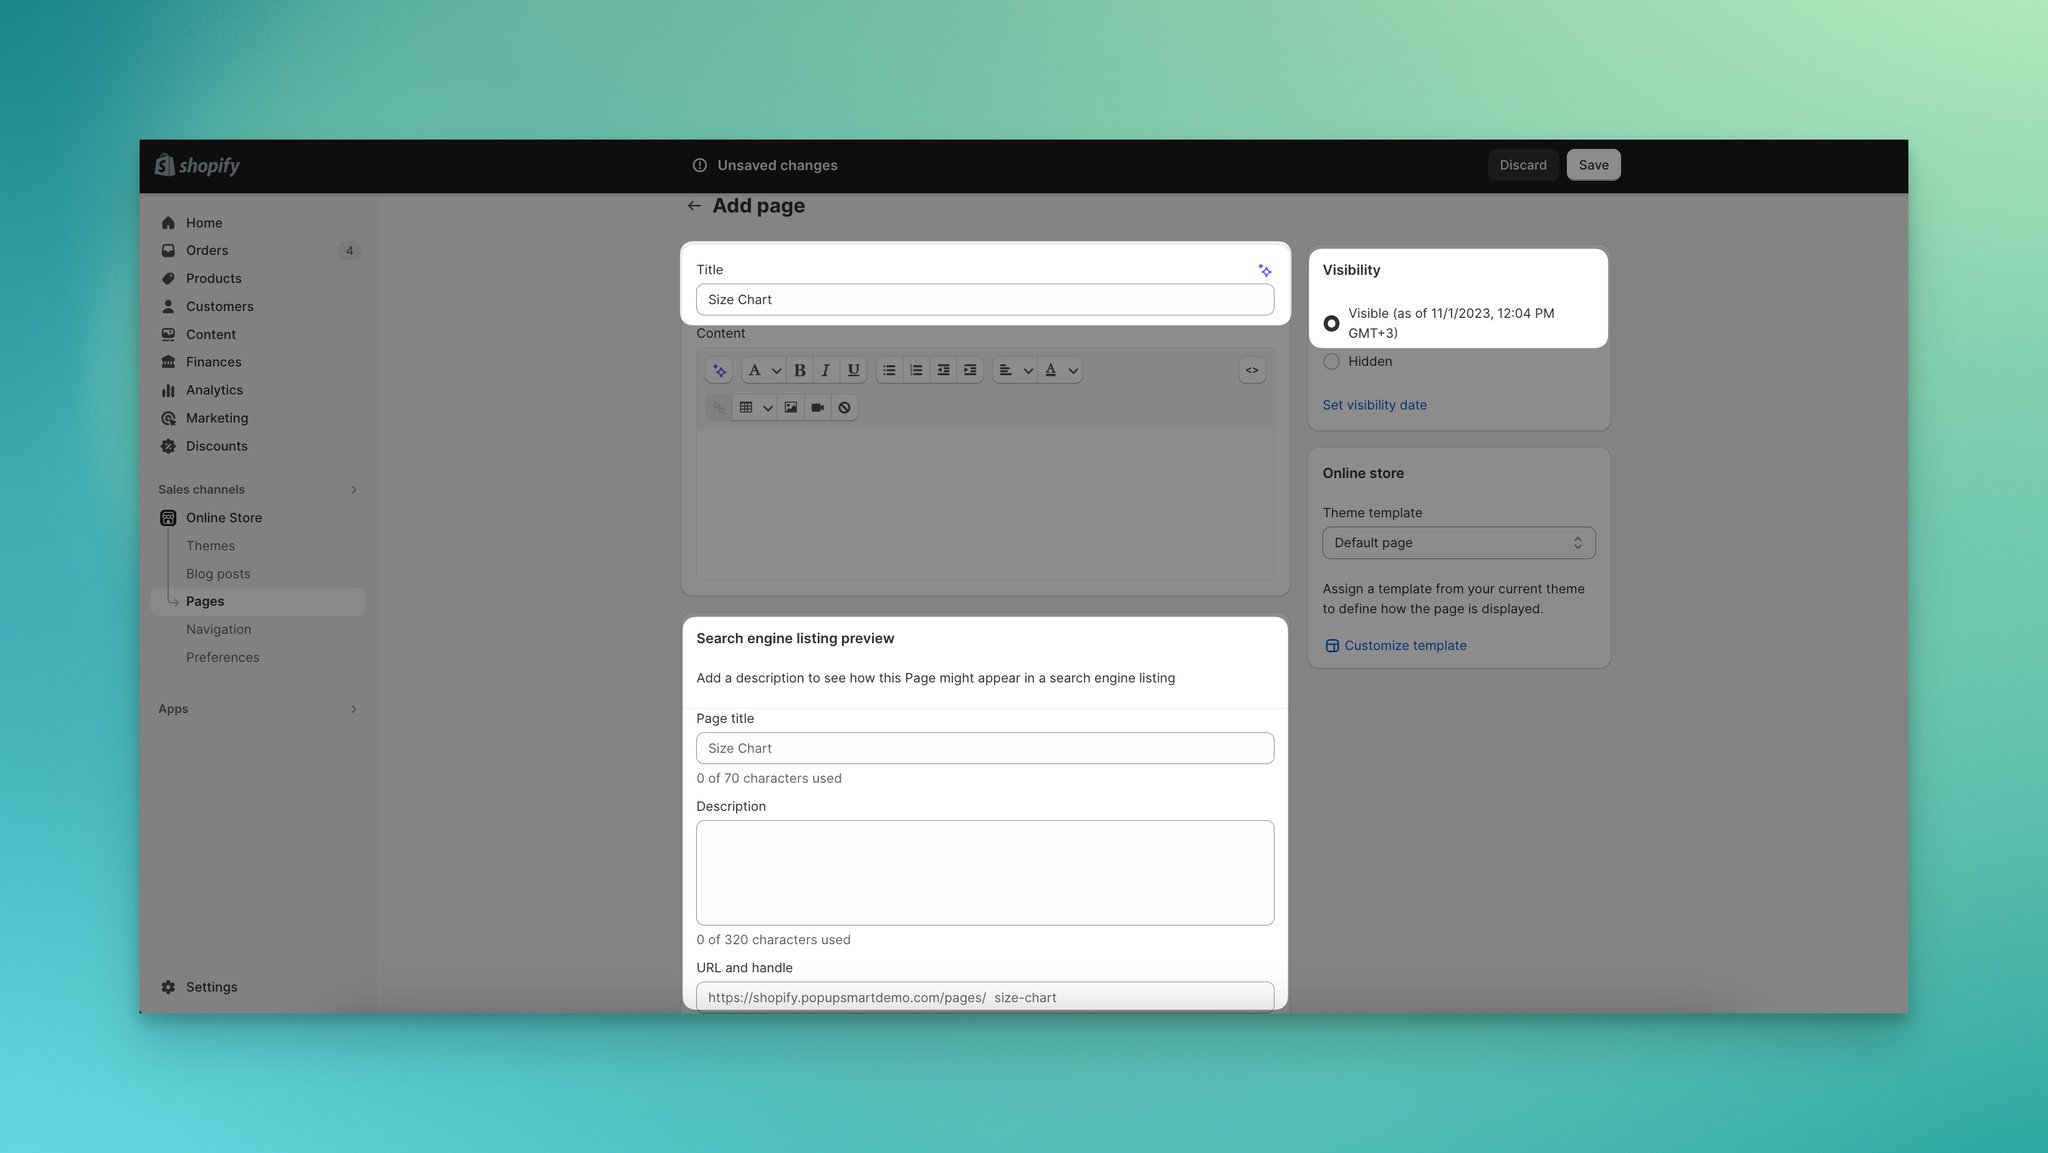
If you want to create a site-wide size chart that will be visible throughout your website, enter "Size Chart" as the page title.
In the "Search engine listing preview" section, ensure that the URL ends with "/size-chart."
If you want to create a vendor-specific size chart that is specific to products from a particular vendor, use the vendor's name followed by "Size Chart" as the page title.
In the "Search engine listing preview" section, make sure the URL ends with "/[your-vendor-name]-size-chart."
To create a size chart that is tailored to a specific type of product, input the product type followed by "Size Chart" as the page title.
For example, if you want a size chart specific to shirts, enter "Shirts Size Chart" as the title.
In the "Search engine listing preview" section, ensure the URL ends with "/shirts-size-chart."
Step 4: In the "Content" box, build a table that contains the size chart information. Then, customize the table to your preferred design.
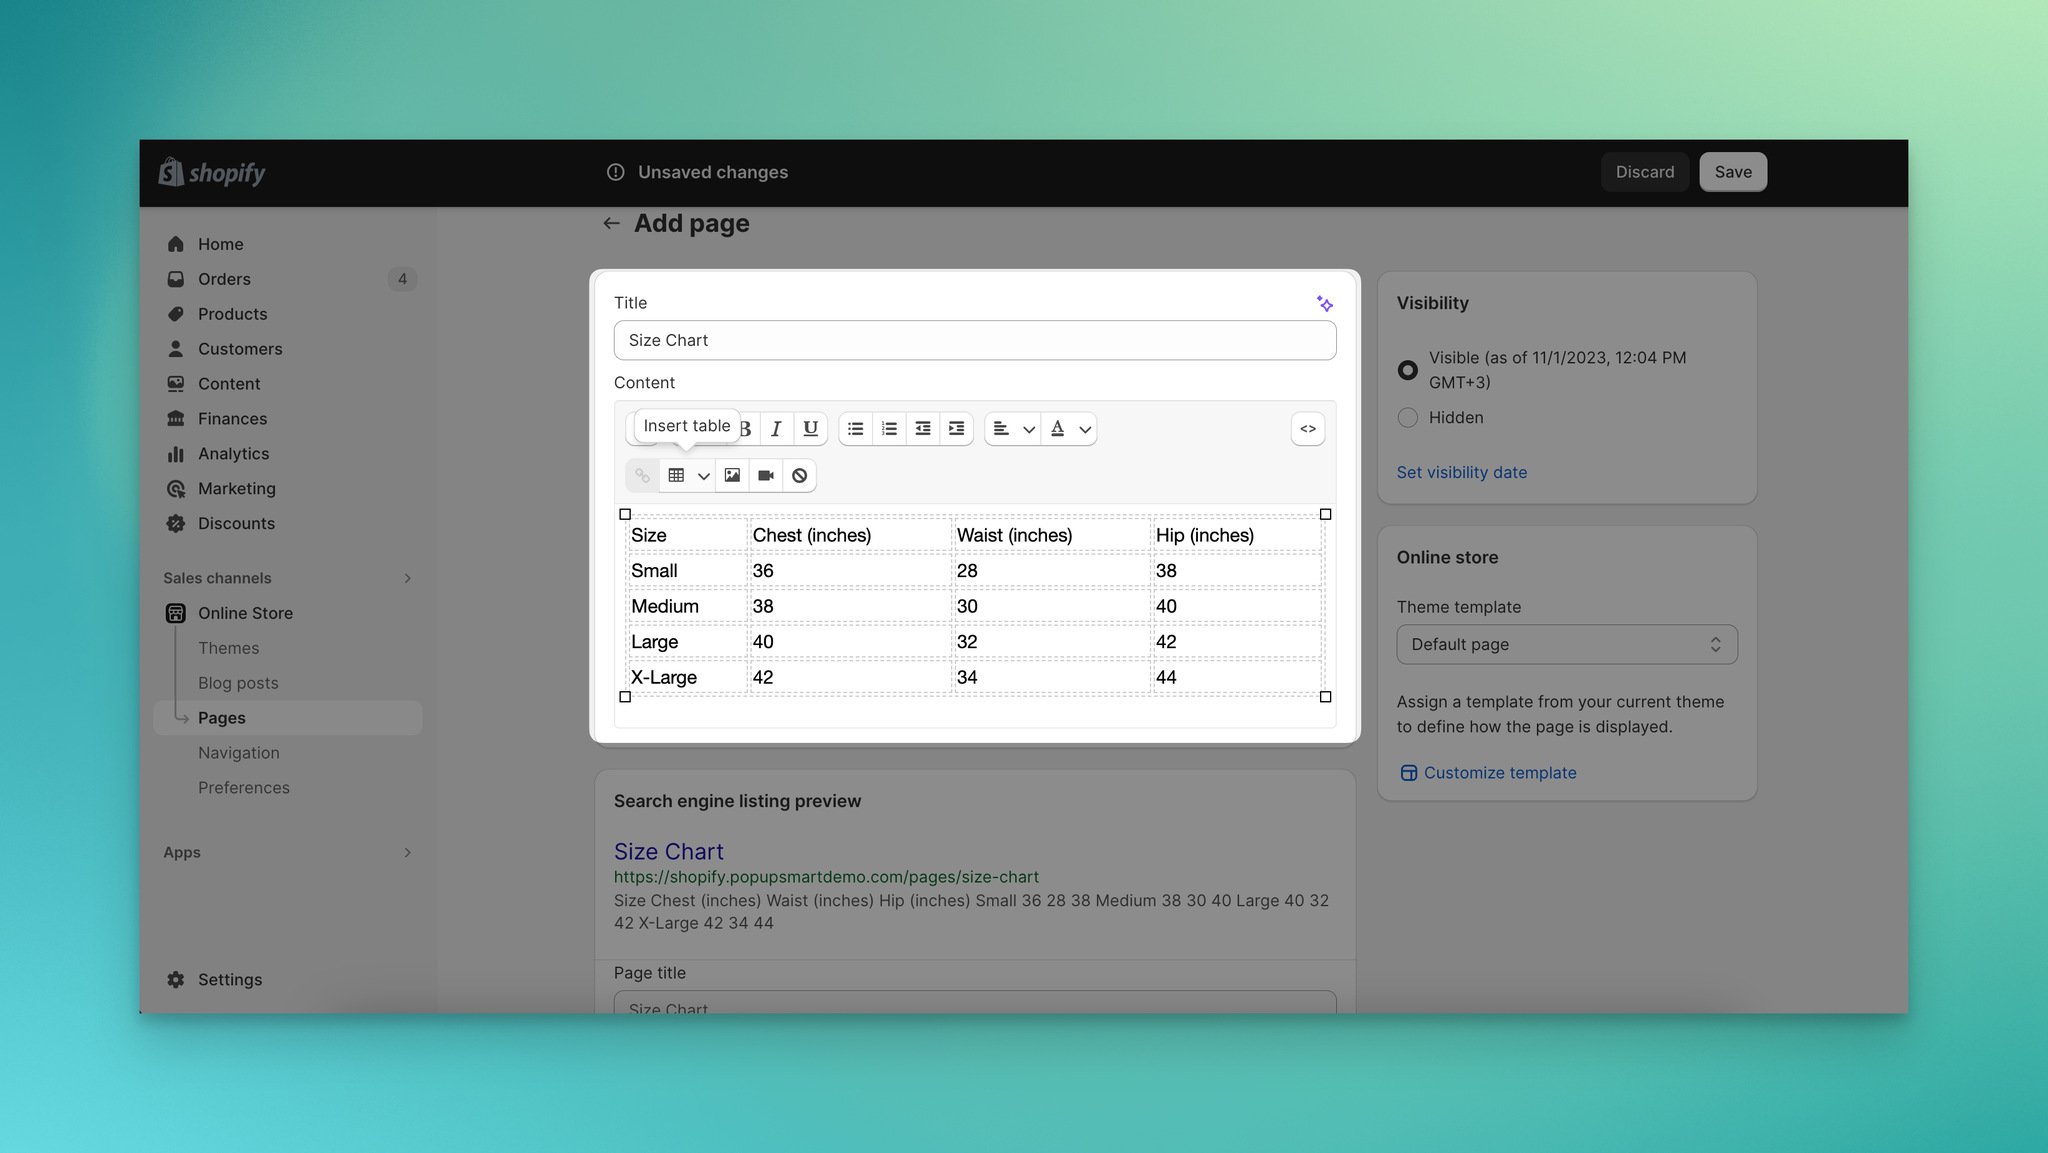
Ensure to tailor the appearance of the size chart table to meet your design preferences.
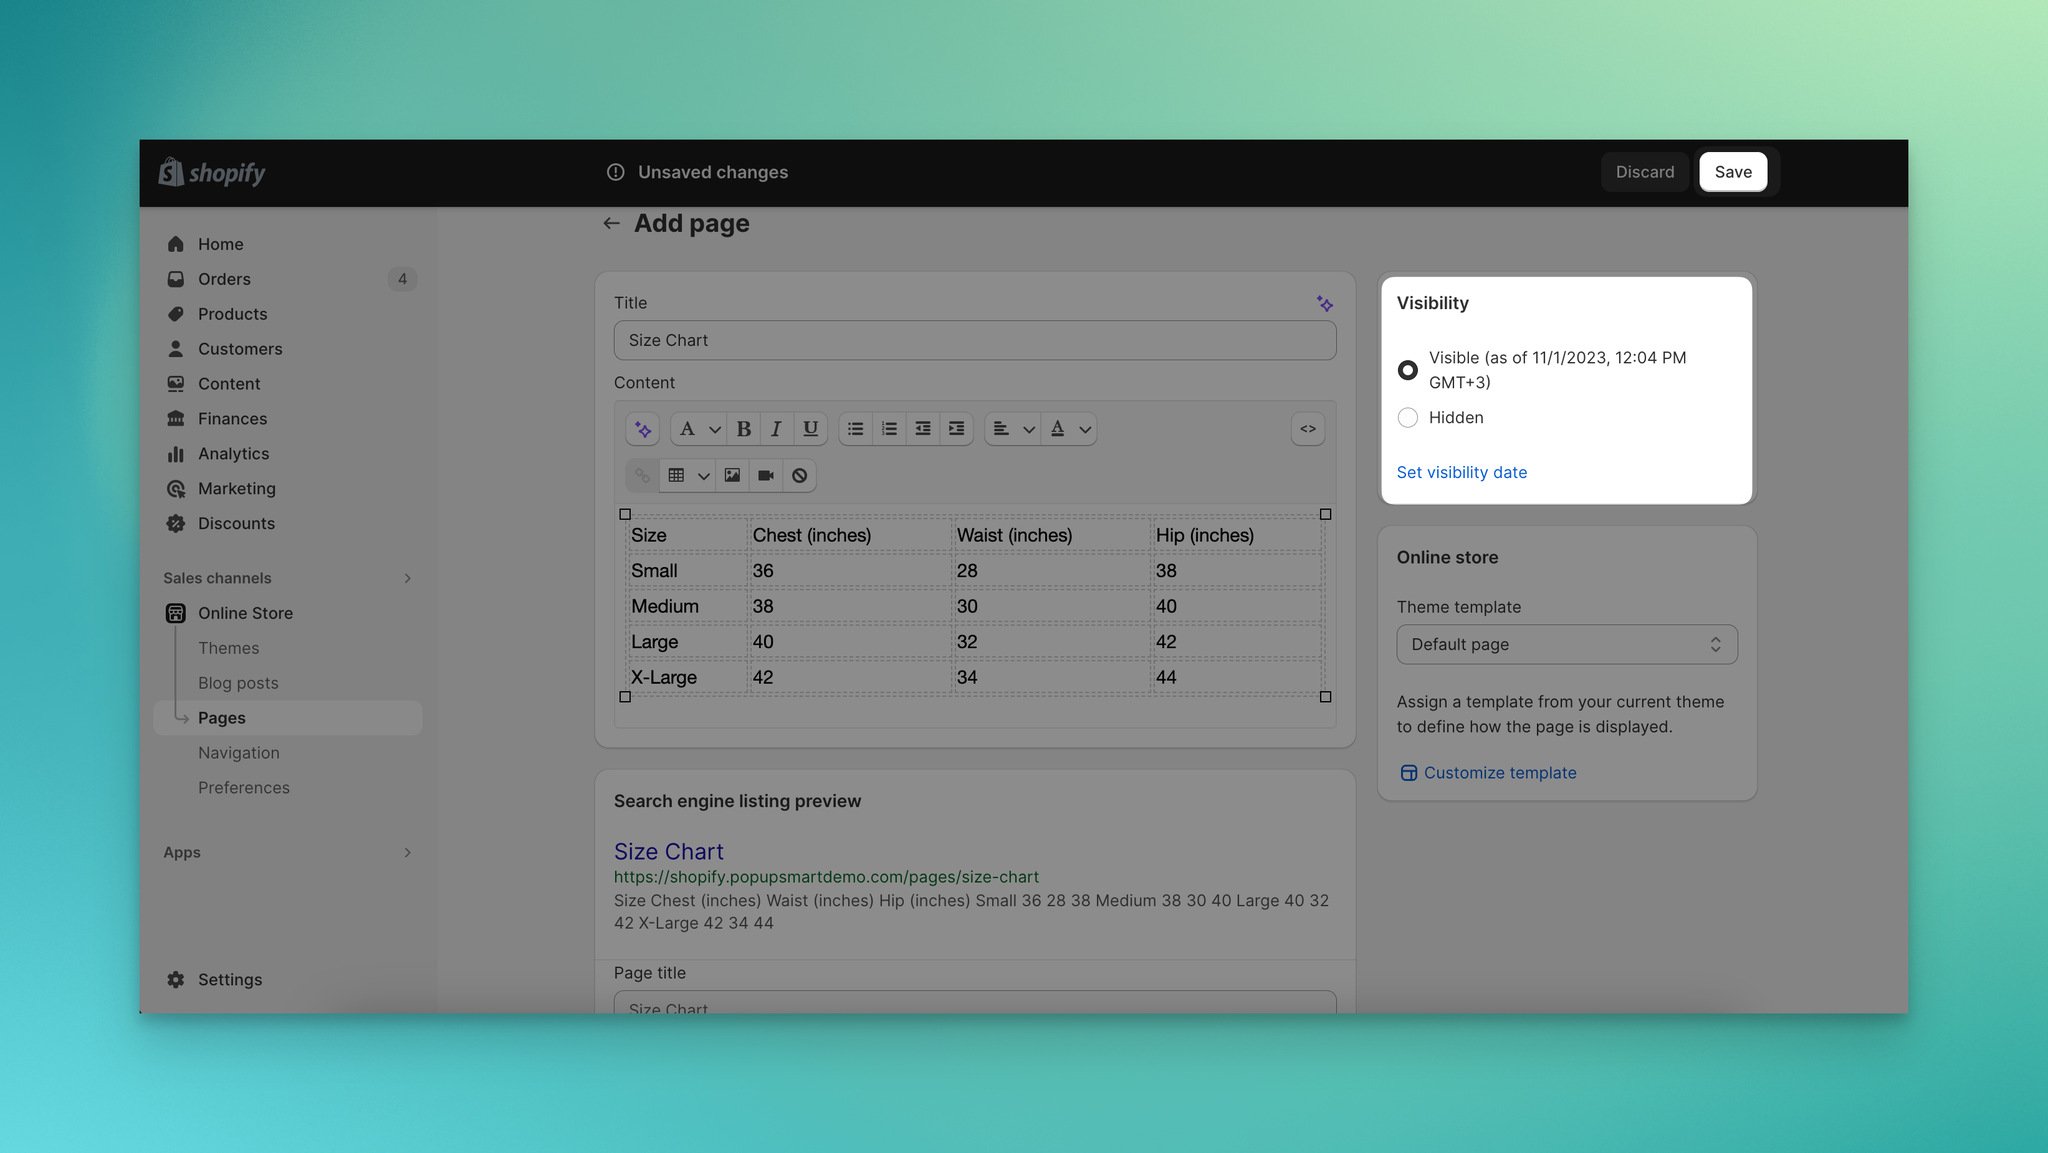
Step 5: In the "Visibility" section, set the page as "Visible." Then click the "Save" button to save your size chart page.
Step 6: Then, you need to access the code editor on your Shopify admin panel. In the sidebar, click on "Online Store." Select the "Themes" and choose the theme you want to edit.
Step 7: Locate the theme you've selected and click the ellipsis icon (…) to open the actions menu. Then, click on the "Edit code" button.
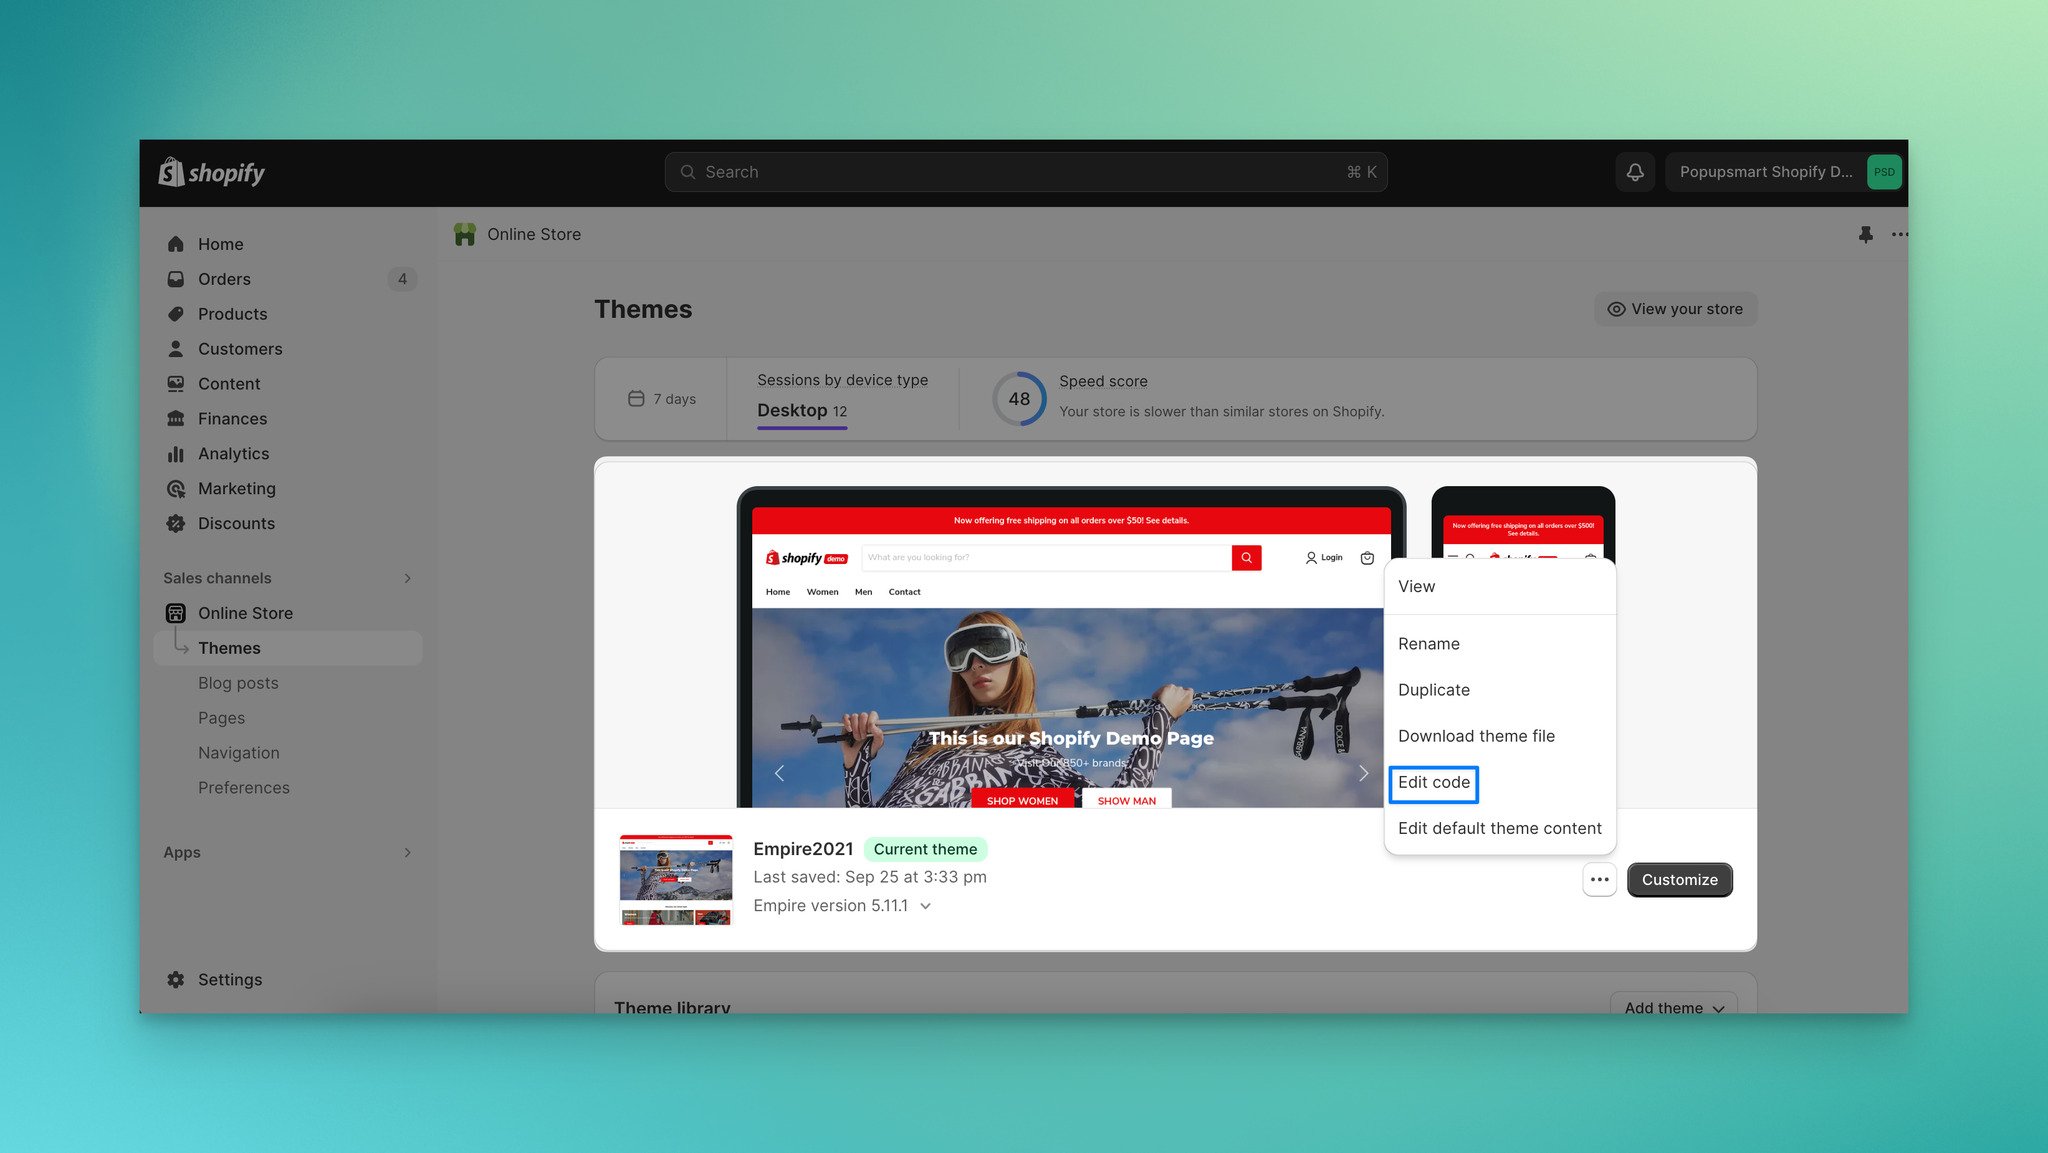
This will take you to the code editor, where you can make the changes to your theme's code.
Step 8: In the code editor, go to the "Sections" directory. Open the "product-template.liquid" file.
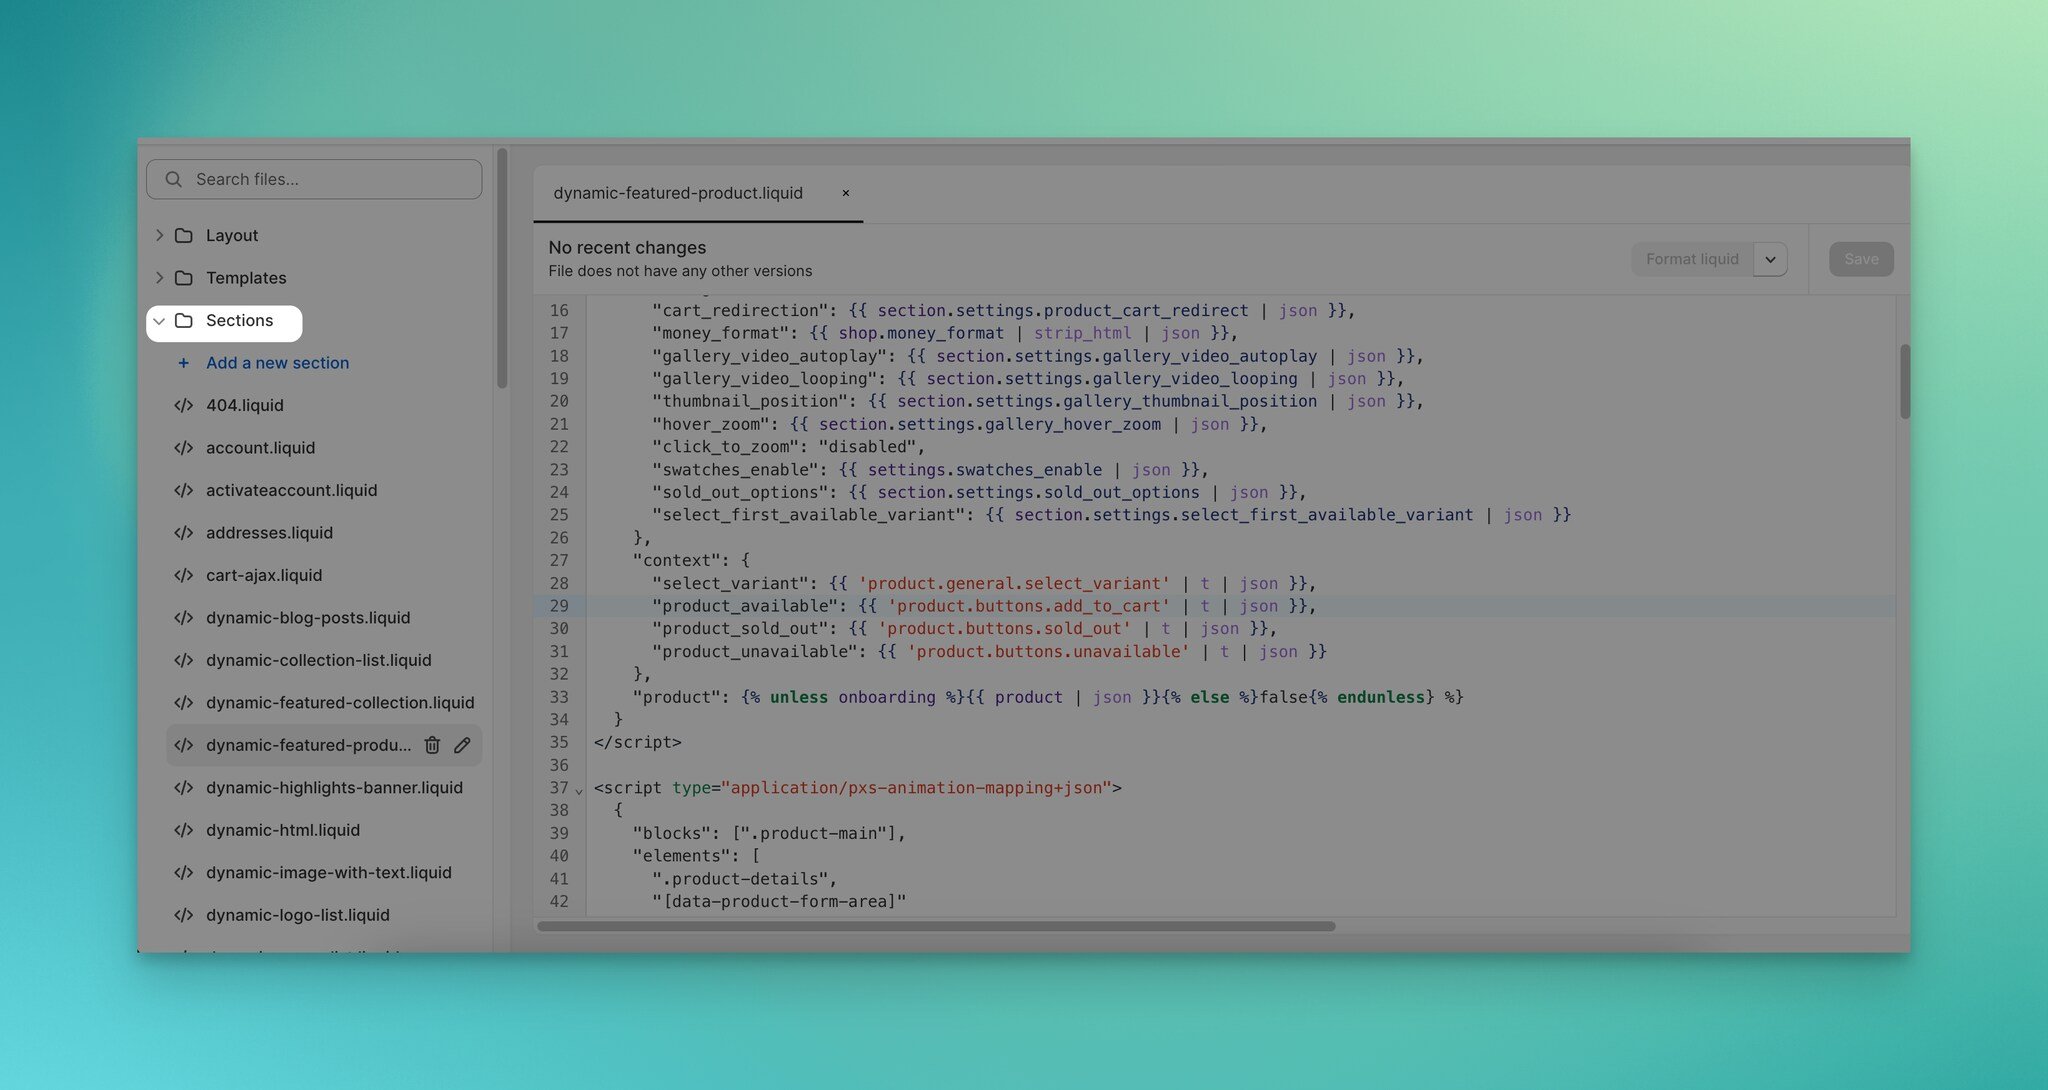
Note: This file name might change according to the template, so ensure that you find the correct file.
Locate and click to open your "product-template.liquid" file. This file controls the layout of your product pages.
To add a button for the size chart, within the "product-template.liquid" file, you should find the "Add to cart " part.
Insert the following code below the "Add to cart " form:
This code will create a button labeled "See Size Chart" if your product has options containing the word "Size." You can optimize it according to your needs.
Click the "Save" button once you finish your customizations.
2. Adding A Size Chart with Product Metafield & Image with Text Section
To add a size chart with this method, you need to have a template for specific products, and these products should have different sizes.
This method works for Shopify 2.0, so ensure that you are using this version.
By following these steps, you can create a Shopify metafields size chart easily.
Step 1: To create suitable meta fields for your product sections, you should go to "Settings," navigate to the "Metafields," also known as the "Custom data" part & click the "Products."
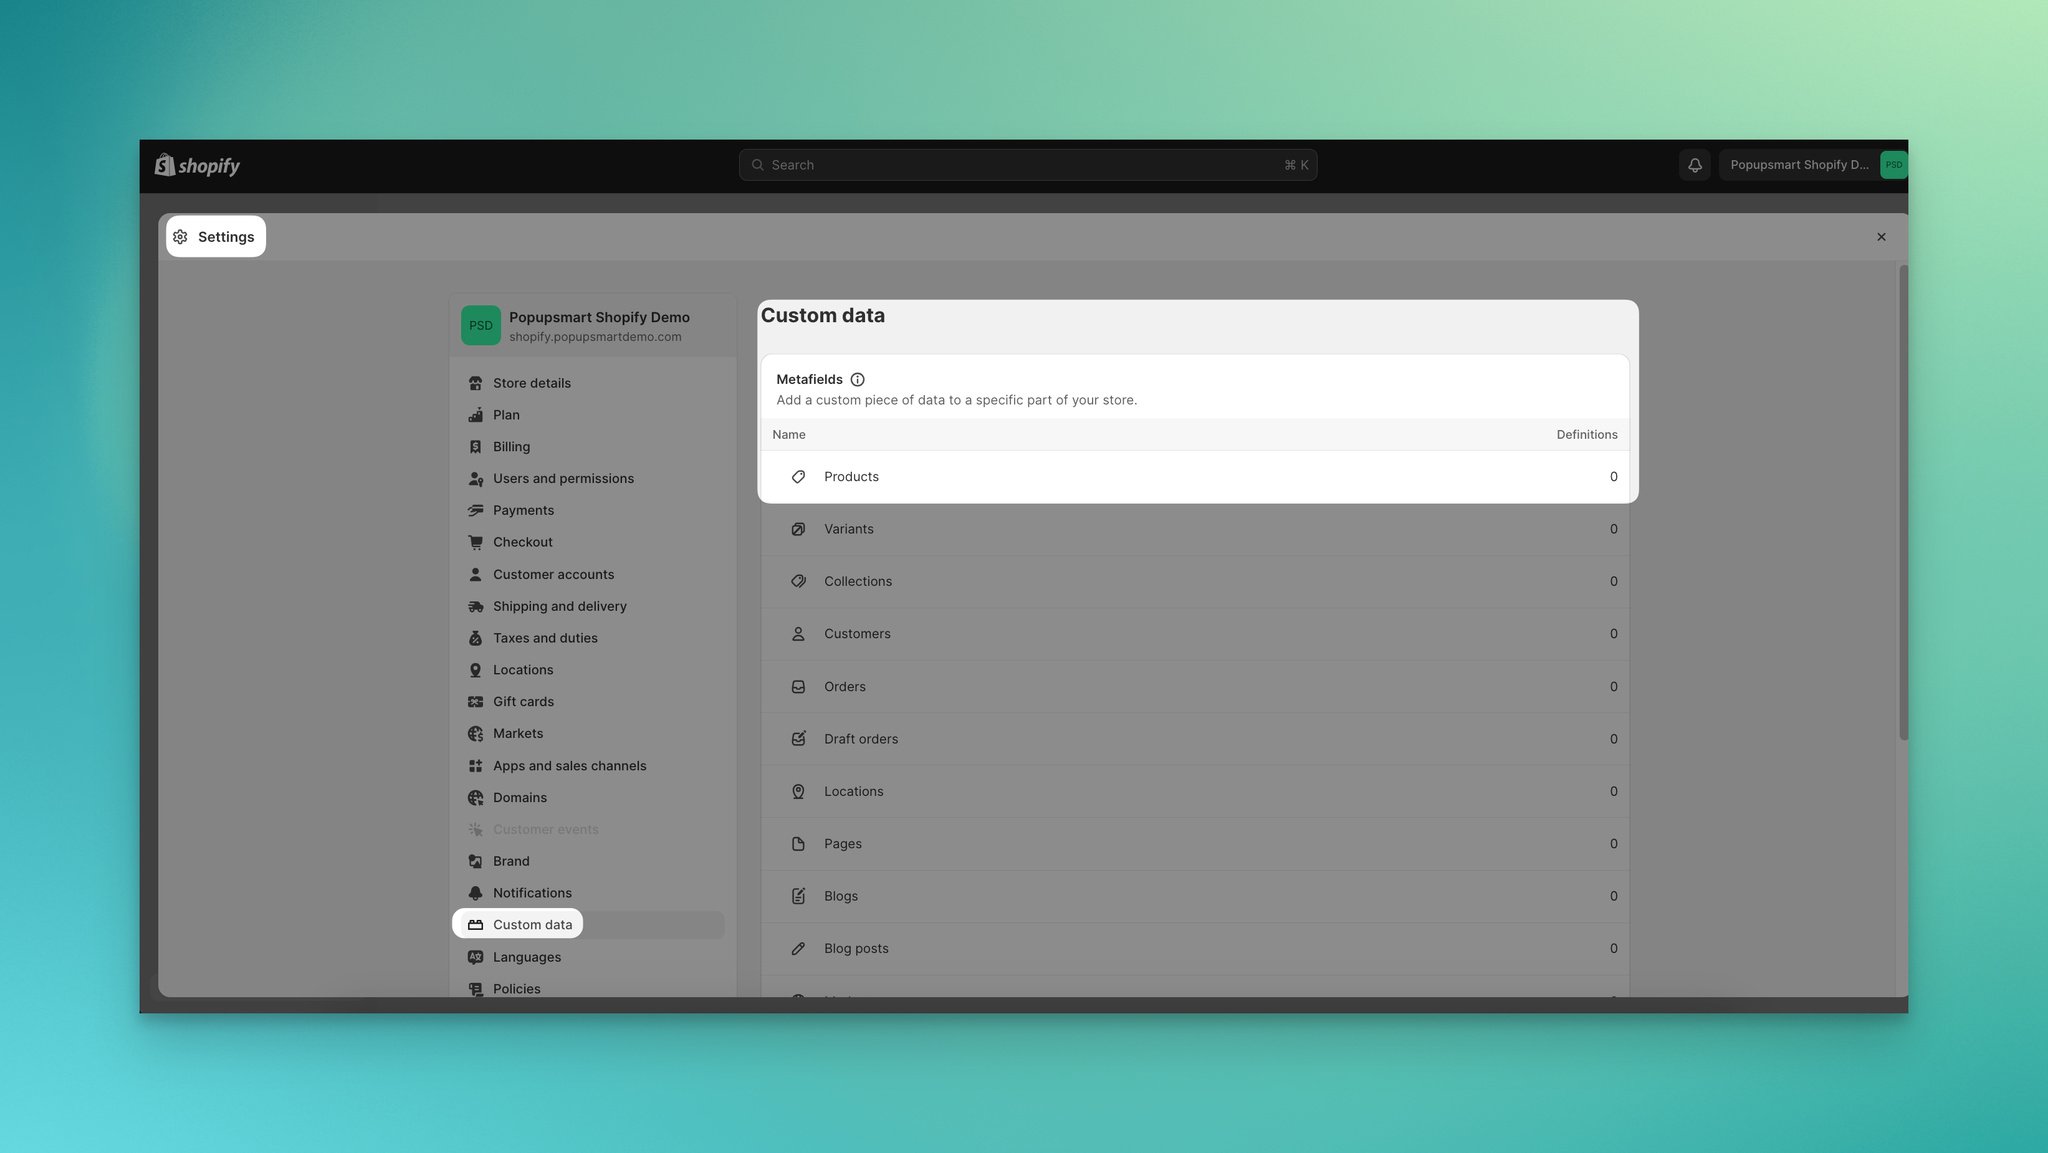
Step 2: Click the "Add definition" part.
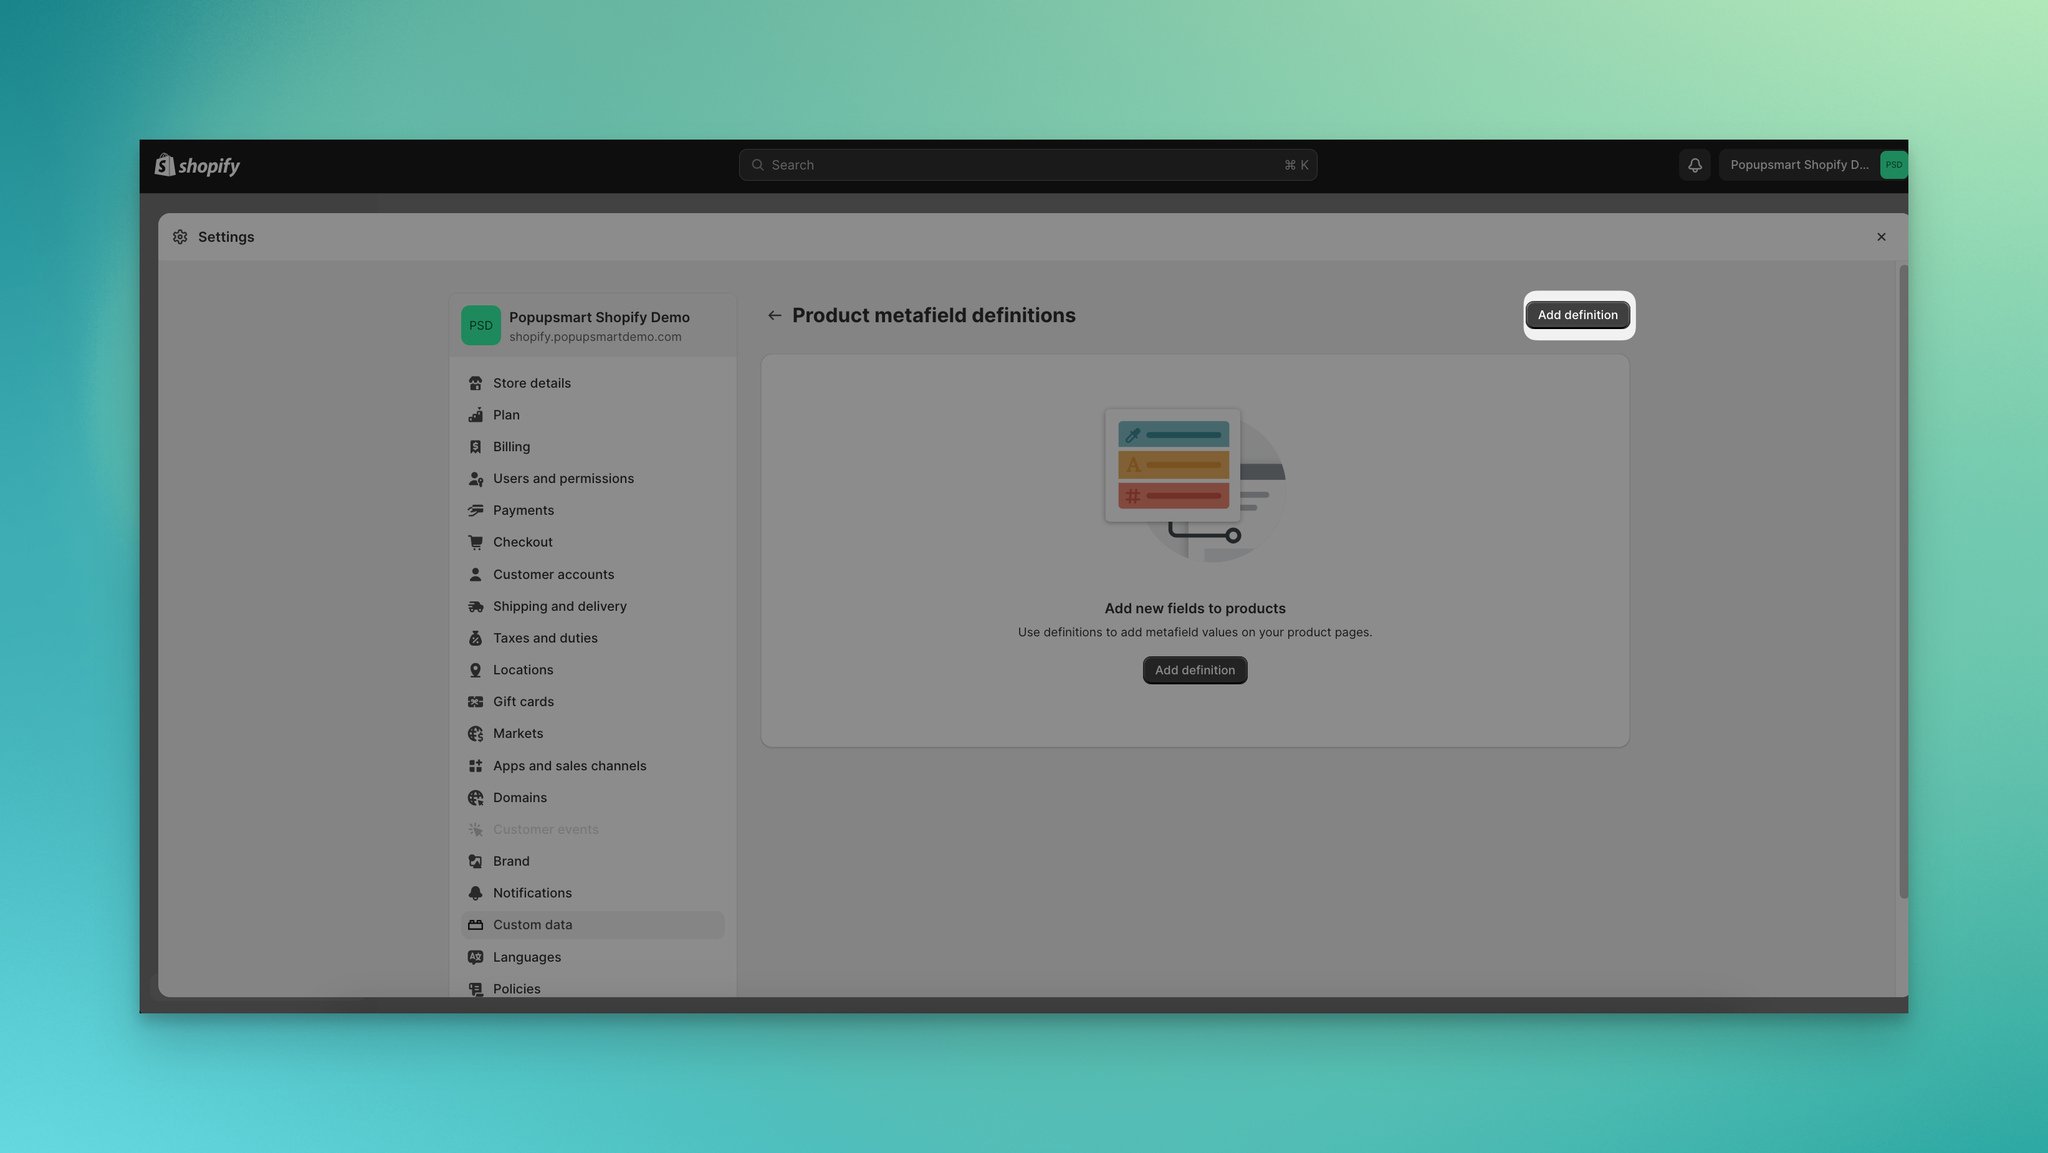
Step 3: Then, create a product meta field with the image type. This meta field will store the size chart image for your products.
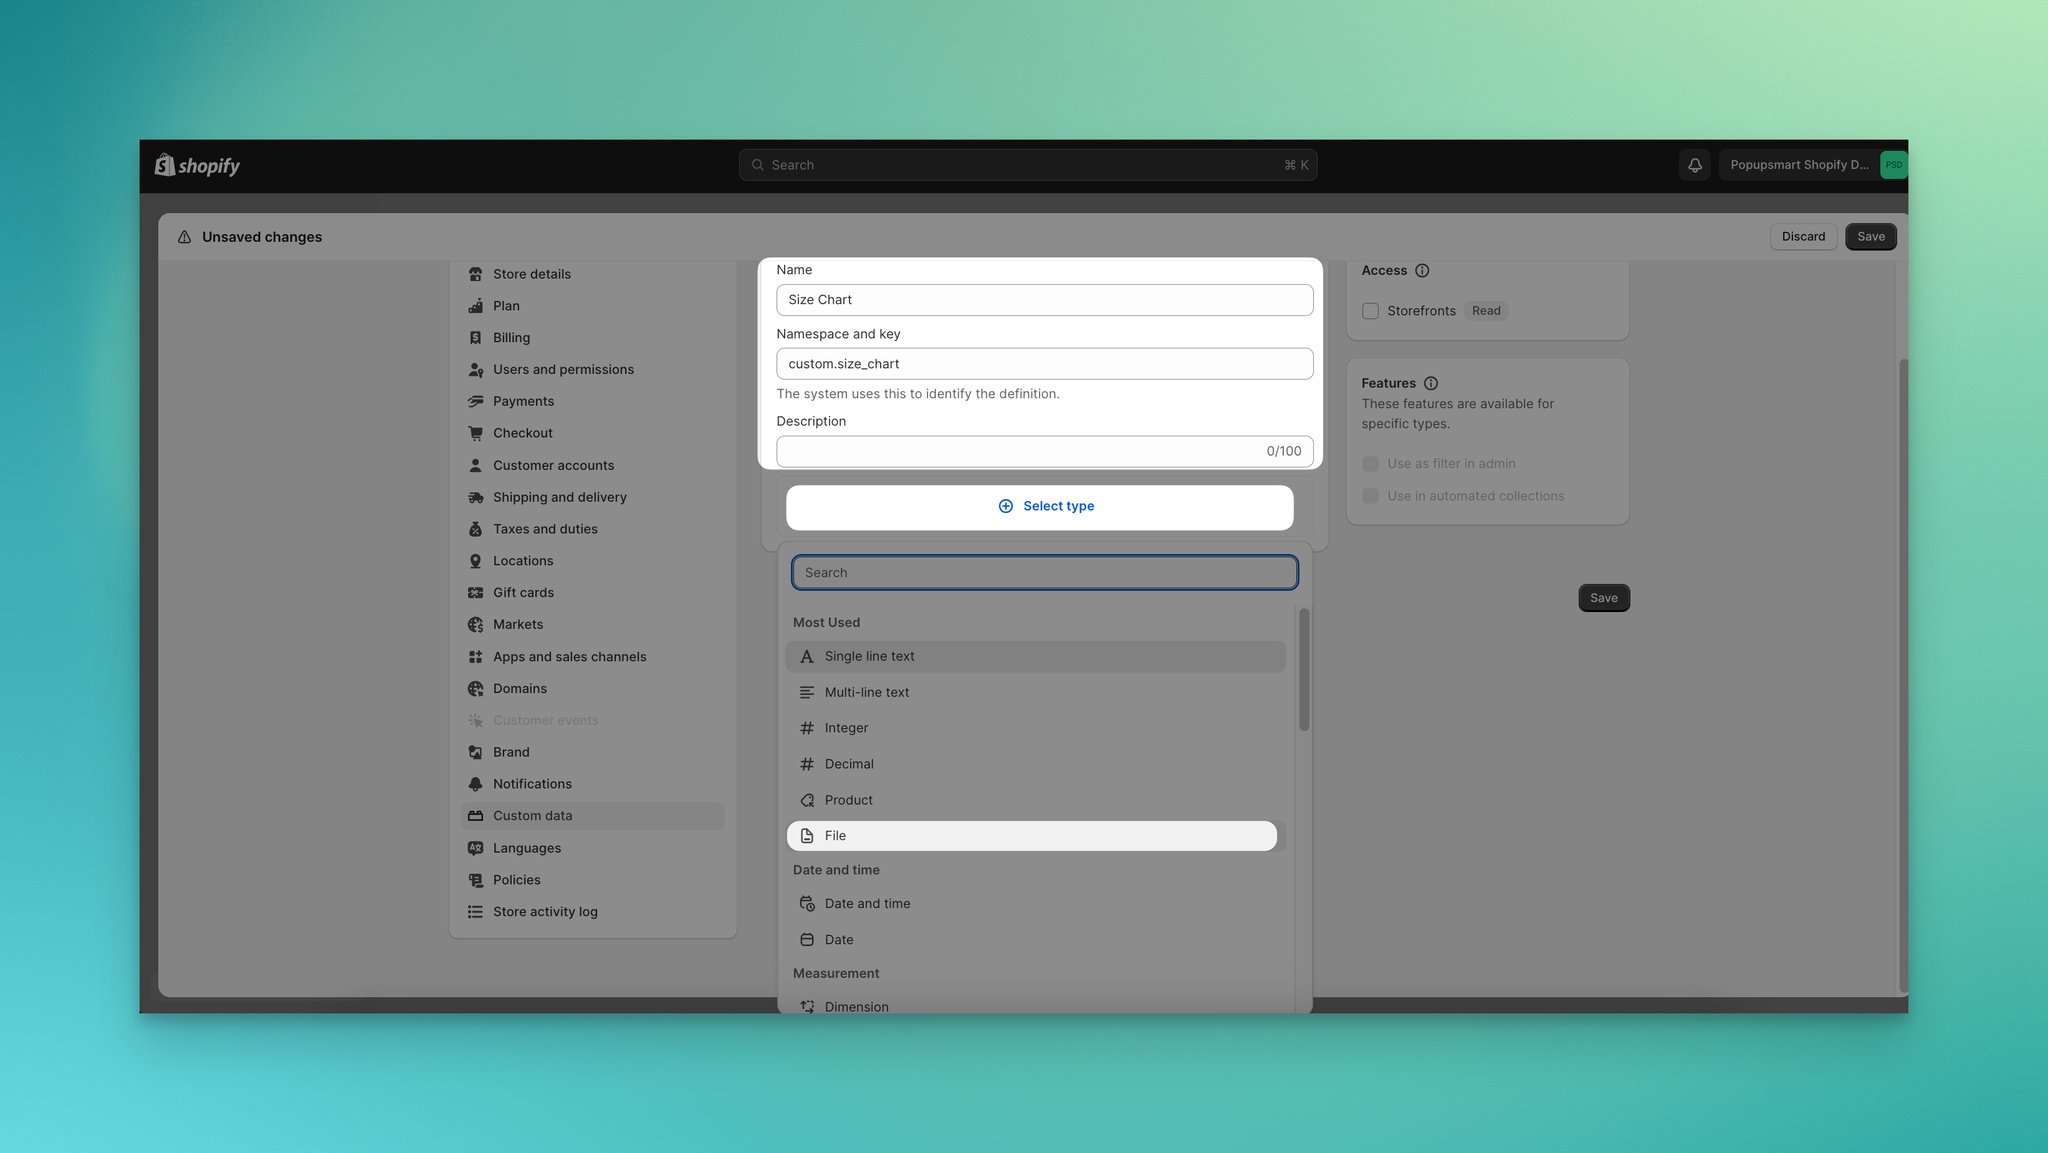
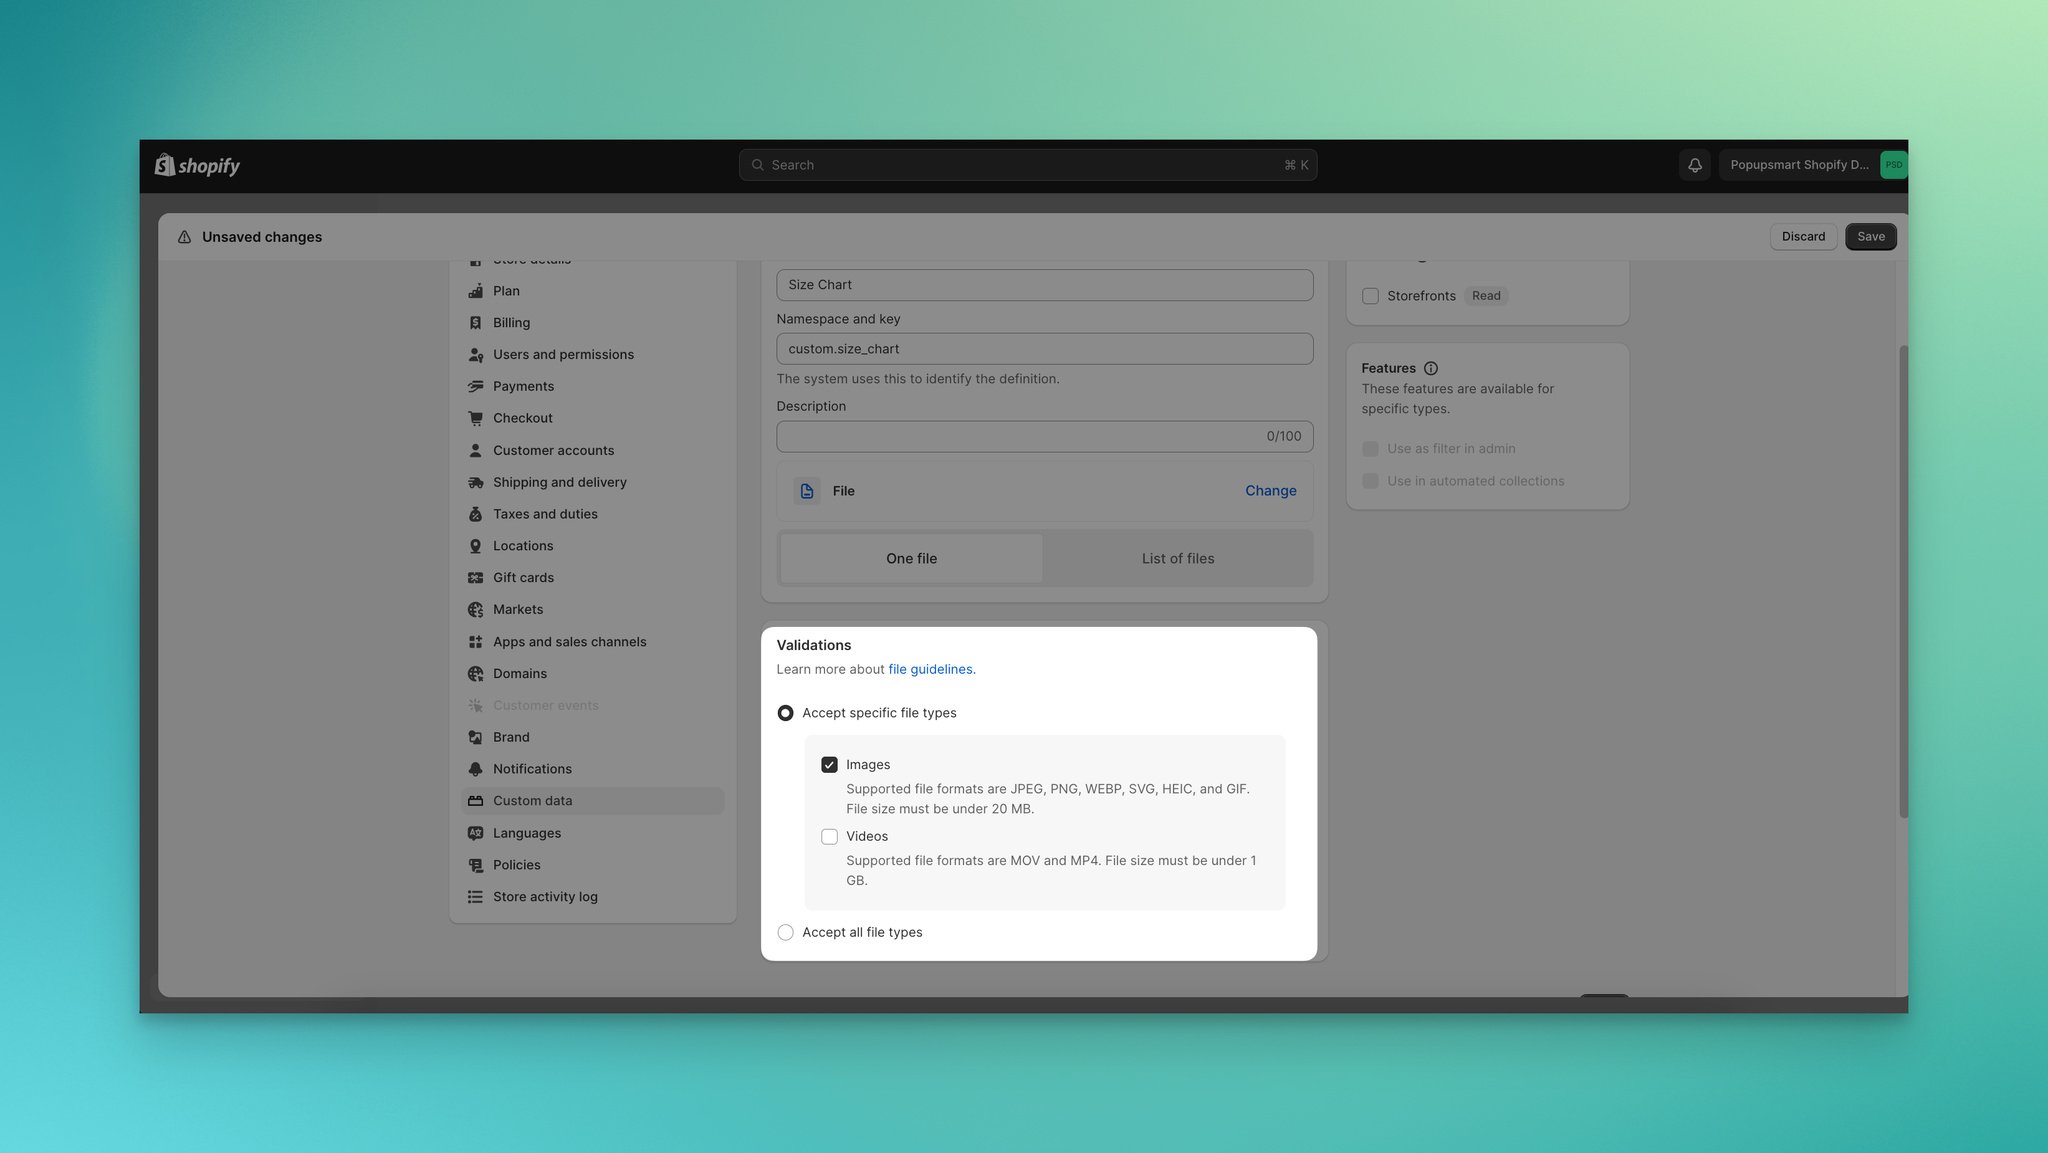
That way, you will include your size chart as an image. Enter a name for your metafield, and select the content type as "File."
On the "Validation" part, the "Only accept images" part should be selected.
Step 4: Head to the "Online Store" and "Themes," and click the "Customize" button under your theme. Then, Go to the "Products" part, upload your image to the related metafield section, and save it.
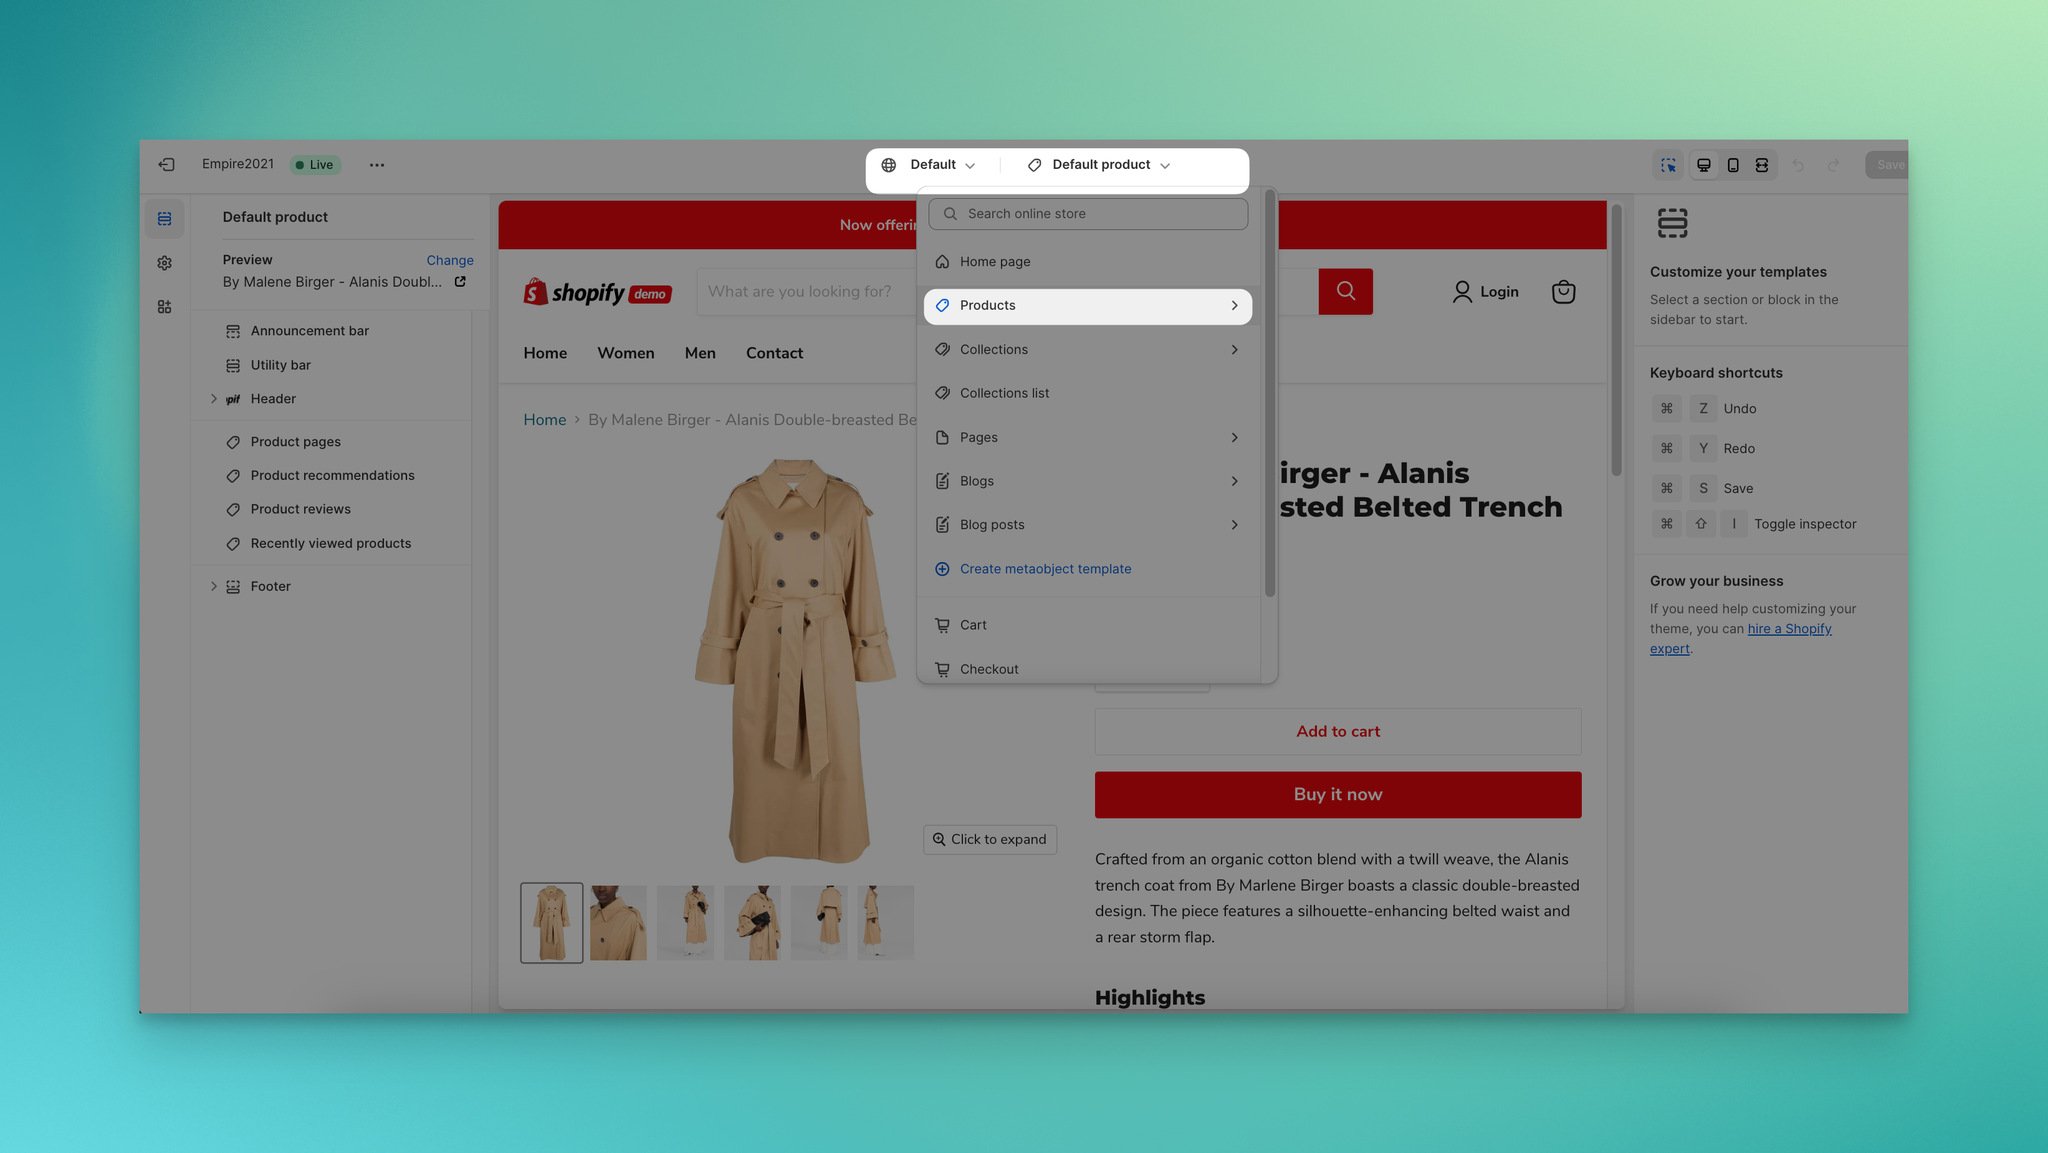
Step 5: Navigate to your theme editor. Add an "Image with text " section to your product page template.
Click the "Connect dynamic source," choose your size chart image meta field, and click the "Connect" button.
This links the image meta field to the section, enabling it to display the size chart image.
Within the "image with text " section, fill the text part with explanatory text on how customers can use the size chart.
The details you add to this part can guide visitors in understanding the size chart's purpose and how it works.
3. Adding a Shopify Size Chart Popup from Theme Editor
Another method is adding a Shopify size chart popup using the theme editor. This method allows you to add a popup block to certain parts and displays your size chart.
Follow these steps to create a Shopify size chart popup from the theme editor.
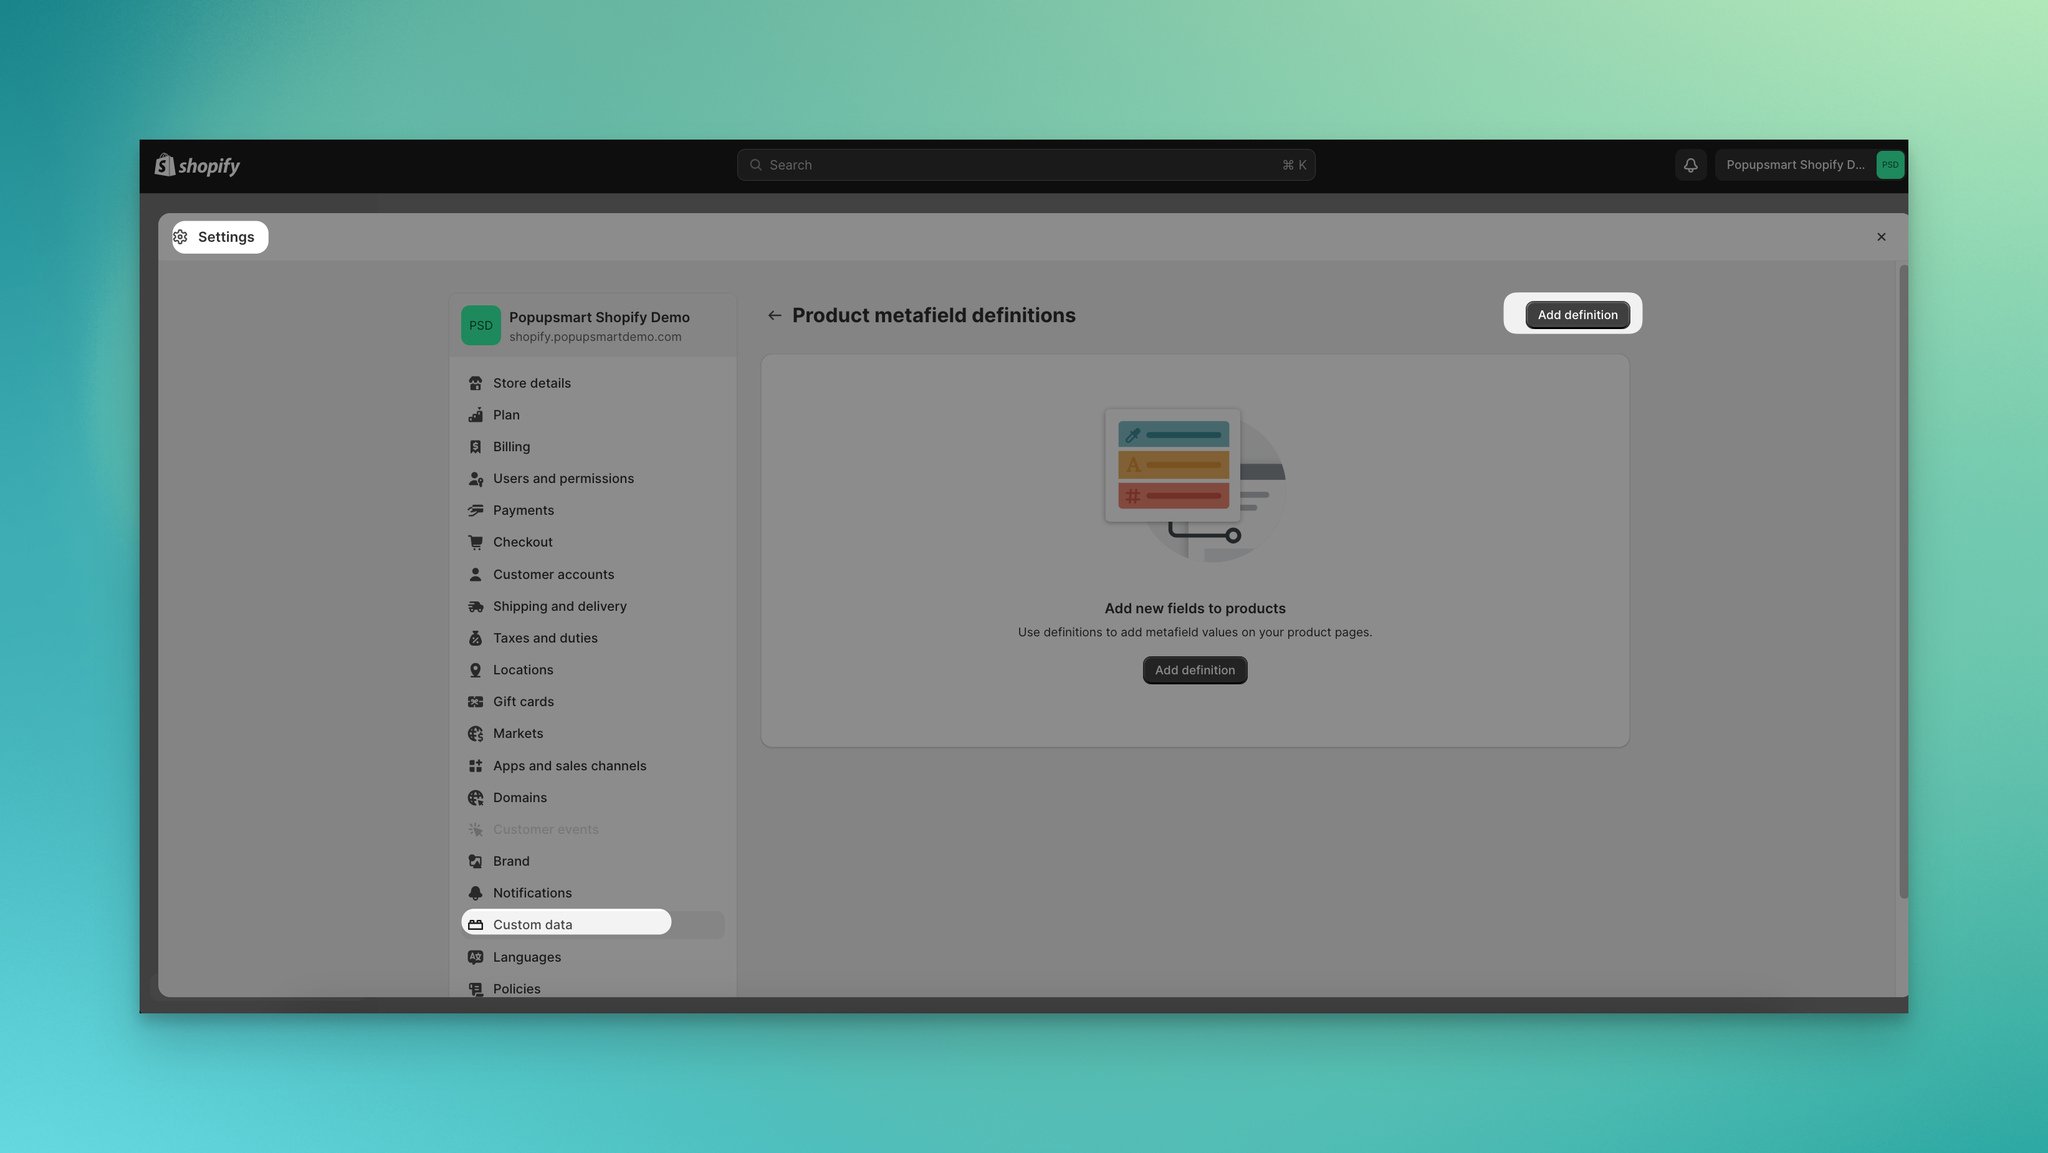
Step 1: Go to the "Settings" and "Metafields" or "Custom Data." Then, create a product meta field by clicking the "Add definition" button.
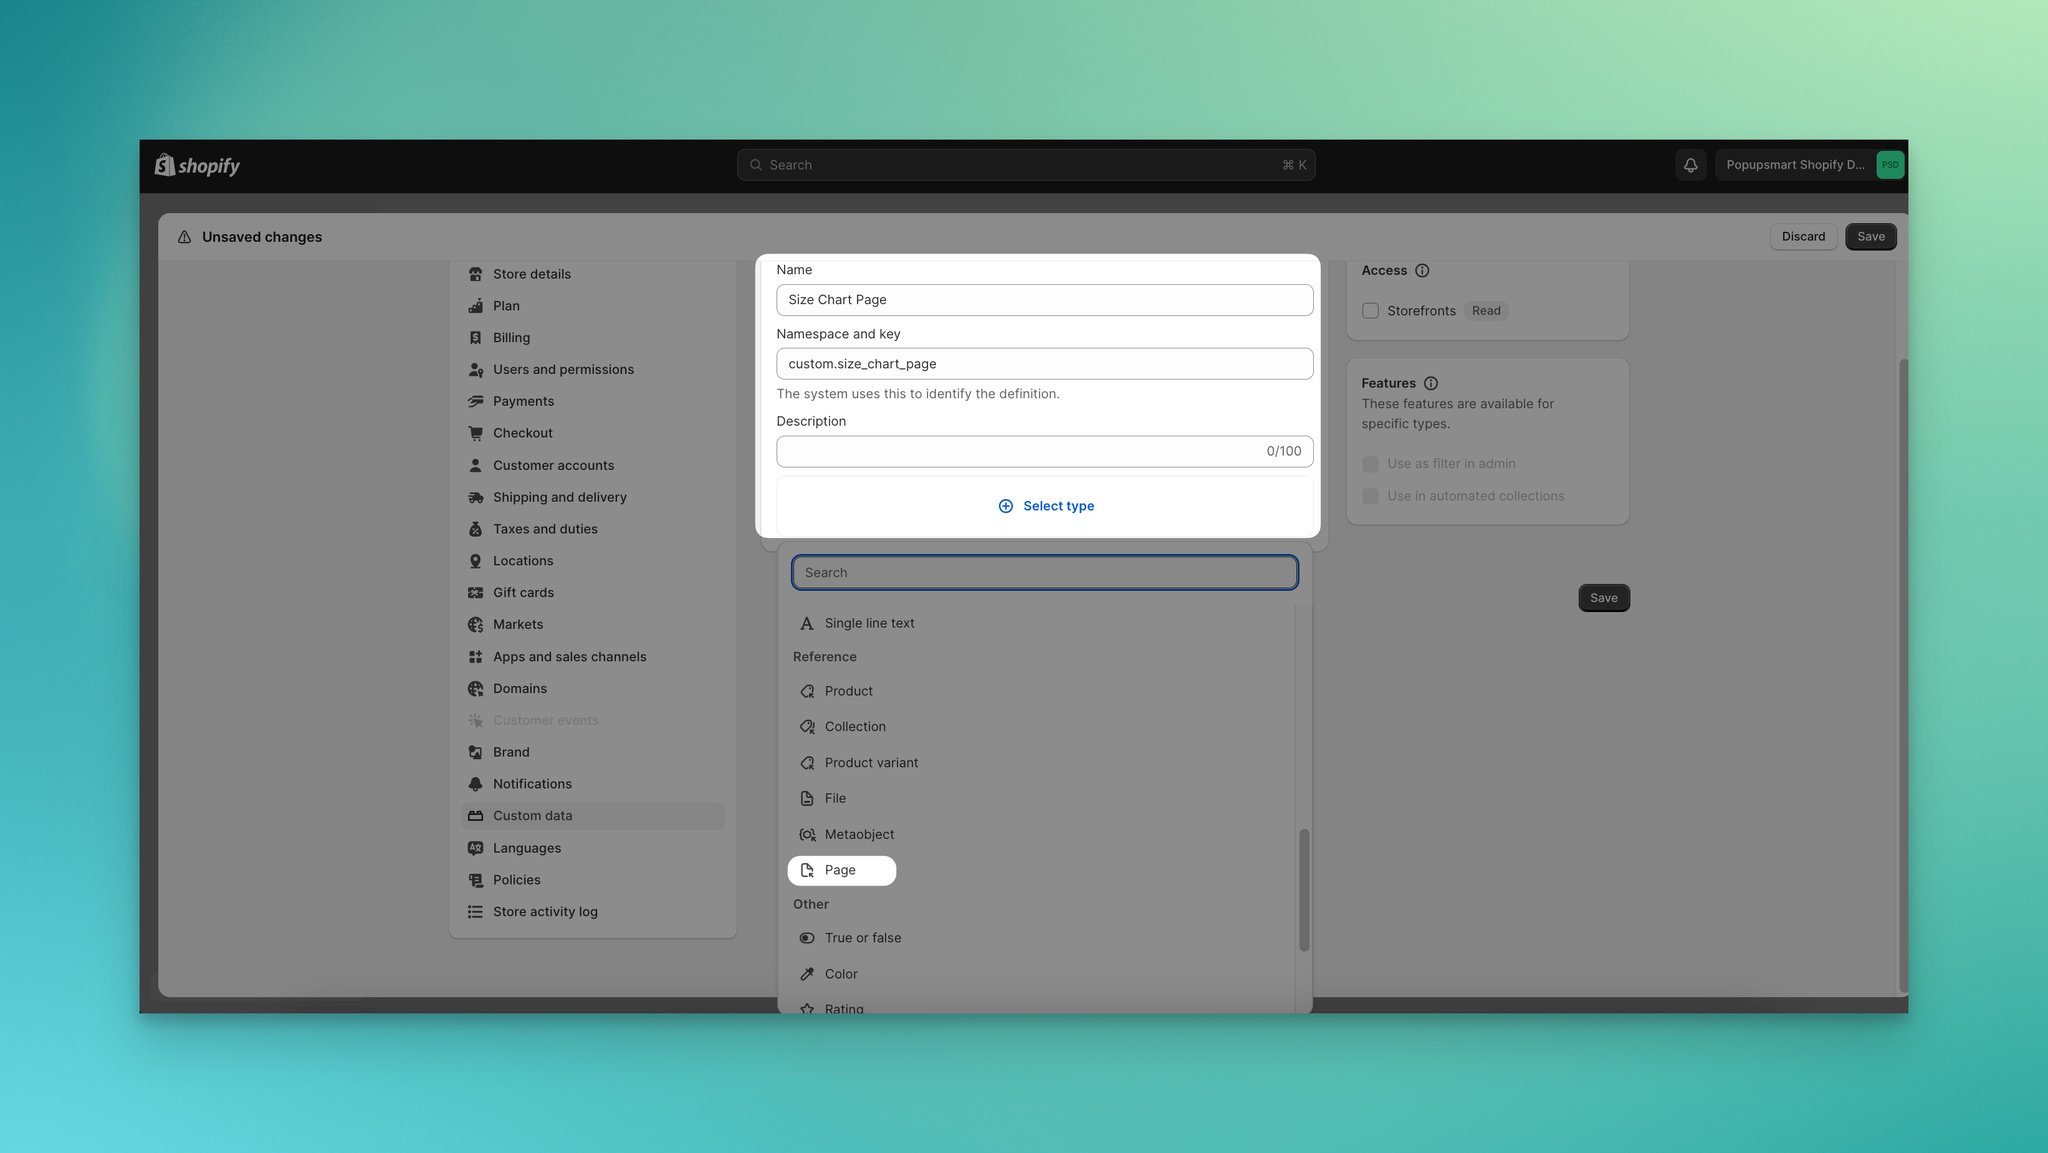
Your metafield content type needs to be "Page." You can call your metafield something like "Size Chart Page."
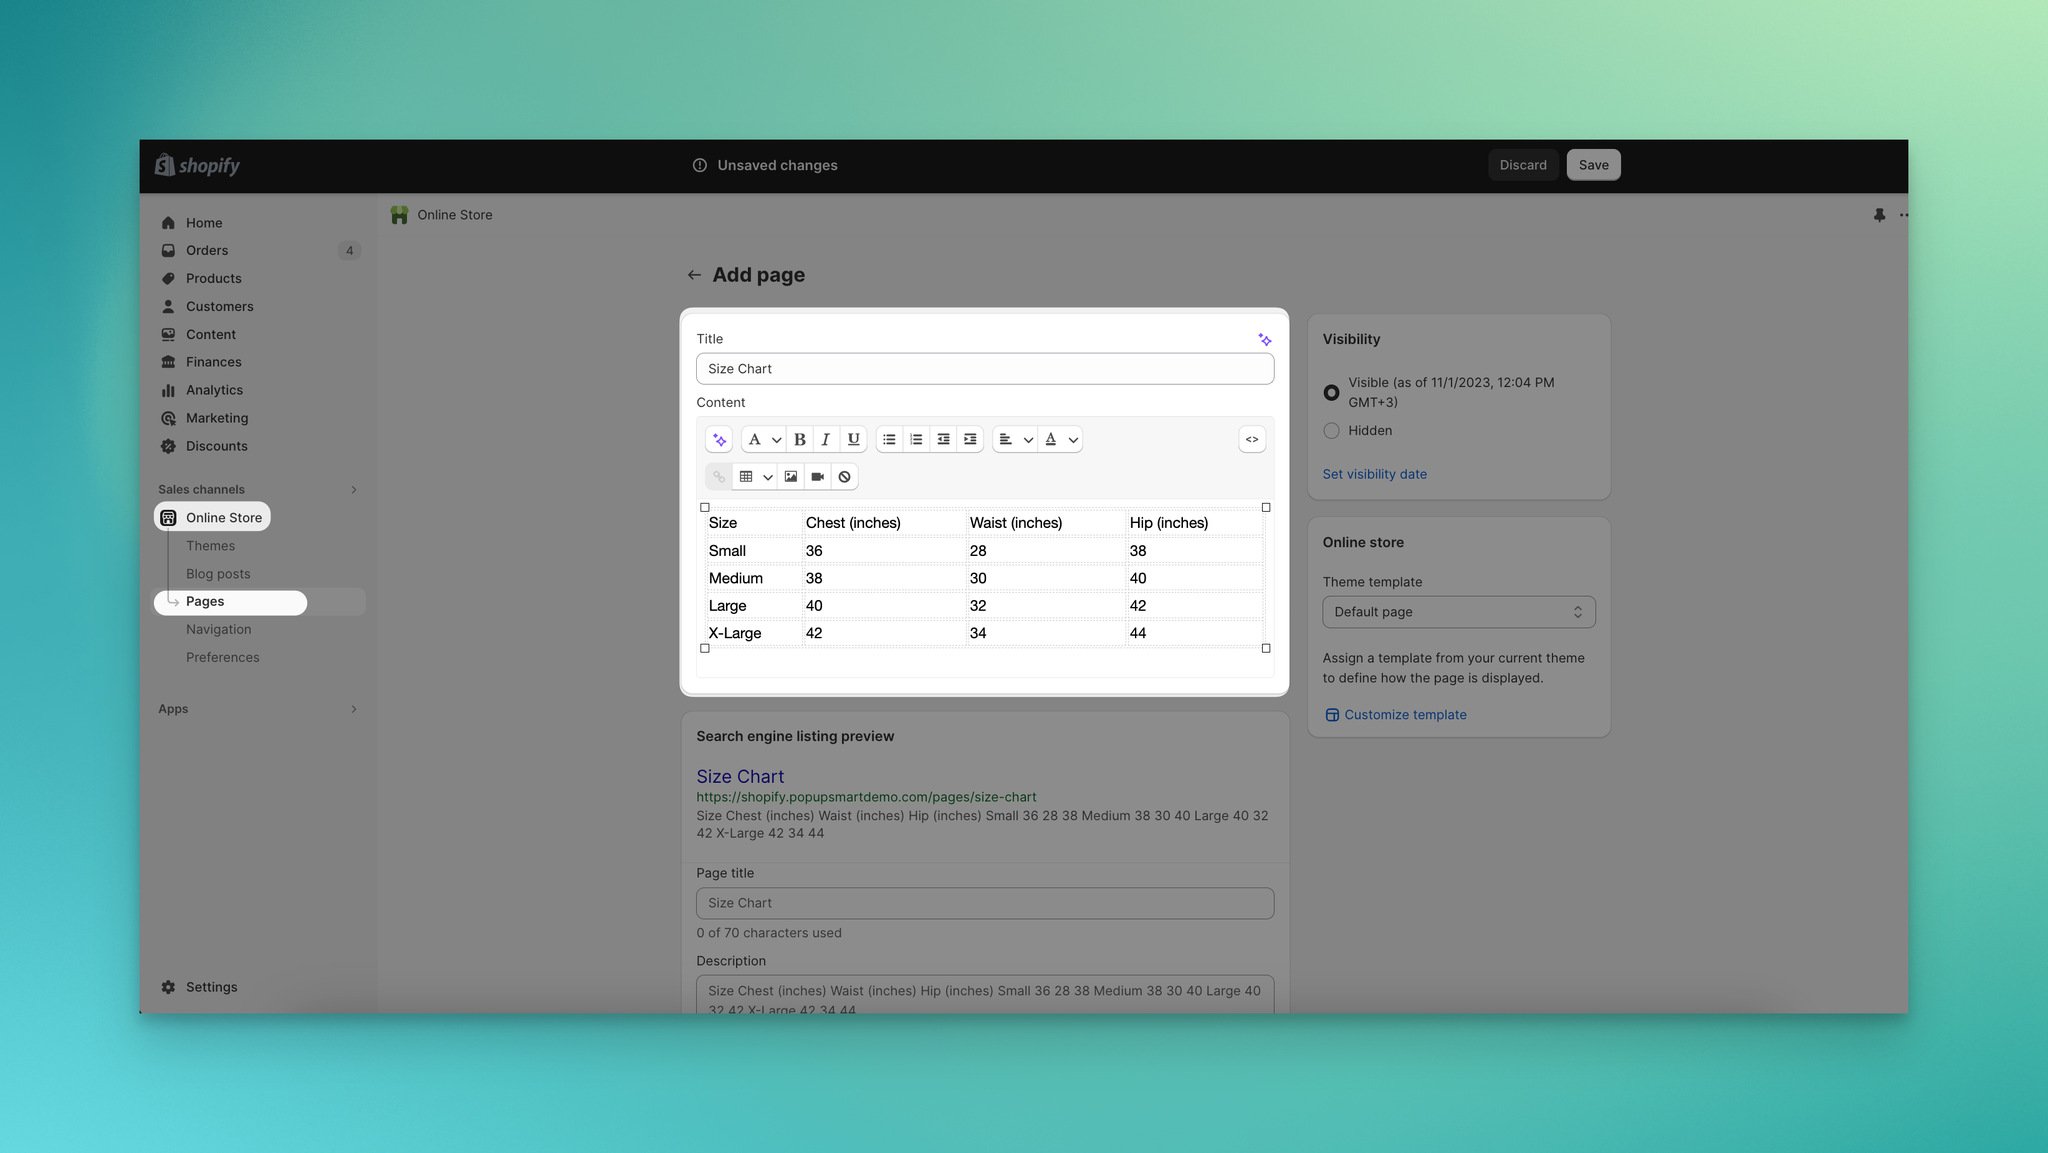
Step 2: As explained in the previous step, create a size chart page by going to the "Online Store" and "Page" sections.
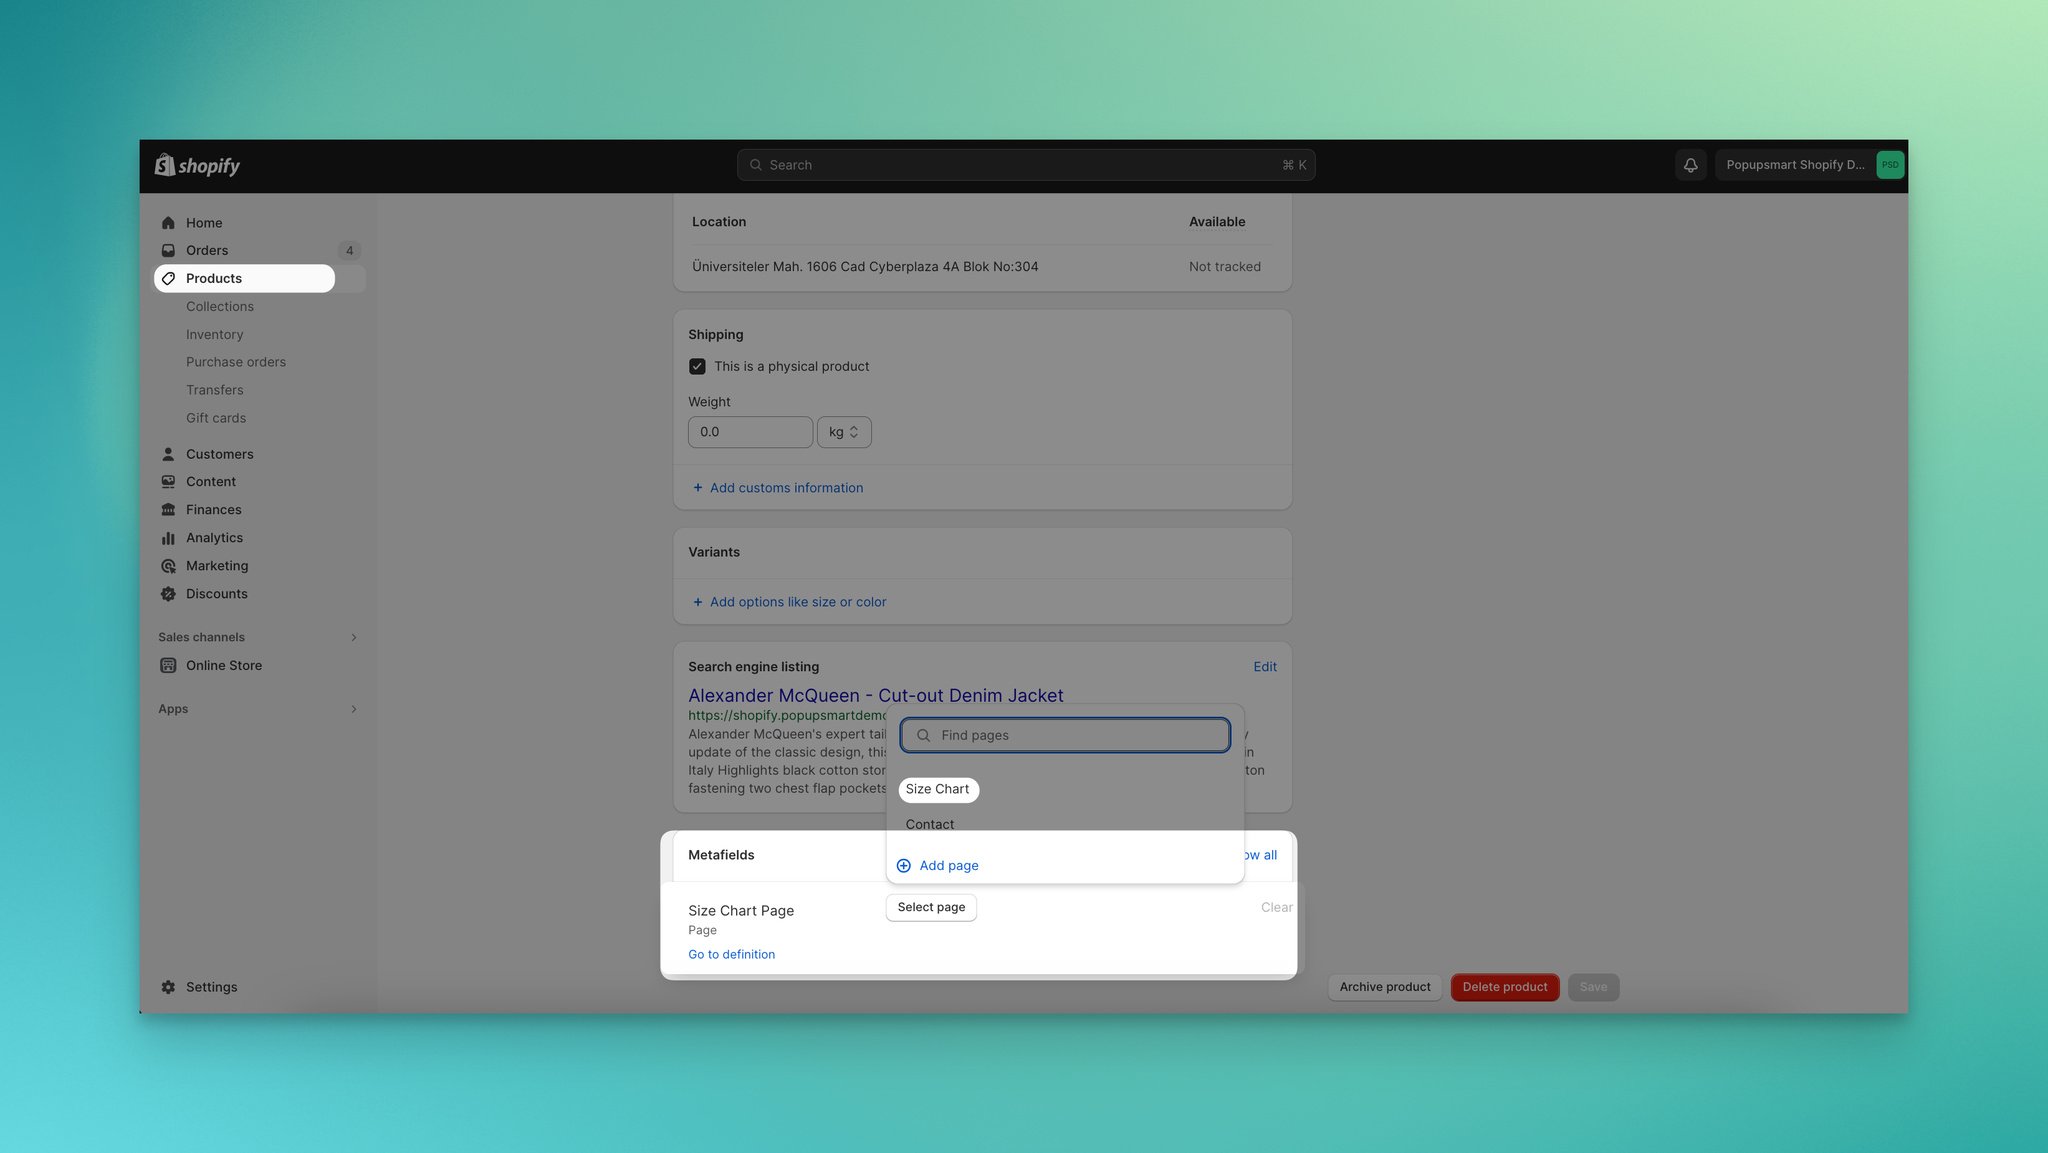
Step 3: Assign your size chart page by going to the “Products” part.
Step 4: Then, navigate to your theme editor. Add a new "Popup block" to your product page template.
This block will enable the size chart to appear as a popup on the product pages. You can move the popup block to the part you want it to appear.
Step 5: Assign the metafields created before to the popup block.
In the "popup" block, assign the metafields you created in the first step. Click the "connect dynamic source" and select your size chart page meta field.
You can give your popup block a name from the "Link Label" section. Once visitors click on that link, they will see your size chart popup.
4. Adding Shopify Size Chart Popup with Popupsmart Shopify App
If you choose to show a size chart popup with a no-code solution, you can use Popupsmart's Shopify app. This solution can be useful if you want to show an engaging popup that can work as a size guide.
Step 1: Install the Popupsmart app on your admin panel.
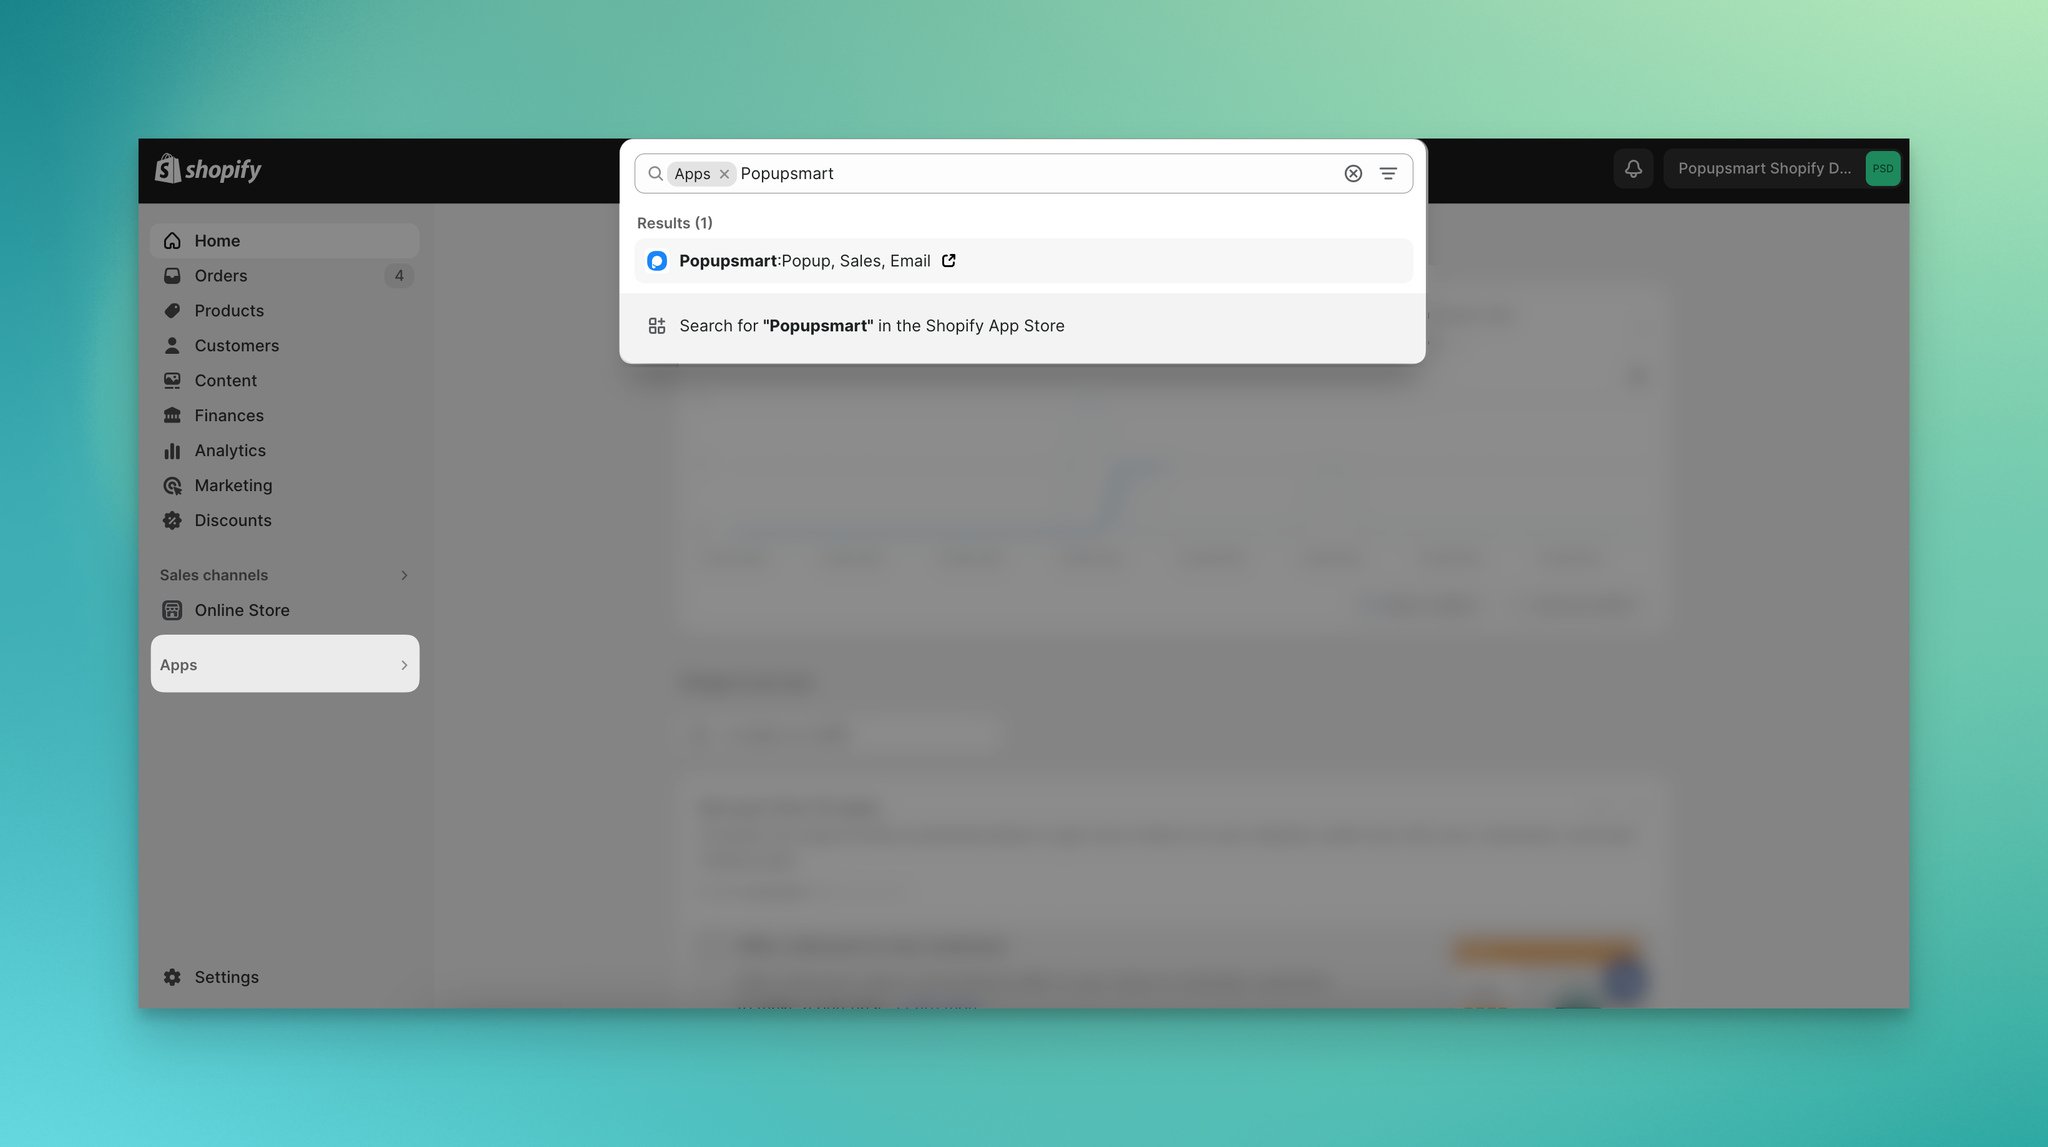
Step 2: Create a new popup campaign on Popupsmart.
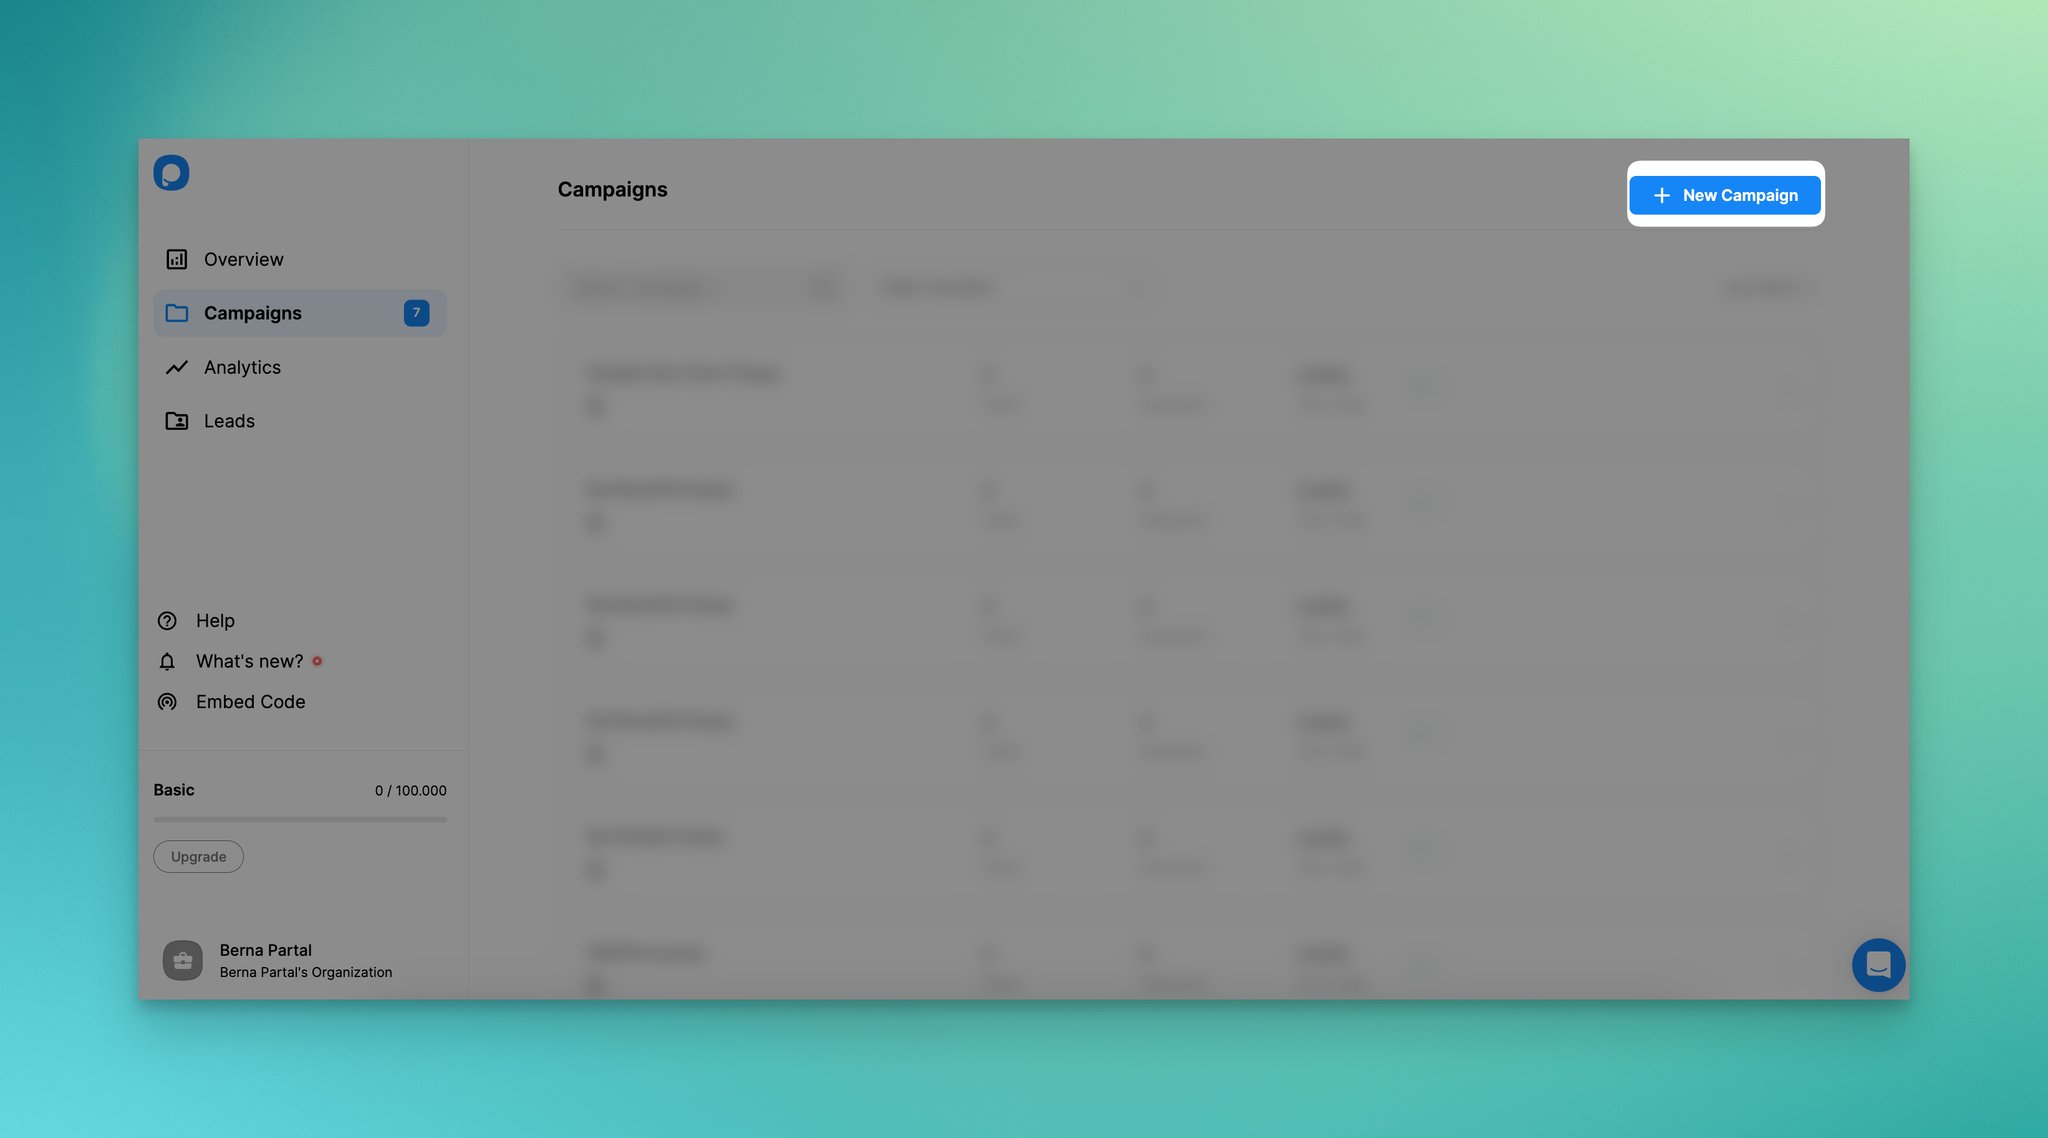
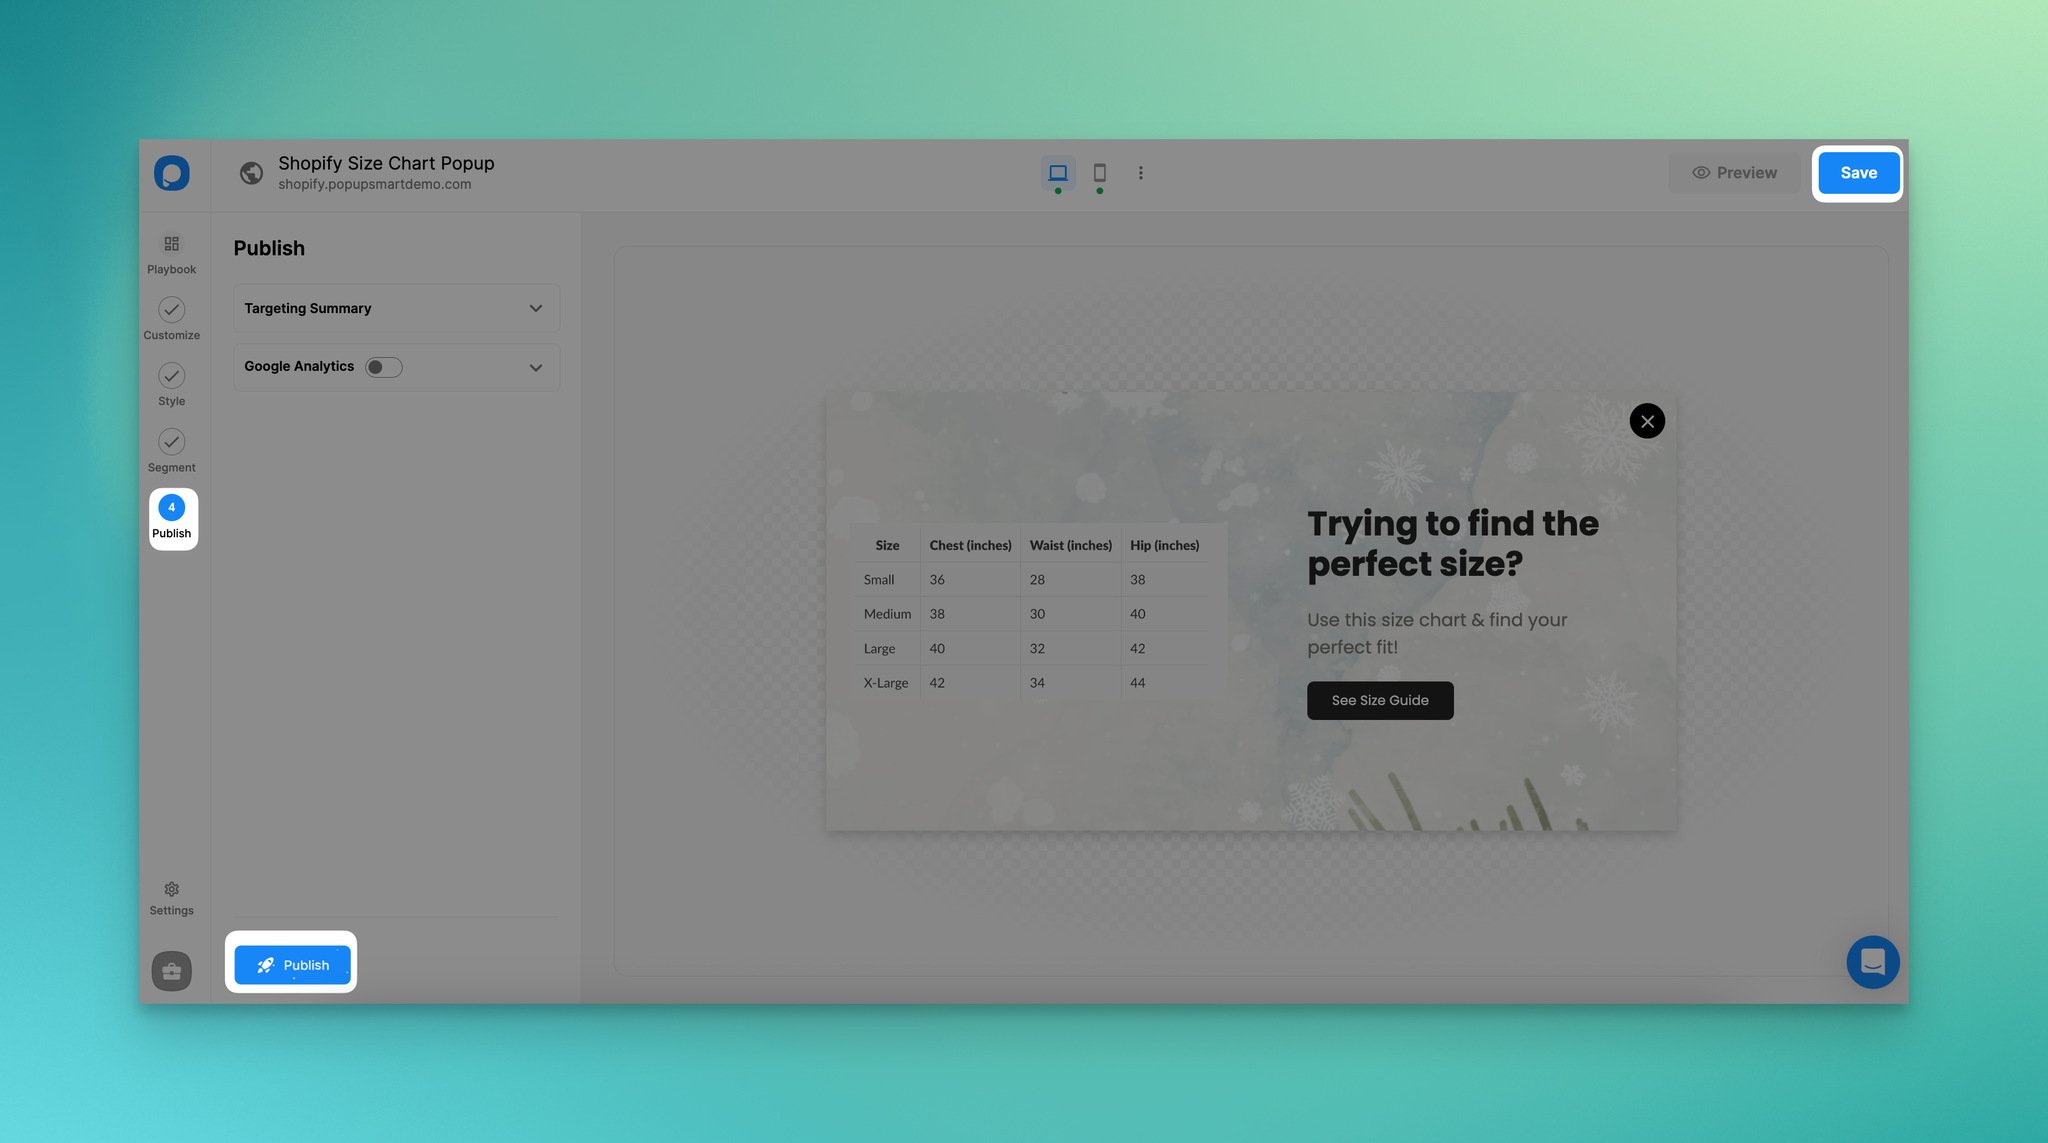
Step 3: Craft your size chart popup in under minutes.
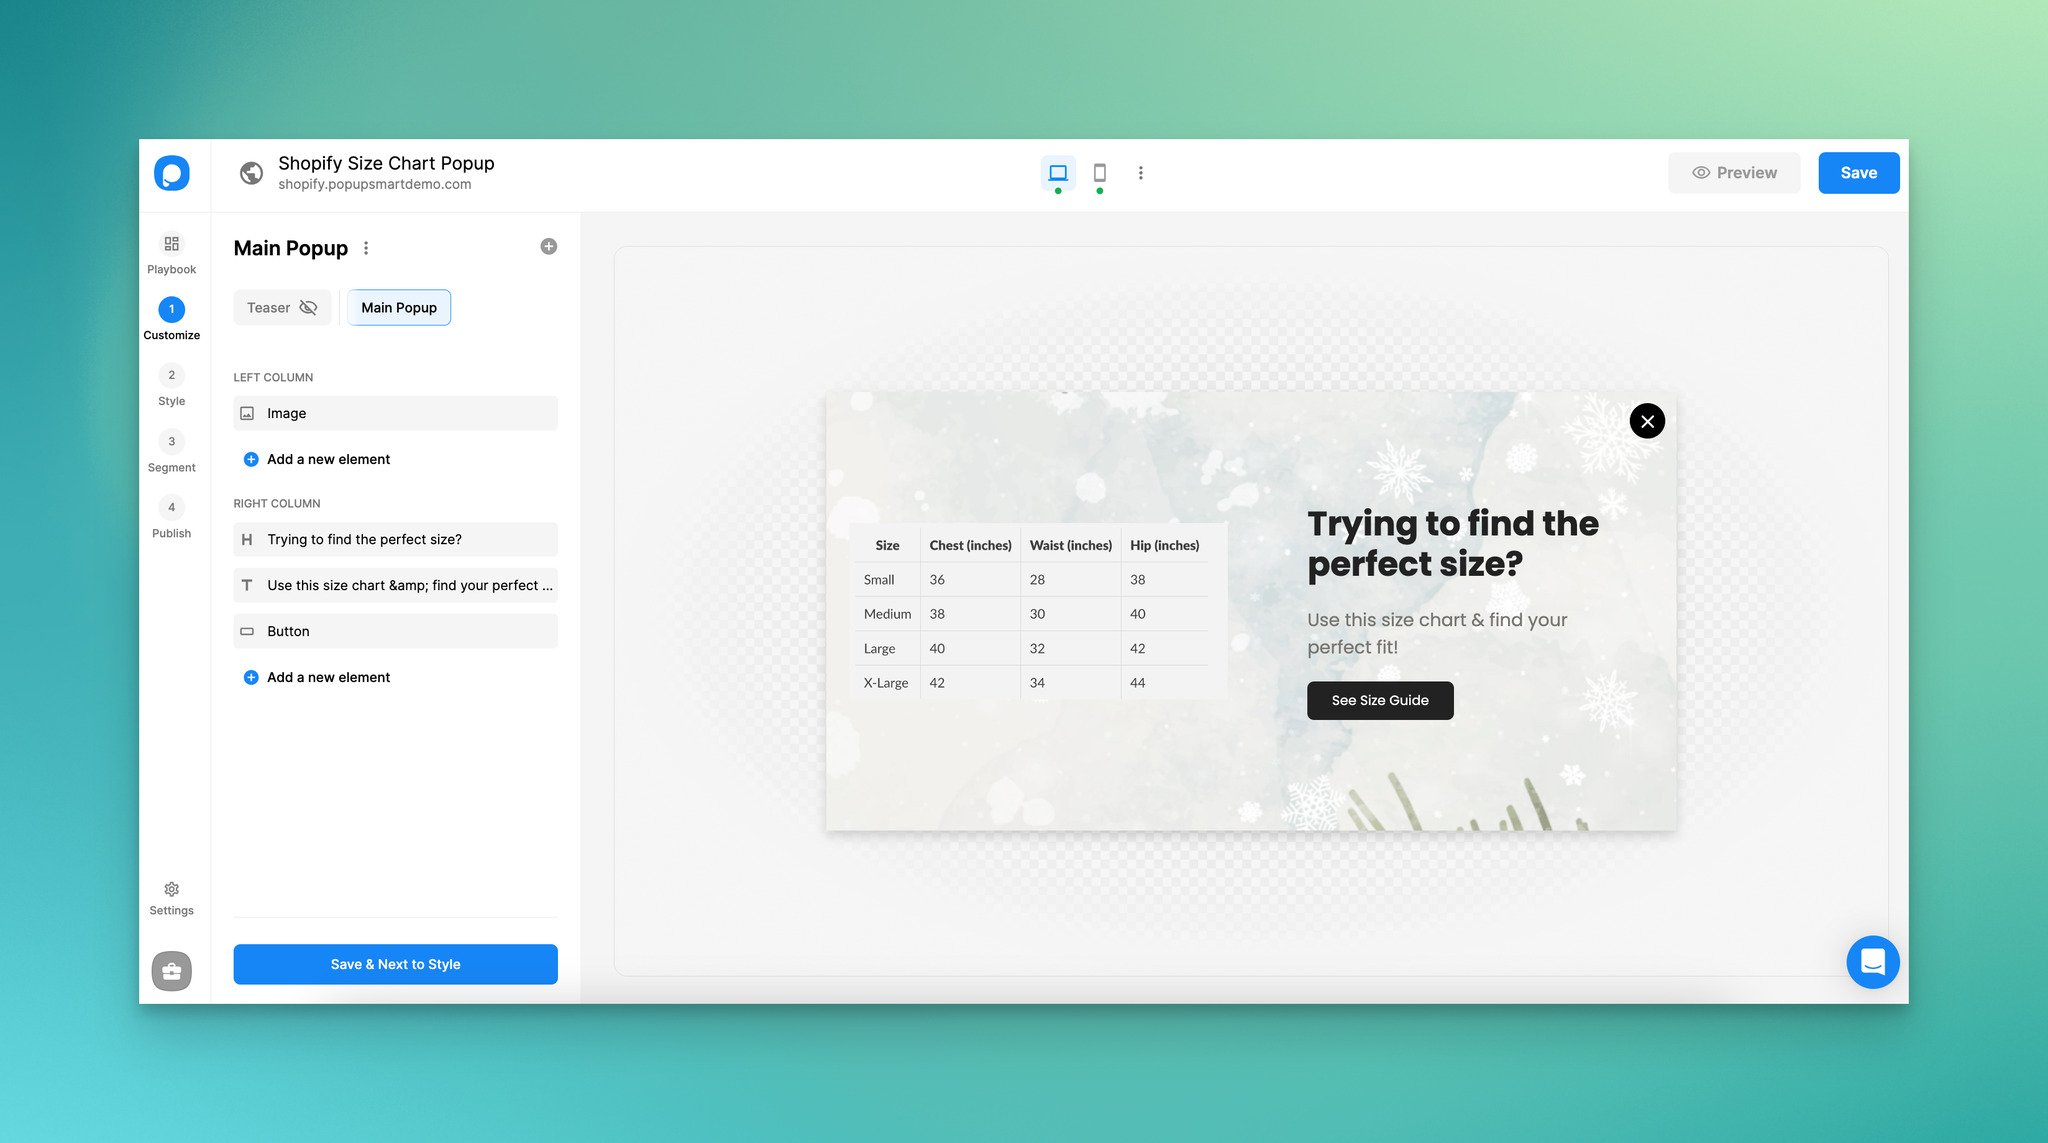
Use engaging headlines and descriptions to grab your visitors' attention.
You can include your size chart as an image and include a call-to-action button at the end. If you have a guide on product sizing, you can direct users to that page with your CTA button.
Tip: If you want to show this popup when a certain action is made by visitors, you can use On-Click Targeting. You can set triggers for certain buttons, and once visitors click on them, you can show your size chart popup.
To use this targeting, go to "Segment," then under "User Behavior Targeting," select "On-Click Targeting." You can enable the targeting and make adjustments according to your needs and goals.
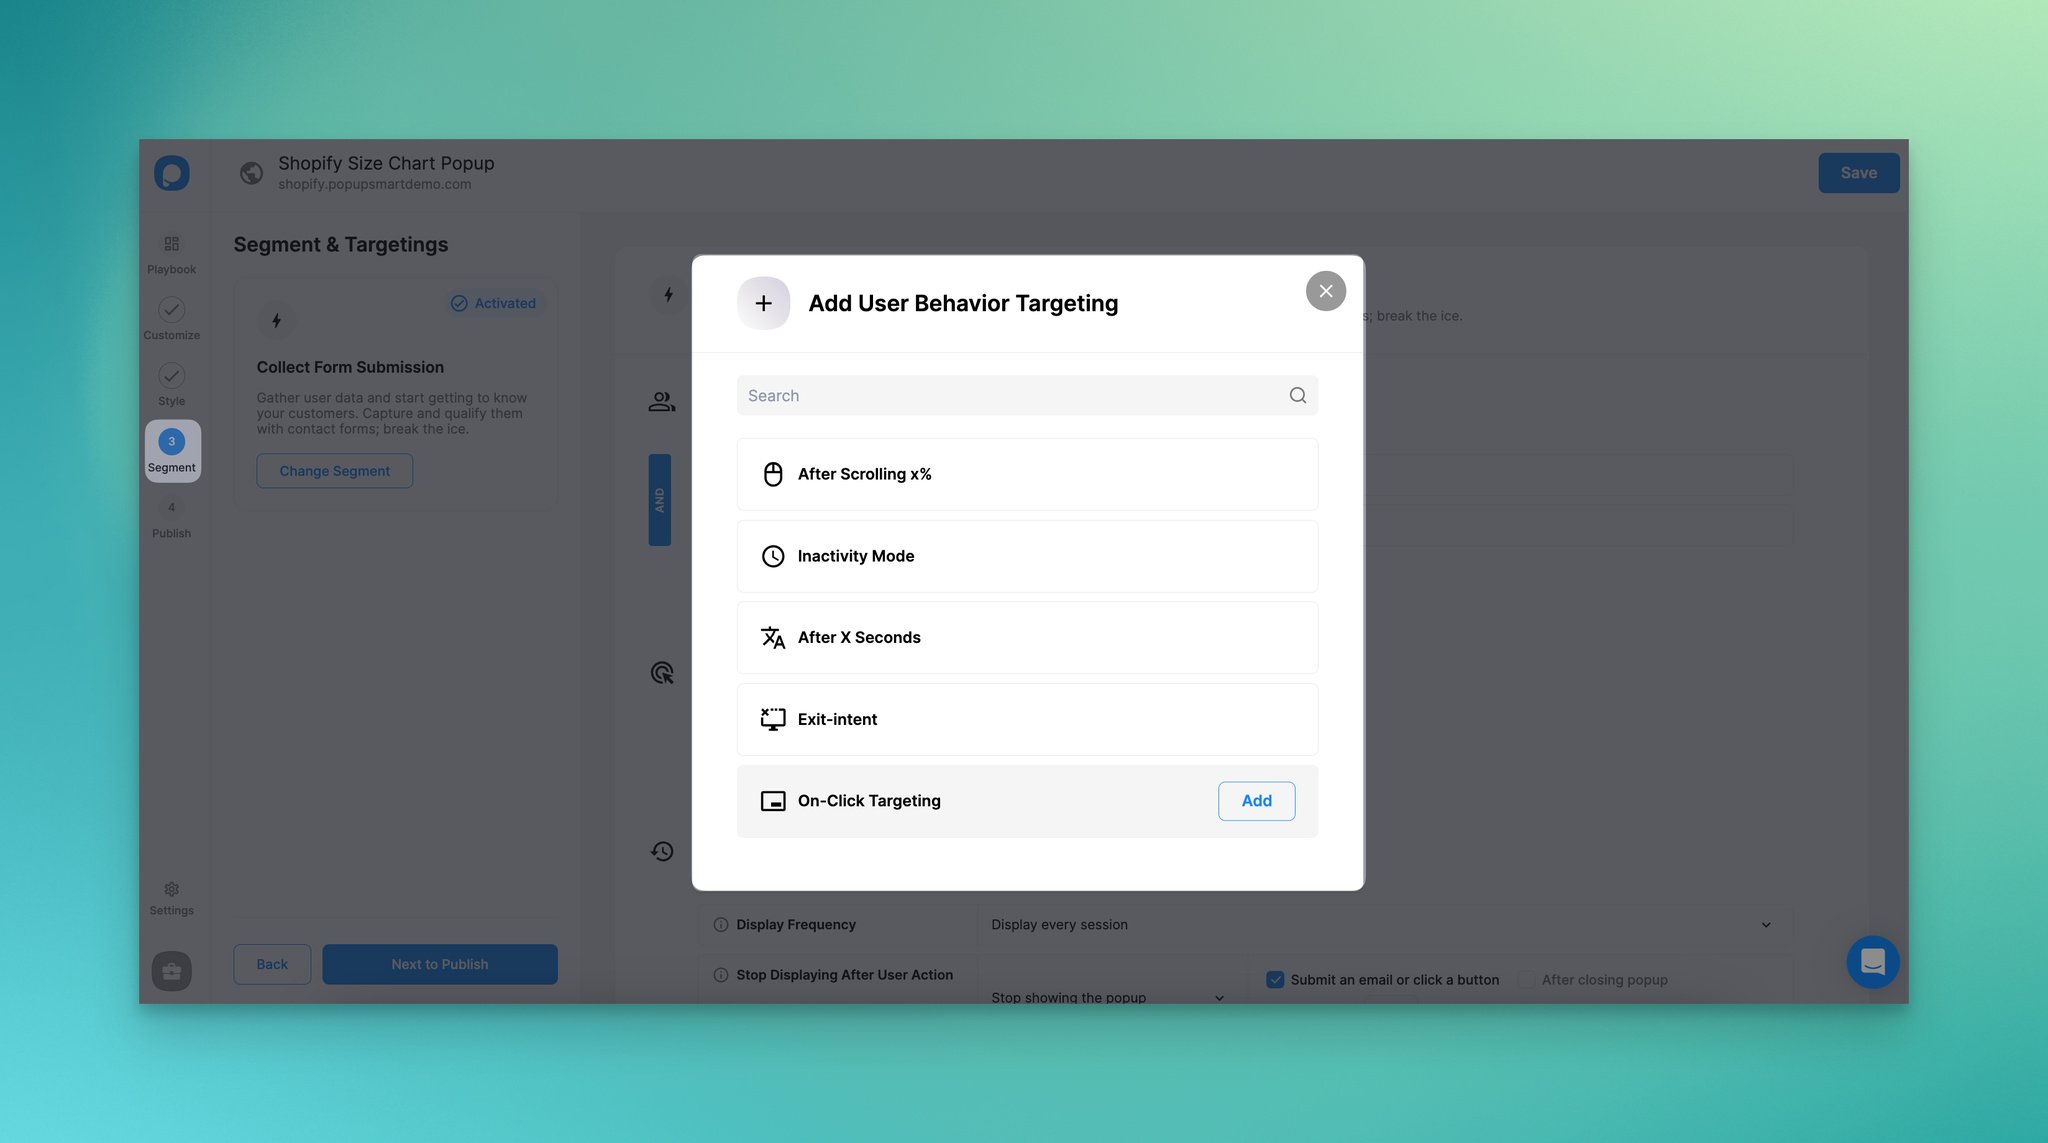
See how it works by reading the guide on On-Click Targeting.
Step 4: Save and publish your popup campaign.
You can explore various Shopify solutions of Popupsmart and start getting the most out of them.
5. How to Add a Size Chart on Shopify by Using a Shopify Size Chart App
Shopify offers various apps that can simplify the process of adding a size chart to your store.
By choosing a size chart app for Shopify, you can quickly add a size chart.
Here are the steps to follow:
Step 1: Choose a size chart app by going to the Shopify App Store.
Search for " size chart" or "size guide" apps. Browse through the available options and read reviews to choose an app that suits your needs and budget. Then, you can install the selected app.
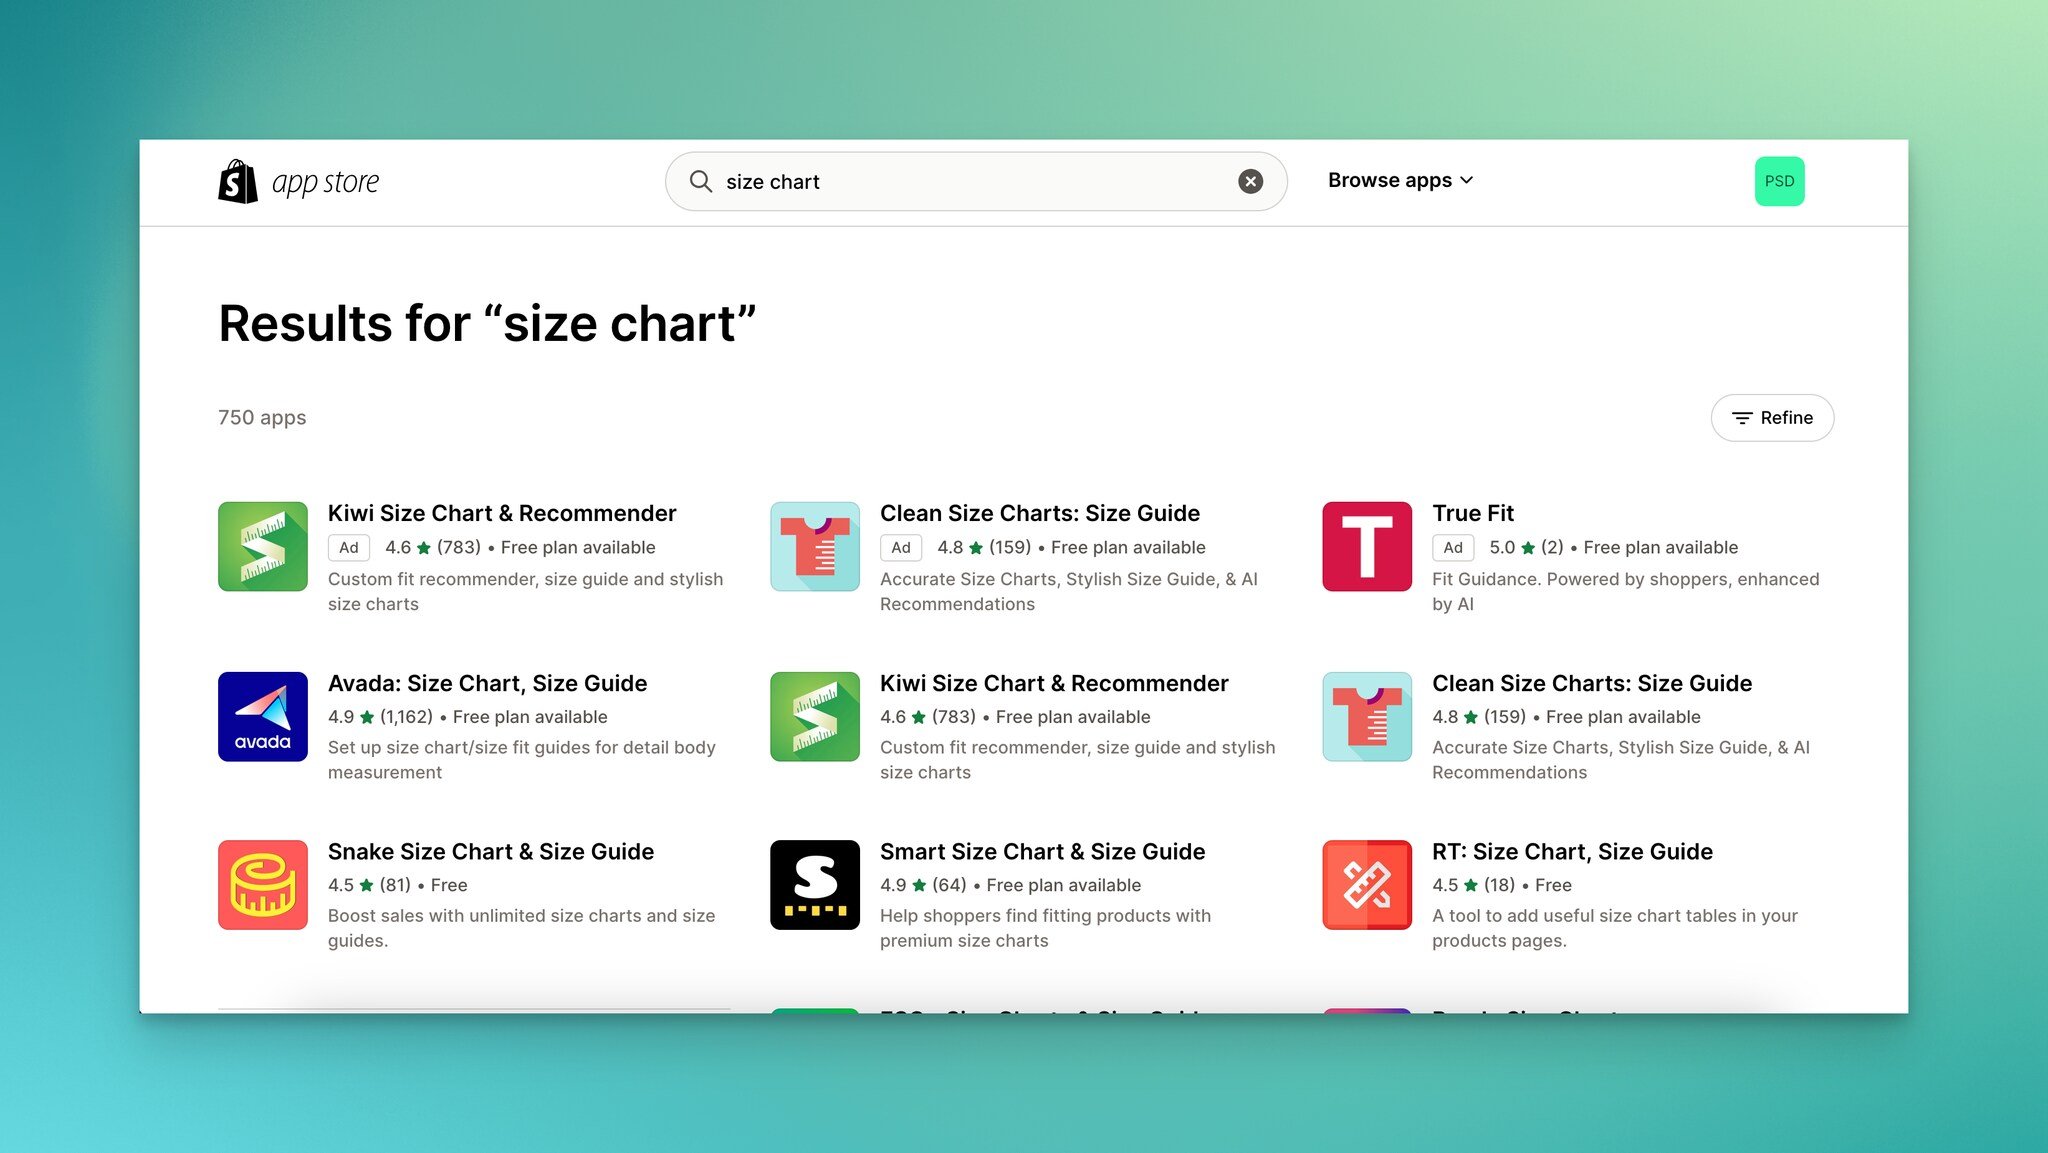
For example, you can use applications like AVADA Size Chart, Kiwi Size Chart, and so on.
Step 2: Install the Shopify size chart app you choose, and start creating your size chart.
Once the app you have selected is installed, follow the app's quick and easy instructions to create your size chart.
Most size chart apps come with user-friendly interfaces, allowing you to include measurements and customize the design according to your style.
Step 3: After creating your size chart, you'll typically receive a shortcode or a unique identifier to add your chart to products.
Go to the product where you want to add the size chart. In the product description, insert the shortcode or identifier provided by the app.
Step 4: Decide where you want your size chart to appear. Ensure that it's easily accessible for your visitors.
Using a size chart app is a user-friendly and convenient option, particularly if you're uncomfortable with coding. Many of these apps offer various customization options, so you can still have a size chart that matches your store's design.
Wrap Up
By adding a size chart to your Shopify store, you'll make your customers' shopping journey smoother, reduce returns, and stand out from the crowd in your industry.
While adding a Shopify size chart, ensure that your charts' style go hand in hand with the overall style of your store.
We've explored why a size chart is crucial and discussed the various ways to implement it in this blog post. Feel free to use the method that suits you the best and start providing a better customer experience!
Whether you're someone with coding experience or prefer to use a user-friendly Shopify app, you have the tools to include a size chart in your store.
Frequently Asked Questions
Why is A Size Chart Important for An Online Store?
A size chart is essential for an online store since it helps customers make informed purchasing decisions by providing accurate measurements for products.
It enhances the customer experience, reduces returns, and builds trust, all of which are critical for an e-commerce store's success.
How Can A Size Chart Reduce Returns Of a Shopify Store?
A size chart reduces returns by helping customers select the right size for clothing items. When customers can access accurate measurements, they are less likely to order the wrong size, leading to fewer returns due to sizing problems.
Where Should You Place A Size Chart on The Product Page?
You can place your size chart near the product description or in a separate section on the product page. The key is to make it easily accessible and visible to customers, ideally above the "Add to Cart" button, so they can refer to it while making their purchasing decisions.
Explore these blog posts related to Shopify before you leave:
- How Much Does It Cost to Start Dropshipping on Shopify?
- How to Add a Countdown Timer to Shopify- Simple Processes
- What Does SSL Pending Mean on Shopify? (Complete Guide)
- 15 Solid Shopify Marketing Strategies to Drive Sales


