The Benefits of Webflow
Webflow is a no-code website design tool that can help you create a website with simplicity and cost-effectively.
Webflow makes things easier for business owners, marketers, or freelancers.
Therefore, although Webflow is designed for professionals, anyone is able to create a website with Webflow.
As for the question, why should people use Webflow when they build a website, there are some matters to order as follows:
- Webflow helps you create responsive websites with responsive designs.
- It provides interactions and animations.
- You do not need to know to code since coding is done visually on the user interface.
- You do not start all over, yet you keep development and design together.
- Webflow has its own highly useful templates to use. It eases your job and saves time.
- Webflow has helpful customer service that you can contact when you need them.
- Customization is what Webflow has the most since you are able to add different fonts and be creative as you wish.
How to Find the Fonts Page
Our first step is to reach the Fonts page. For this, you should sign up for an account on Webflow.
It is one of the most accessible processes, and since Webflow is free to start, it will charge no expense while signing up.
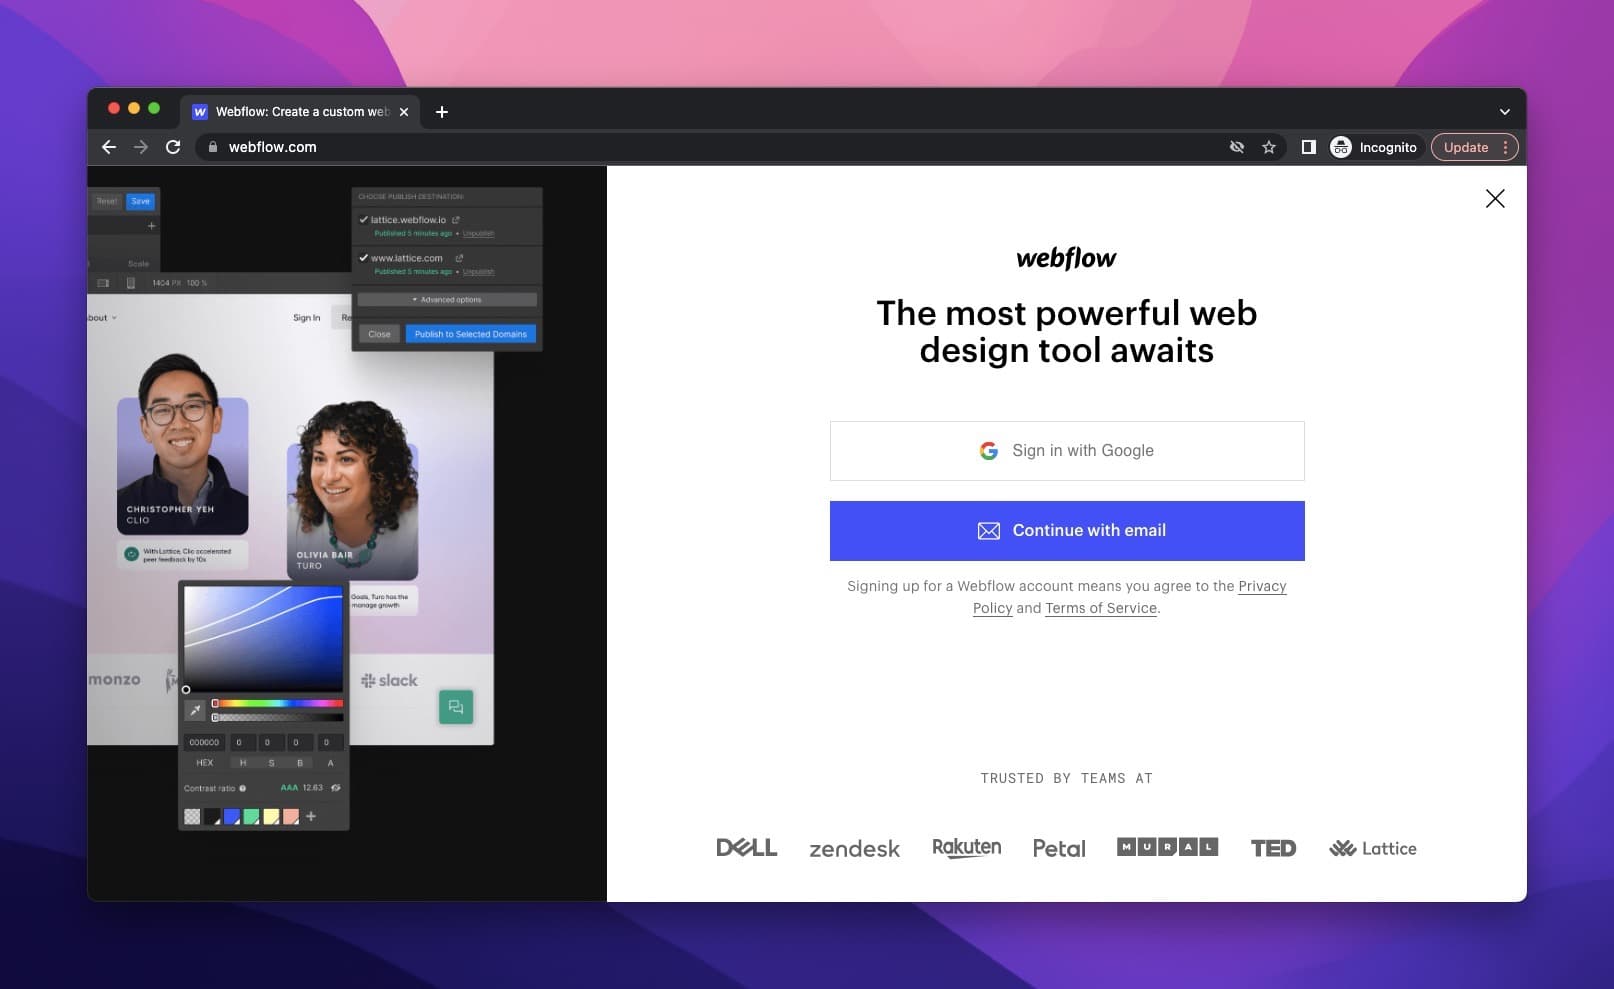
After you create your account, you need to start building your page by choosing from templates or creating on your own.
Webflow has lots of engaging templates to pick from, so you might prefer them. Then, you can customize your website easily.
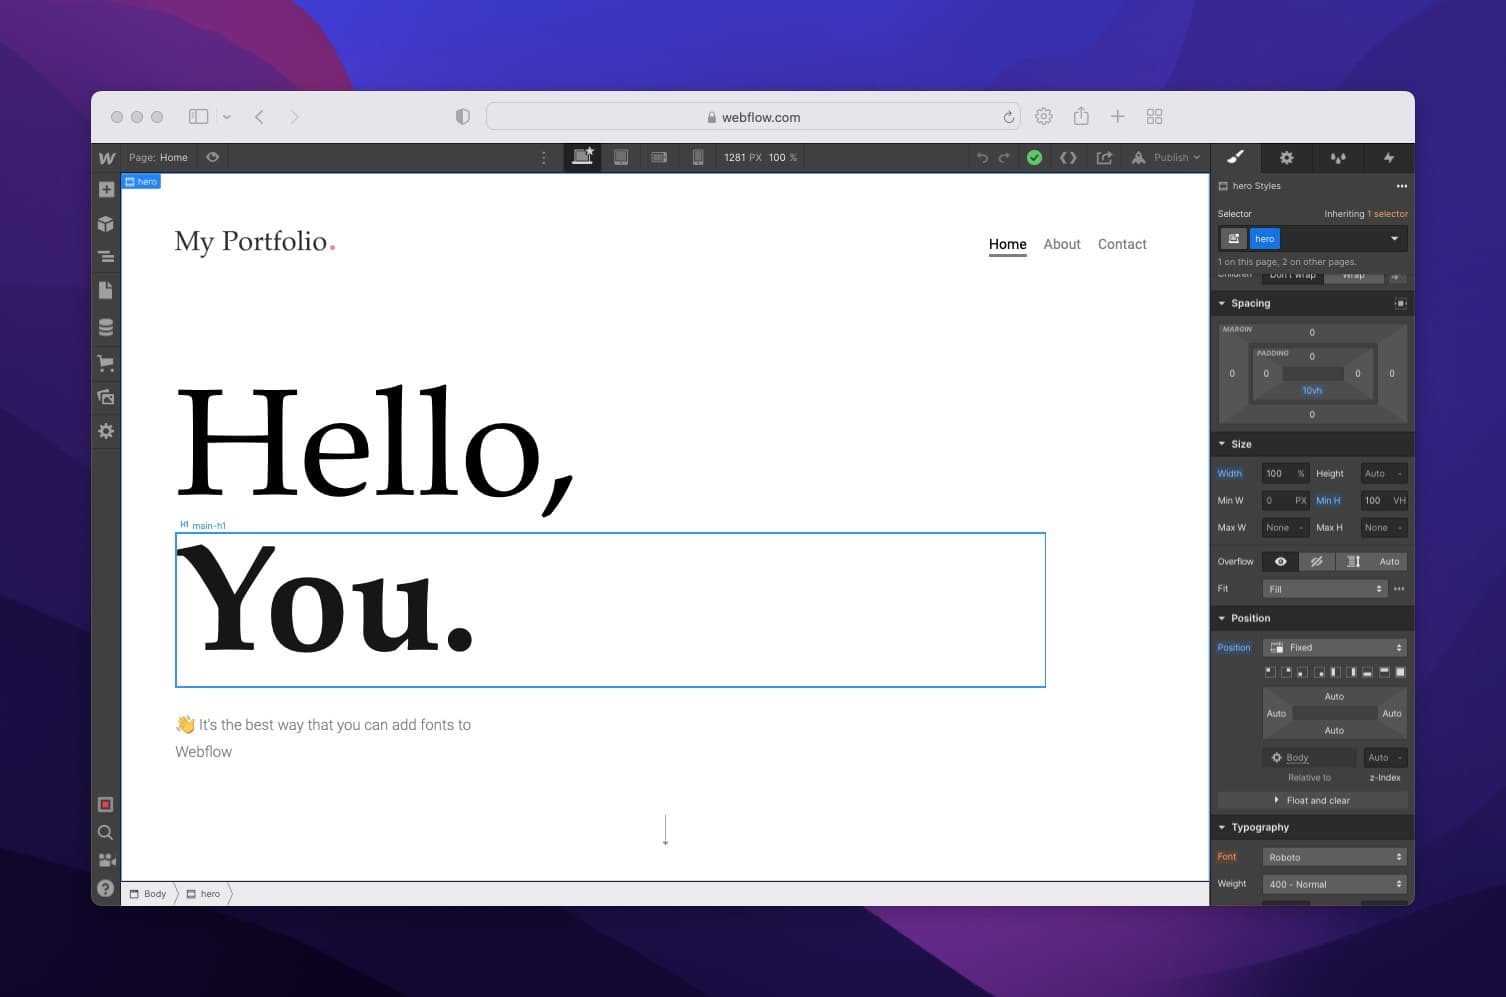
Now that you have a template for your website, you can start learning your page.
There are two sides, and your website is at the center.
The left side belongs to the technical part of your website.
And the right side, the Style Panel, belongs to the details of the page. Also, here is the part where you can deal with trim works.
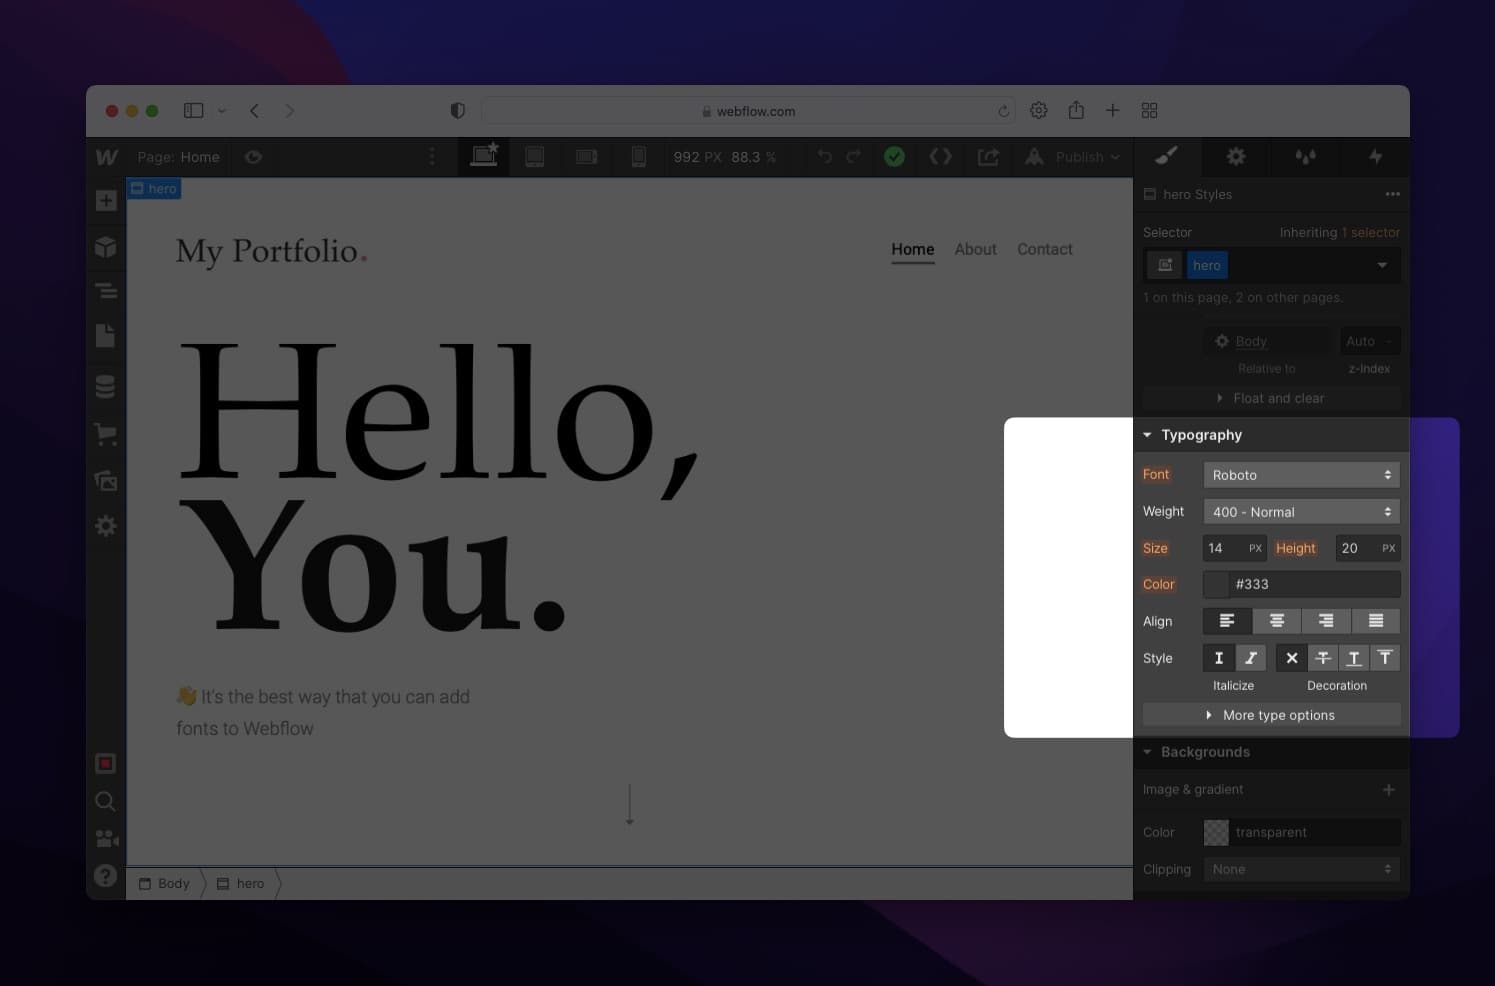
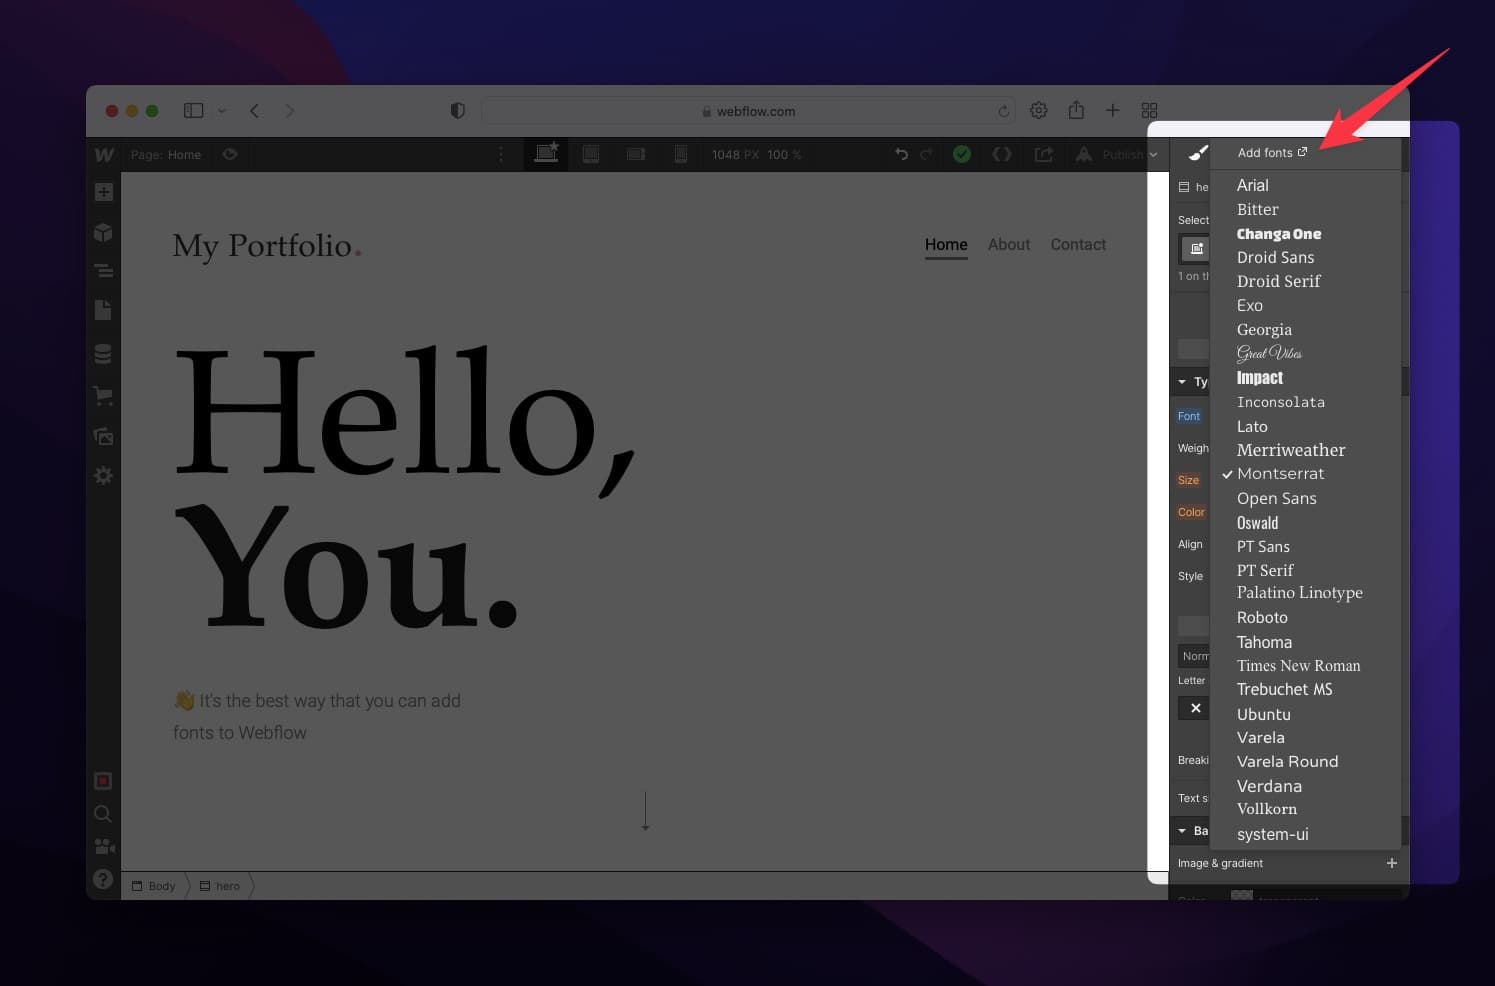
You can discover some titles under the brush icon from the Style Panel.
There you will find a title, “Typography”.
Next, click on “Add Fonts,” which will direct you to the new tab that belongs to the Fonts.
How to Add Google Fonts to Webflow
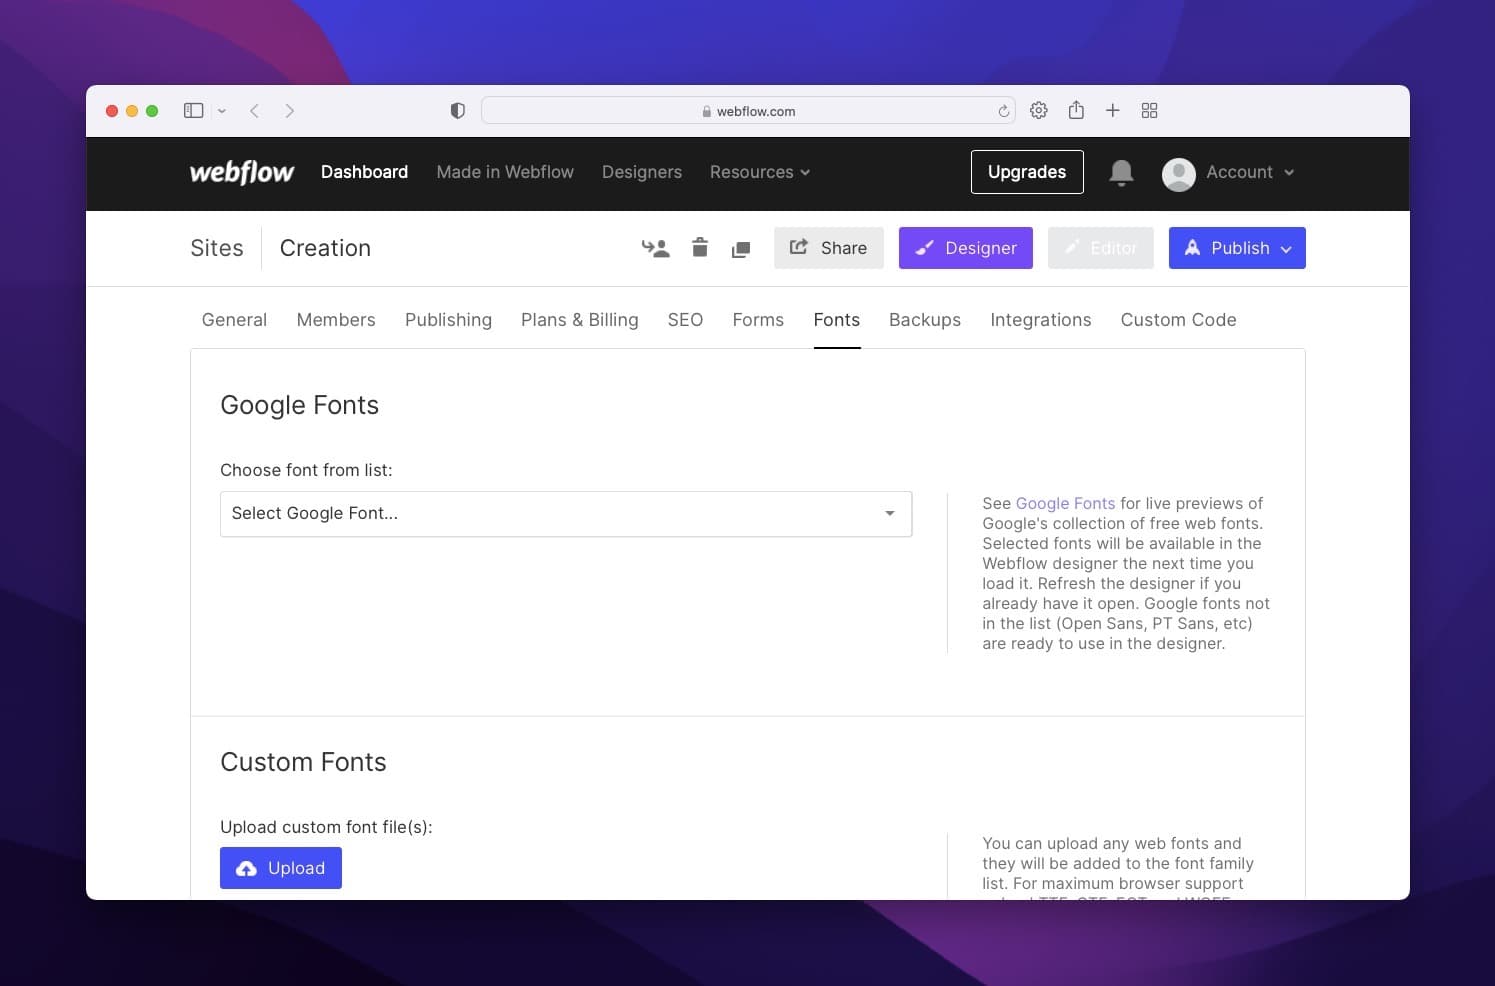
Webflow’s first option on the Fonts page is Google Fonts, where you can reach plenty of different fonts and use them in your works.
Step 1: Discover Fonts
You can select your Google font from the fonts list easily.
Additionally, before deciding which font to use, you can see their live preview by clicking Google Fonts.
When you click on the “Google Fonts,” you will be directed to the Google Fonts page.
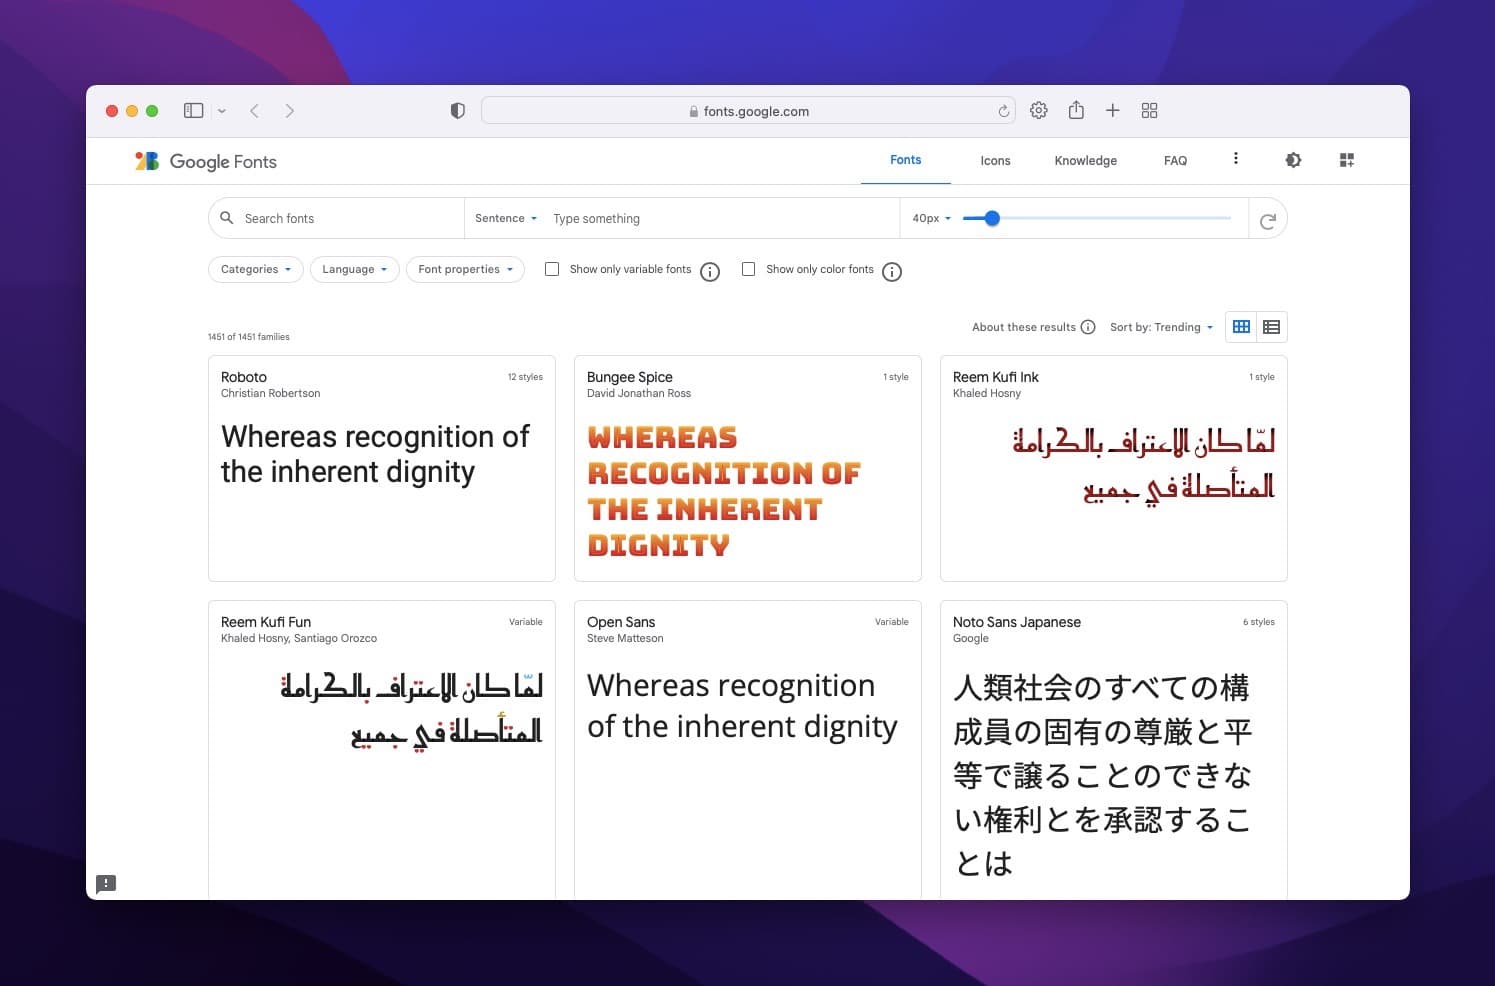
Find your favorite fonts from there and turn back to the previous page to choose them.
Step 2: Adding a New Google Font
After you choose from the dropdown, click on the green button, “Add Fonts.” And your new font is ready to go.
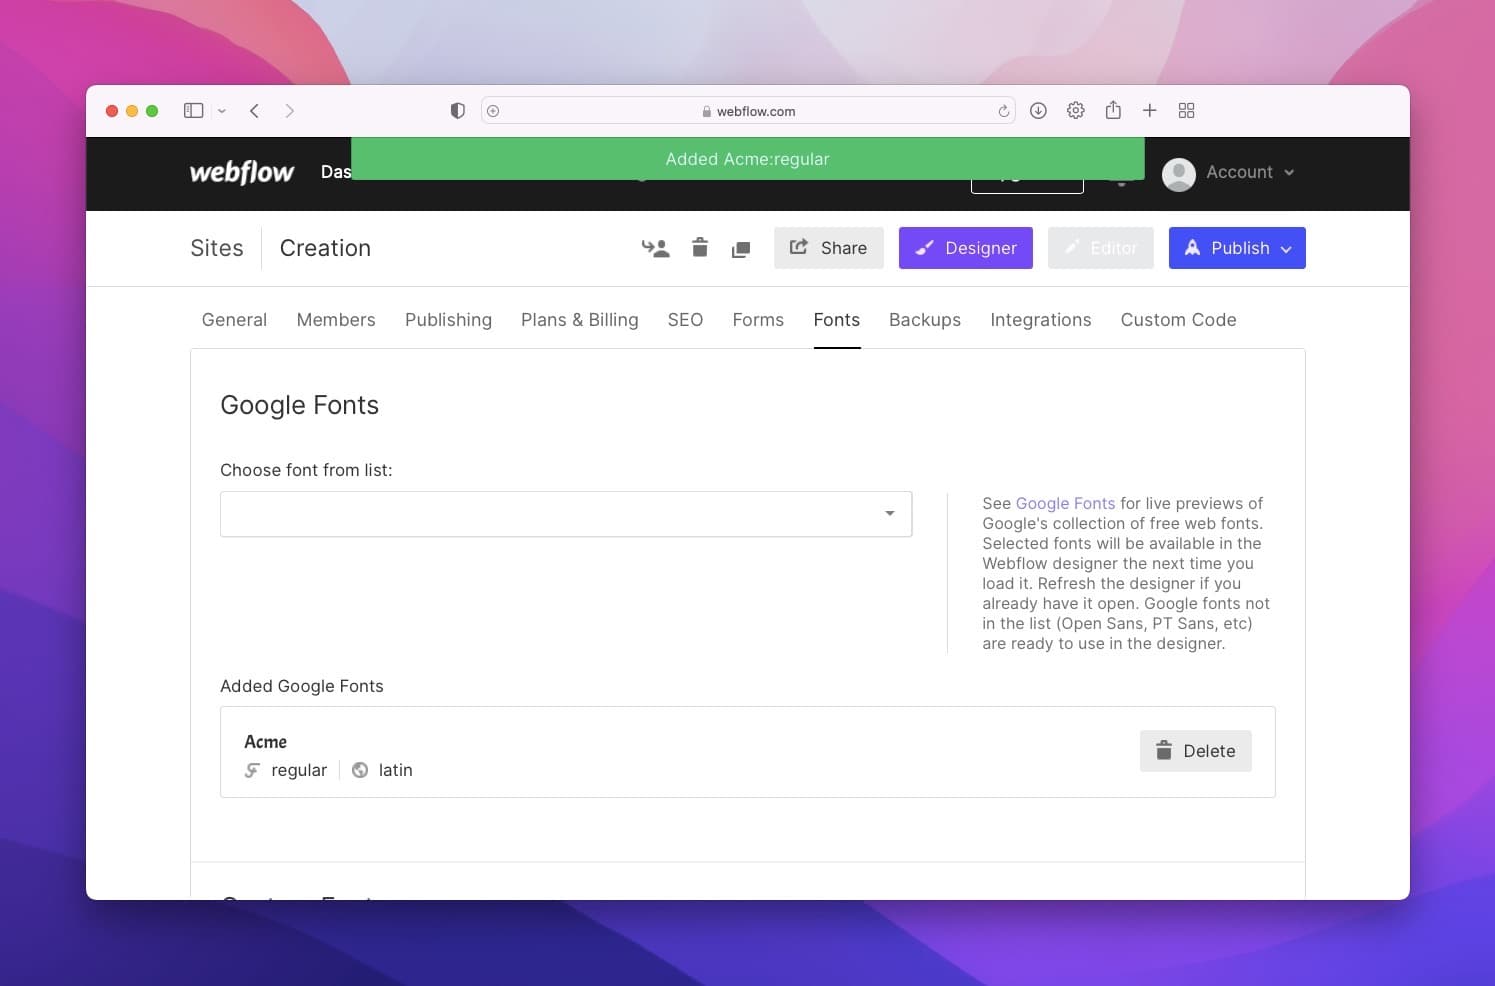
Also, it would be best if you determined whether you want your font in regular type or not.
It may affect your visitors’ perspective toward your webpage.
Lastly, do not forget that you can delete or stop using the font you choose anytime you want.
How to Add Custom Fonts to Webflow
Adding custom fonts may seem and sound a little complex at first, but it is as easy as adding Google Fonts since we will go step by step.
Step 1: Gain Custom Fonts
Before starting to add a custom font to Webflow, you should decide which font family you want to use.
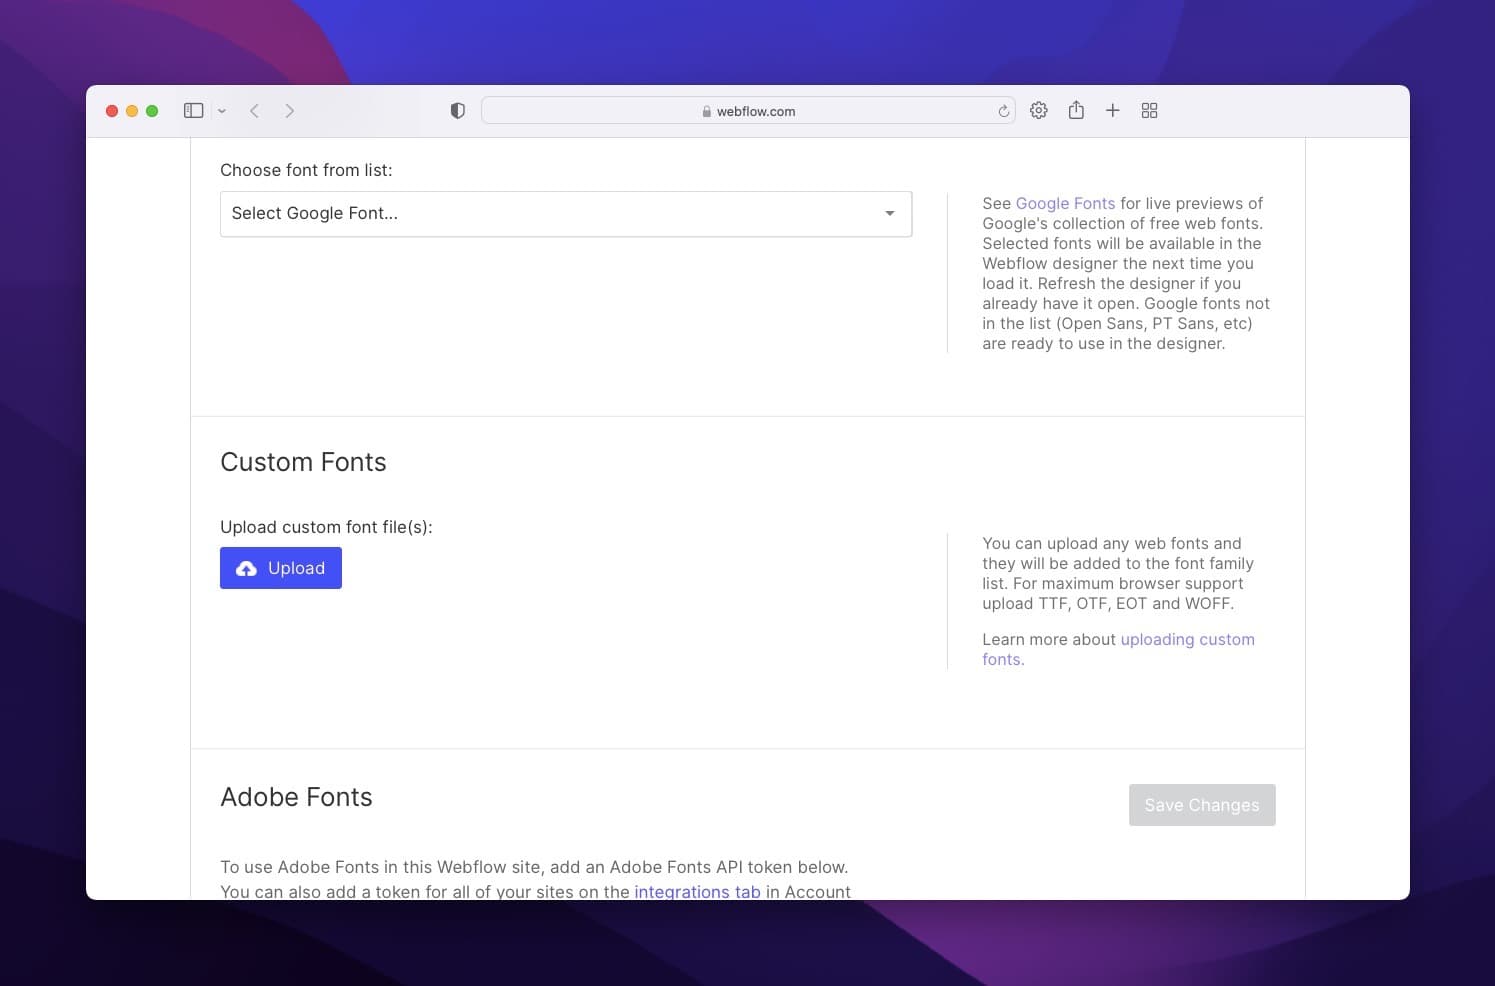
Then, you need to reach the fonts through web sources that you trust.
Step 2: Adding a Custom Font to Webflow
It would help if you started by clicking “Upload Fonts” and finding your target file on your computer.
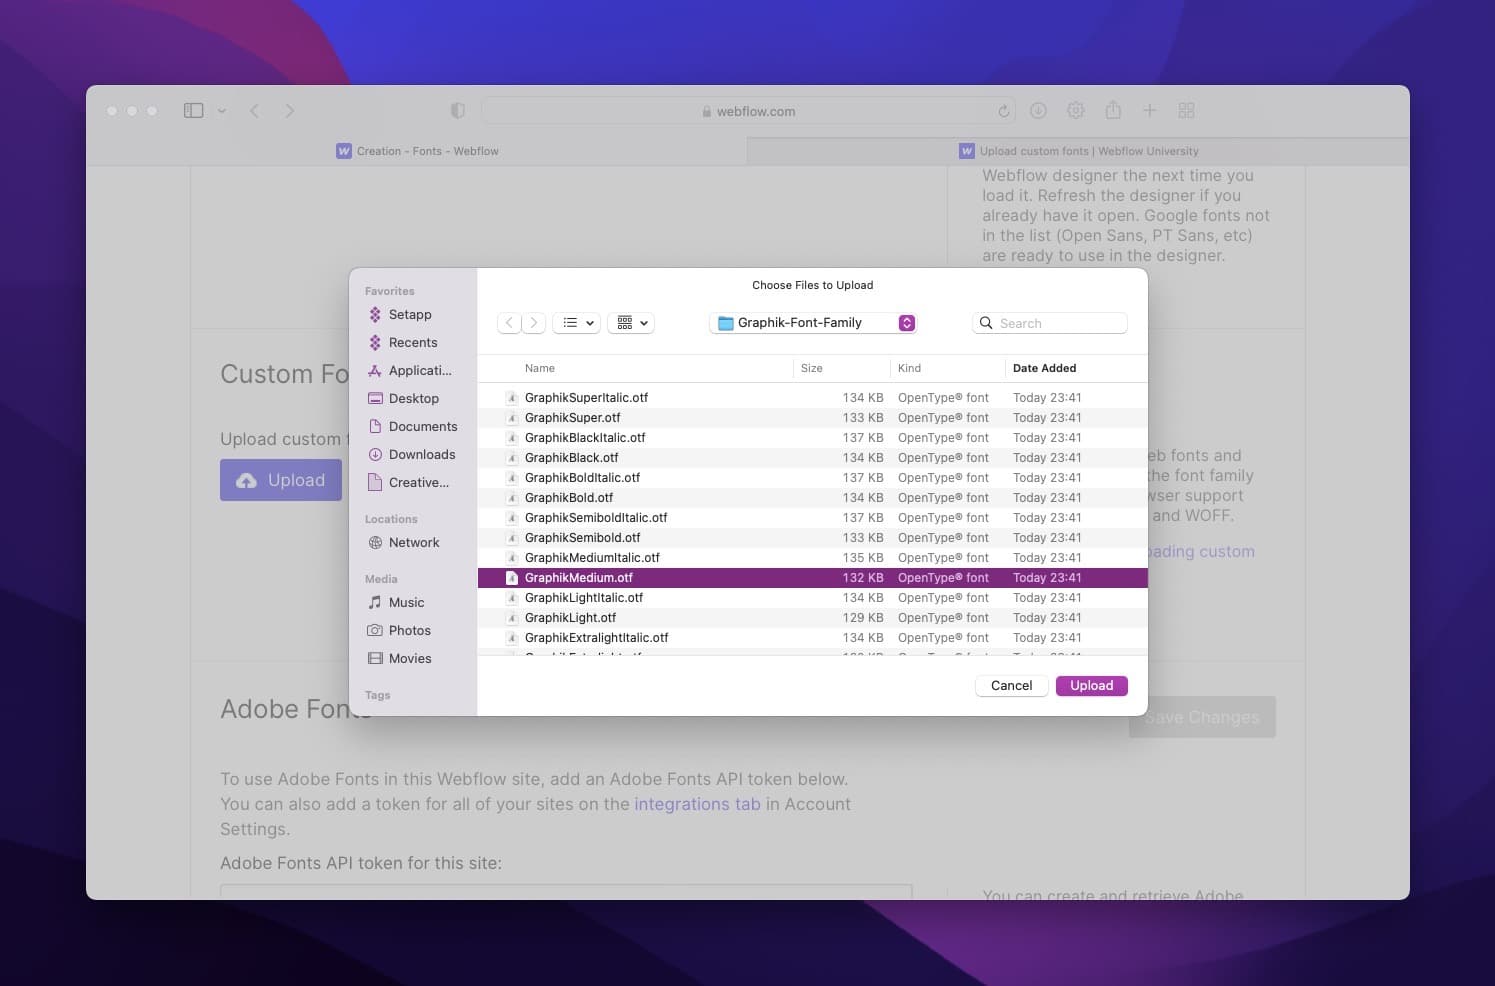
Choose your favorite one from here and click “Upload” on the files.
Step 3: Editing Font Family Name
You have a chance to edit the font weight and font style, and you need to give a font family for it because if not, you will get an error.
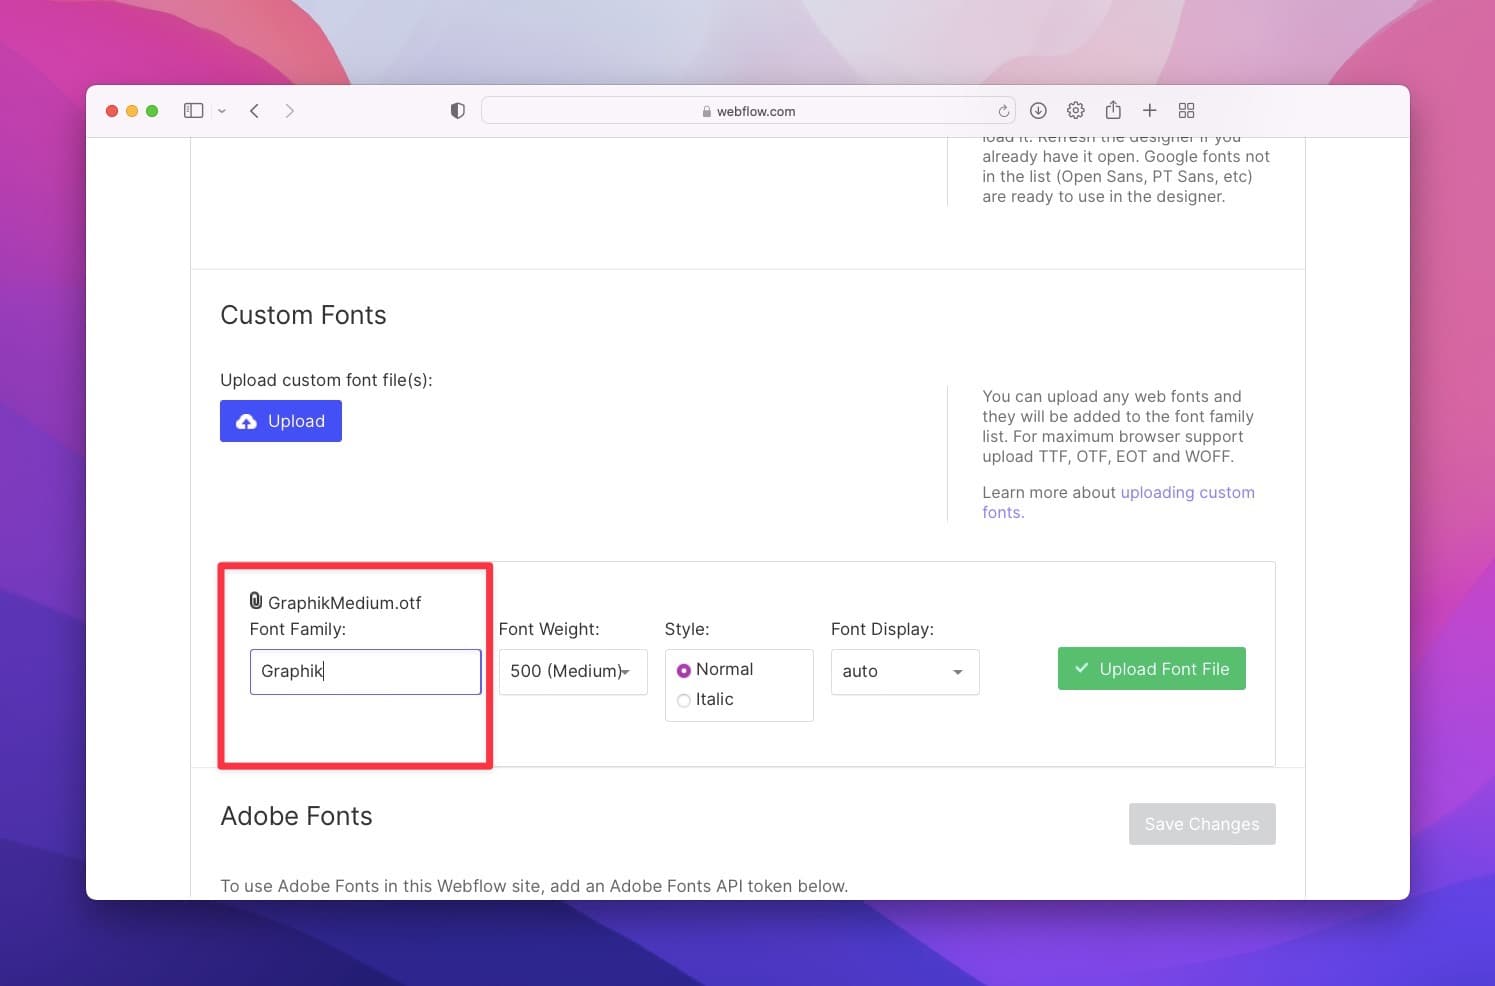
To explain it better, Webflow wants a font family to group the fonts together.
The sentence means if you wish to add another font from the same family, they will be grouped under the same family title in the Designer.
Step 4: Font Display Settings
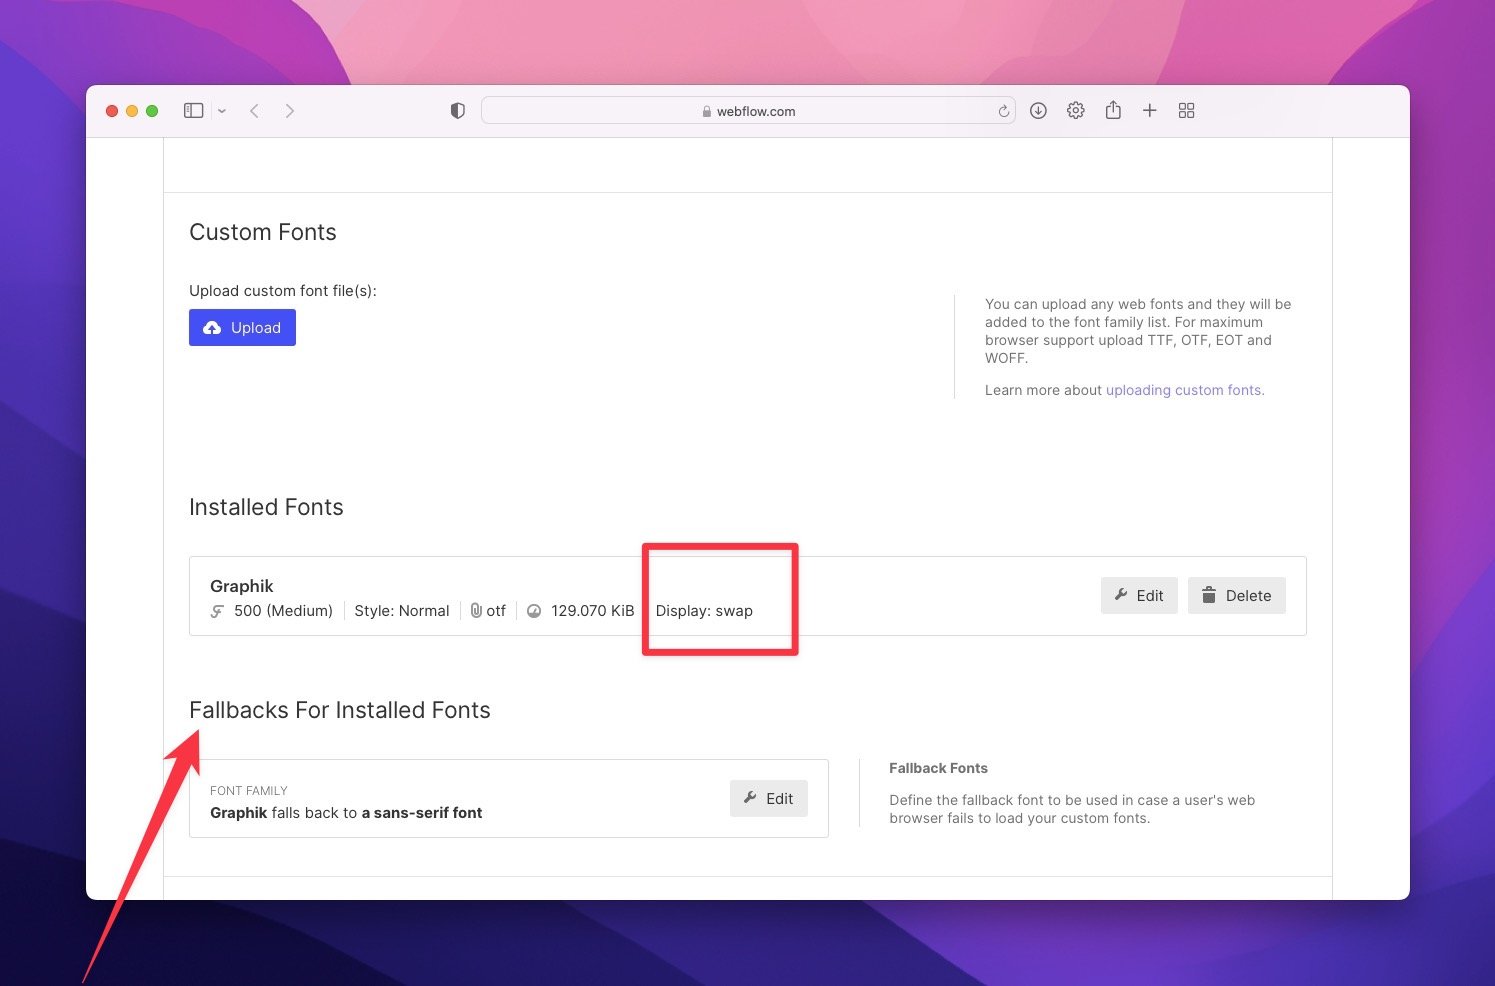
Font display matters since it determines the pace of the fonts.
Therefore, you can arrange it according to your website strategy plan.
However, Webflow suggests that swap is more appropriate to use since it provides the visibility of the fonts.
Step 5: Editing Fallback Fonts
Also, you see the part, Fallback Fonts. It can change based on the font family of your uploaded font.
Fallback fonts are crucial because when there is a delay or loading issue with your font on your webpage, the fonts automatically appear in the fallback font format.
If you want a specific fallback font, you can edit it below the fonts, from the “Fallbacks For Installed Fonts.”
Step 6: Start Using the Custom Font
After you complete the steps and all the editings according to your wishes, you should get back to the Designer.
There you can find the new custom font and the changes.
A little reminder to emphasize is that you should not forget that you can change your editings or delete the custom fonts whenever you want.
How to Add Adobe Fonts to Webflow
The third option is to add Adobe Fonts and let’s find out how it can be done.
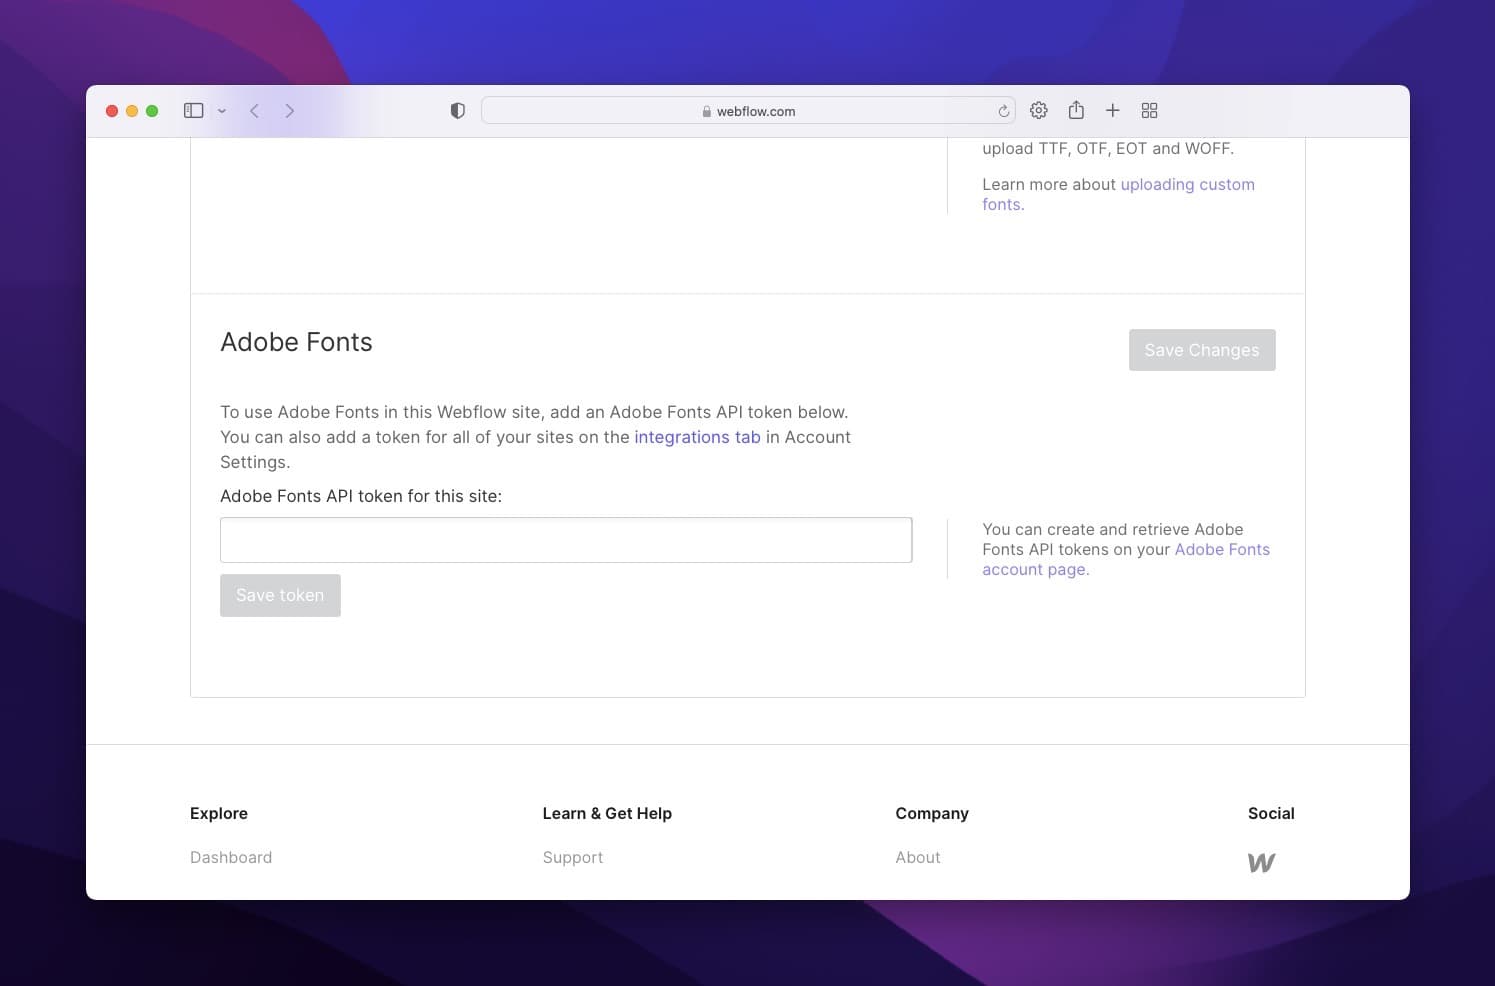
To have an Adobe Font, you need to have an Adobe Fonts account, or you can simply create a new account.
Step 1: Having an API Token
You will be directed to the Adobe Fonts account page if you just click the link on the Fonts page.
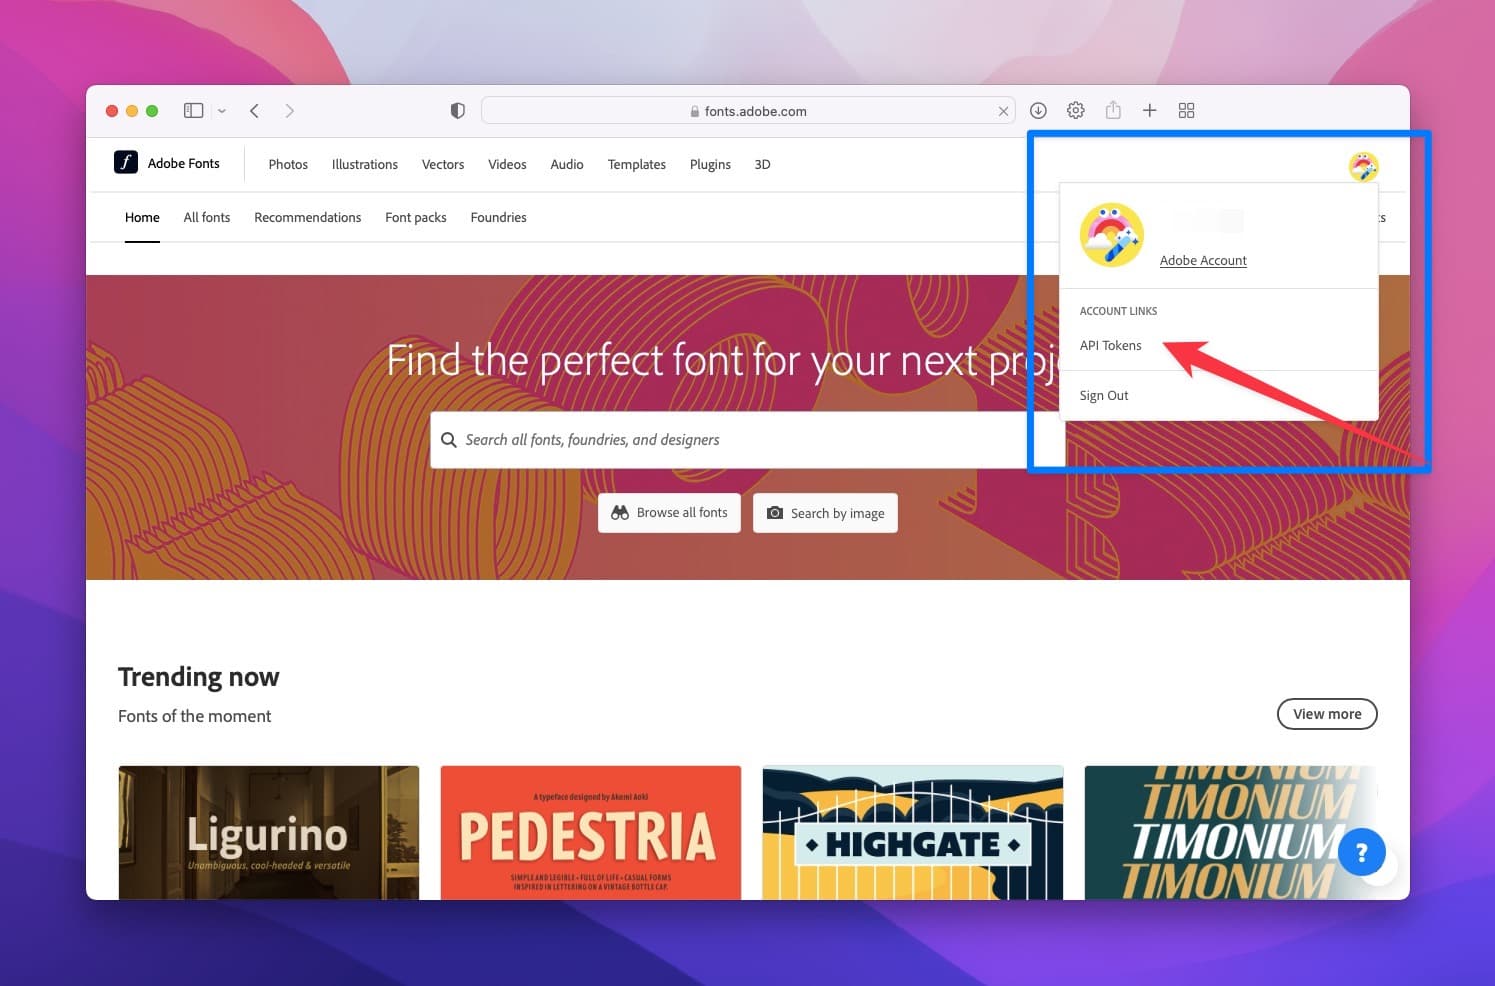
For having an API token, you should click on the API Token on the account icon.
After it directs you to the creation page of the API token, “Make me a new token” is your next step to click.
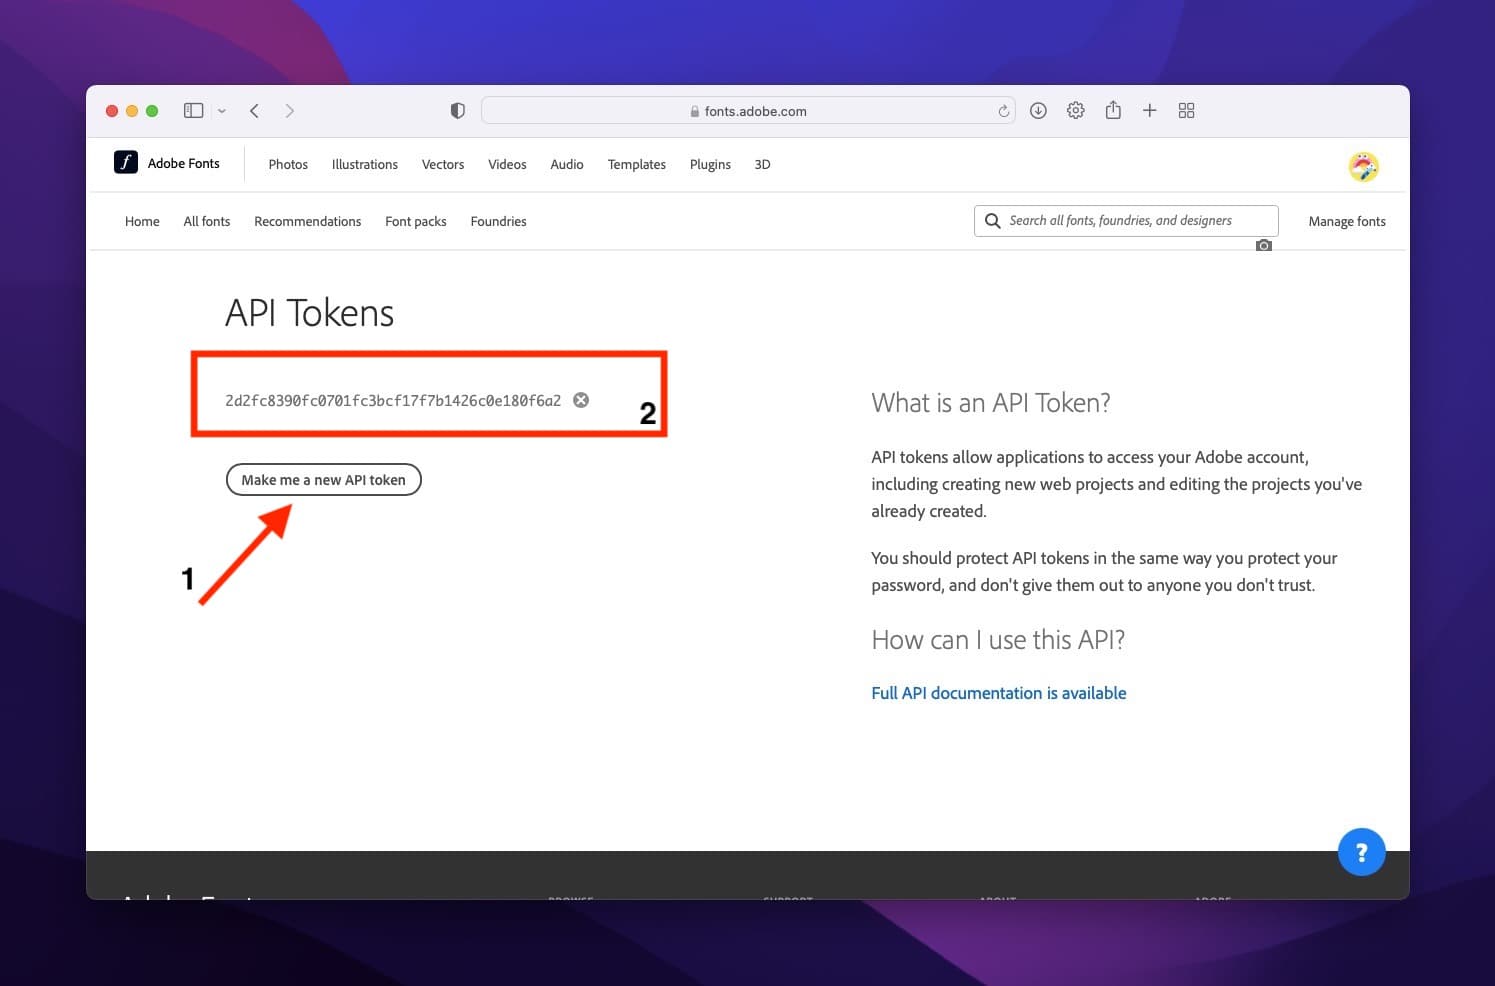
Step 2: Adding the New Token
The second step is to copy the new token and paste it on the Webflow Fonts page > Adobe Fonts API token for this site part.
Then click Save Token to save the changes.
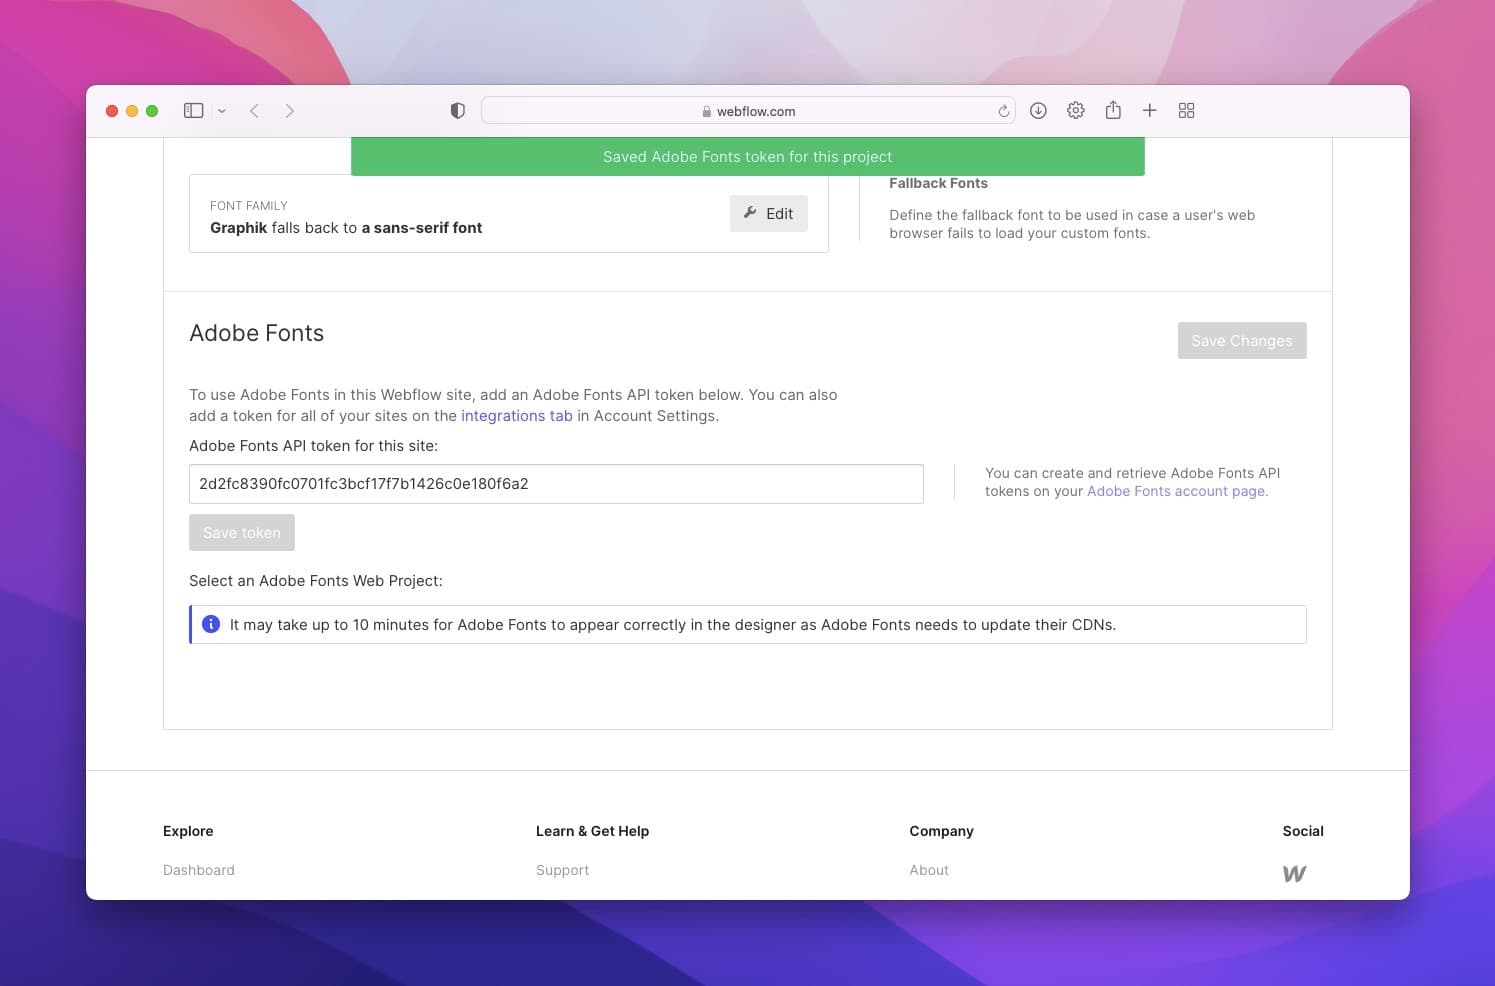
You should be aware that the changes may take time to be seen, so Webflow informs you in advance about this.
Step 3: Integrations Tab
If you want to integrate the new token, not only the project but the website, you need to go to the Integrations Tab.
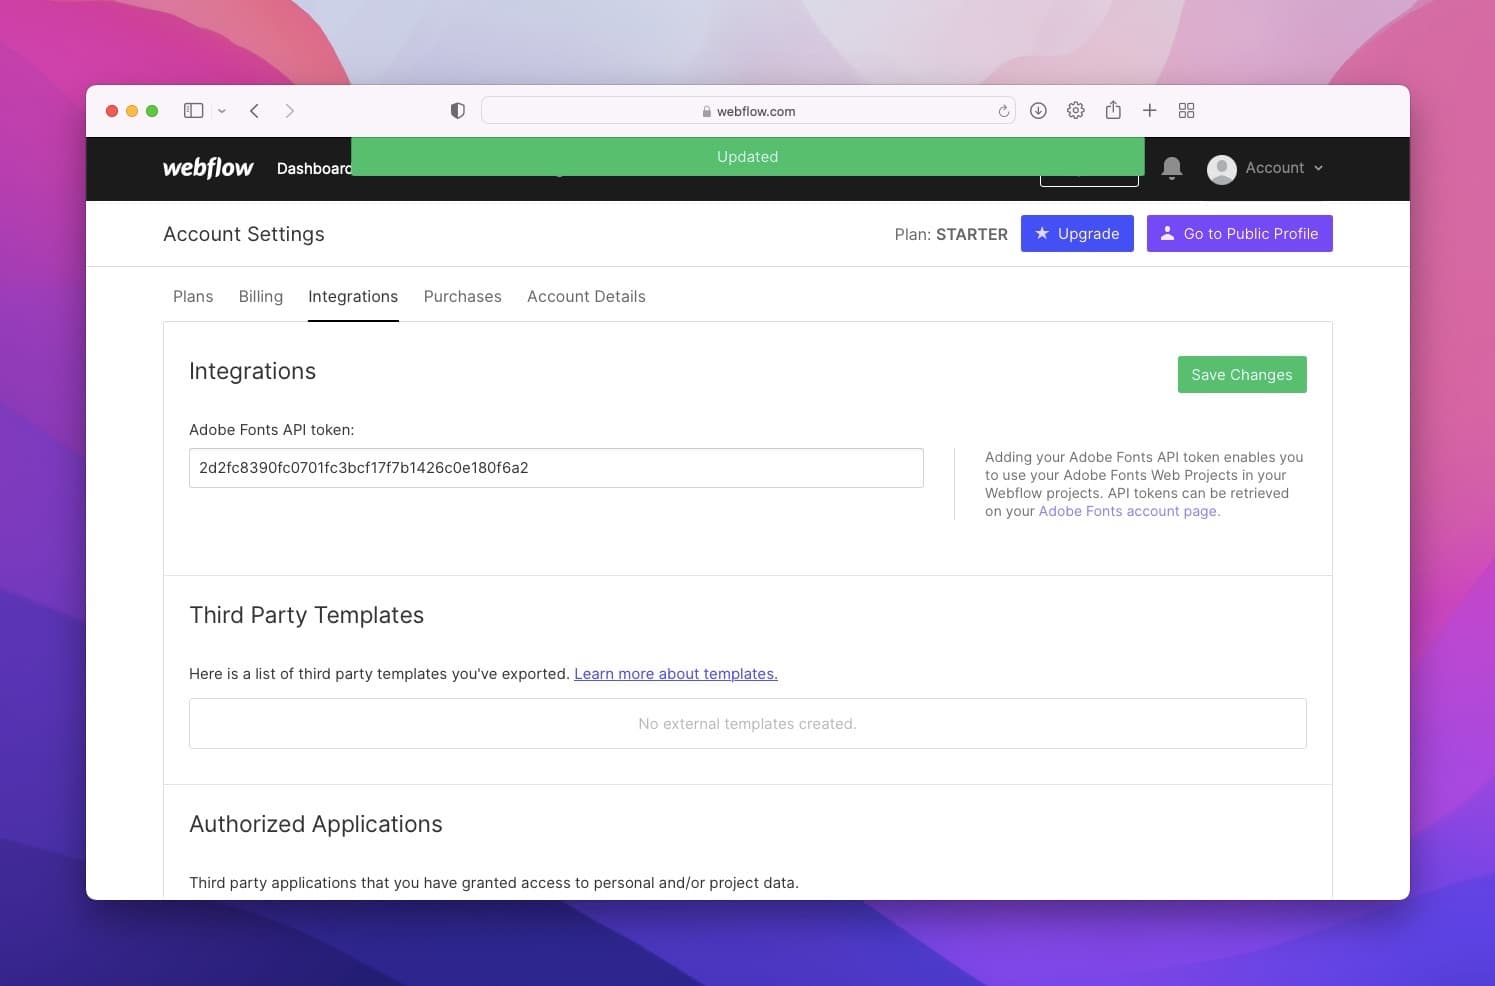
To do this, you need to paste the token to the related part and save changes.
If you want to remove the new tokens you have added, all you have to do is to delete and click Save Changes button.
These will convert them as if you have never added a new font.
Some Vital Points While Adding Fonts to Webflow
There are some precautions that you need to take and information that you will use, such as:
- Fonts are added alphabetically. So, if you look for your new font, you should check it based on the order.
- Control your font’s license agreement- if it is proper to use on a website or if the creator has consent for this.
- Webflow allows you to add custom fonts for free, but you need to make sure that the fonts are free to add as well for your budget.
- You will not be able to upload a font file that is more than 2MB, so know the file size you want to add beforehand.
- You need to know which fonts are suitable to add and supported by the browsers.
To End
Though Webflow has useful fonts, it gives the opportunity of adding different fonts from different platforms.
Therefore, since you know how to add fonts to Webflow, you can give them a try by integrating new ones and finding your style.
All these three processes are very straightforward and explanatory enough to follow.
Do not hesitate to be creative with the websites you will create.
Lastly, you give a chance to Webflow; let us know your favorite and how your process went in the comments section below!
Frequently Asked Questions

How Does Using Custom Fonts in Webflow Affect SEO?
Using custom fonts may affect SEO if the font files are large and slow down page loading speed or if they are not optimized for accessibility and legibility.
How Do I Optimize Webflow Fonts For Better Performance and Accessibility?
Use web fonts that are optimized for loading speed and legibility, use font-display to control how fonts are loaded and displayed, and test your fonts on different devices and screen sizes to ensure they are readable and accessible.
Can I Use Variable Fonts in Webflow?
Yes, you can use variable fonts in Webflow to create responsive typography that adapts to different screen sizes and contexts. However, using variable fonts may affect performance if the font files are large and slow down page loading speed or if they are not supported by all browsers and devices.
How do Google and Webflow Fonts Compare in Terms of SEO and Performance?
Google Fonts and Webflow fonts both offer a wide range of web fonts that can be used for SEO and performance optimization. However, Google Fonts may be faster and more widely supported than custom Webflow fonts and may offer more advanced features like variable fonts and font subsets.
Related Articles
If you want to read more about Webflow, we can recommend some blog posts!
